Shooting from Top Down with an iPhone
Lesson 8 from: Craft Photography FundamentalsCandice Stringham
Shooting from Top Down with an iPhone
Lesson 8 from: Craft Photography FundamentalsCandice Stringham
Lesson Info
8. Shooting from Top Down with an iPhone
Lessons
Session 1
1Introduction to Craft Photography Fundamentals
04:59 2What Your Visuals Say About Your Brand
04:56 3How to Become a Photographic Author
10:44 4How to Use Natural Light for Your Product Photography
10:00 5Setting Up Your Photo: The Basic Rules
09:07 6Becoming the Viewer to Take Better Photos
10:30 7Shooting 3 Setups: Creating the Backstory with Images
34:32Shooting from Top Down with an iPhone
19:49 9Shooting Paper Products with an iPhone
10:54 10Shooting Jewelry with an iPhone
19:01 11Editing on your iPhone
15:28 12Finding Your Brand's Aesthetic
18:39 13Find Your Product and Customer Target: Exercises
11:12 14Figuring Out Your Audience
08:46 15Interview with Gilit Cooper of The Bannerie
08:45 16Branding Beyond Instagram
19:47 17Looking for Natural Light in Your Home
19:36 18Building a Styling Prop Collection
08:22 19Creative Backdrops
13:52 20The Essential Product Photography Props
11:18 21DSLR Basics
02:39 22Understanding Shutter Priority And When To Use It
26:29 23Understanding Aperture Priority And When to Use It
37:16 24The Basics of White Balance
12:52 25Photographing Jewelry
37:27 26Setting Up a Bedroom Set and Photographing Pillows
19:59 27Photographing Greeting Cards
06:53 28Shooting Products on a White Background
17:24 29Top Down Photography on a White Background
13:06 30Shooting Products on a Black Background
07:23 31Shooting Reflective Items
12:20 32Shooting with Backlight
04:01 33Top Down Photography: Shine & Reflection
24:50 34Basic Editing in Lightroom
31:37 35Batch Editing in Lightroom
06:00 36Editing Jewelry in Lightroom
10:01 37Editing White on White in Lightroom
06:54 38Editing Shine and Reflection in Lightroom
17:03Session 2
Lesson Info
Shooting from Top Down with an iPhone
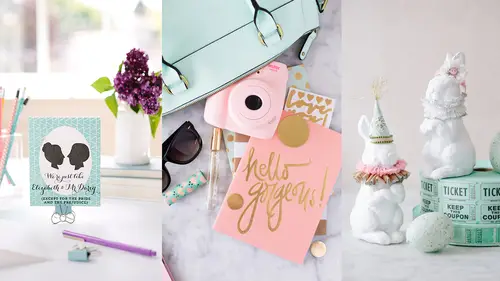
iPhone's, it's a part of our life now whether we want it to be or not. It's pretty much connected to us and I just read a study today that said we check our phones an average of 150 times a day. 150 times a day we are looking at our phone and for me that's mostly Instagram, let's be honest. It's an important part of our life and it's a part of our life as a creative business person that we need to sort of embrace because if everyone is checking their phones 150 times, that's 150 chances we have to be in front of them on social media 'cause why are they checking their phones? To check social media. Maybe text, but let's be honest, Facebook and Instagram and maybe Periscope now. That gives us a lot of opportunity. Why use an iPhone over a DSLR because I'm sure as a small creative business owner you've heard that you need to have a DSLR and I'm gonna say you should have a DSLR. It's important, it's a great tool and when you are doing things in print or larger and you need high quality the...
n you're gonna want that but I shoot the majority of our social media with my iPhone, why? Because it's with me, it's convenient, and I know how to use it in a way that can make it look like I used a DSLR. There are certain types of shots that are really difficult to get with an iPhone. We're gonna talk about the best practices of using your iPhone with your product to put on social media or you can, I have a lot of and know a lot of people that I've helped use their iPhone for their Etsy shop. If it's just living online, it can be not quite as high quality of an image. I'm not talking about high quality as in beautifully styled or lit, but actual like quality as if you were gonna blow it up or print it. iPhones, they're awesome, let's talk about it. The thing that you really need to know about your iPhone is that it is similar or the equivalent, did I spell equivalent right, I don't know, of a 35 millimeter lens. For most of you that probably means nothing right now and so we're gonna talk about why that's so important and what that does when you're using your phone and we will get more into lenses in later lessons and what I prefer and then also some options price-wise but obviously a phone camera, we all have it and we're all gonna be using it. What does having a 35 millimeter lens mean? It means that your lens is going to create some distortion. Wide angle lenses elongate or make larger whatever is closest to the camera. Is it good for a closeup portrait? No, you notice when you're using your iPhone you're like I'm gonna take that selfie from like right up here because it's closer to my eyes as opposed to down here and it's gonna make this look bigger because it's closer. If you really think about how you're using your phone you're naturally correcting for it already but we just don't think about it when we're photographing other things. We're gonna keep that in mind as we're shooting. It also means because you've got a small sensor and you have this wide angle lens, that it's really difficult to get a shallow depth of field. Let's address shallow depth of field really quickly and what that means. Basically what that means is when you focus your camera on the iPhone, when you tap on whatever item you're focusing on, there's only a certain amount around that that's going to appear sharp and crisp. That's your depth. When I focus on an object, things behind it and things in front of it start to fall out of focus. Now your depth of field is how fast or quickly that falls away. If you have a shallow depth of field that means one area is in focus and then it really blurs out. If you have a large depth of field that means it's probably all sharp. When you're using your iPhone it's really hard to create shallow, where one area is in focus and you're blurring out the background, and to me that is a key in getting your images to look really professional. Being able to blur out the background, telling your audience where you want them to look. That becomes very difficult when you're using your iPhone and you have to work around that. How do we solve that problem because otherwise if I take a snapshot and there's a lot of depth to it it's just gonna look like a snapshot because we're used to what a point and shoot camera looks like and it means everything's in focus and we don't get that shallow play of depth and field so we're gonna talk about how to get around that. For me what that means is I'm gonna shoot scenes where I want everything to be in focus on purpose. I know that my camera's going to do that so now I'm gonna set up images that look that way so that it doesn't look like I've made a mistake, it doesn't look like I'm using a cheap camera or not a professional camera, it looks like I wanted it to be that way and it's actually easier to take top downs with your iPhone, I think personally, than with a DSLR so why not take advantage of that and when I'm using my iPhone shoot top downs. That's why you saw me do that today with those sets and I'm gonna show you an example in a minute. We'll try shooting something from the side and show you what that does, what I mean by making it look like a snapshot but here you can see, these are, if you saw the preview video for the class, these are the preview images that we shot in my kitchen just like this right next to a window, much smaller, not much light, and it still looks beautiful. Just by using a reflector board, here's my little marble slab, there's a white foam core board, and it's just laid out really beautifully. Here's two more. Again, this is white foam core board and we're laying out and we're using angels. Now together they look a little bit busy but alone on Instagram they really stand out. This got a ton of likes because it's really graphic and bold, it really stands out as you're scrolling through and it's really bright and you can see, these are gold foiled, and you can see that because I've manipulated the reflector and we're gonna show you how to make things look reflective and how to make things not look reflective 'cause we want things both ways sometimes, later in a different lesson. This image on the right, I love telling the story of this image because this is another one that the designers were like can you send that to us for the catalog and I was like it's an iPhone. We're gonna have to re-shoot it just because, again, the printing aspect of it. This image on the right, I was at a conference and I met this calligrapher, melissapher, if you wanna find her and she calligraphed this for me, my mind's eye, on a piece of our card stock that we sell and I could have just put that on the table and take a picture of it and it would be okay but instead, I went up to my hotel room and we all know hotels have those super crazy carpet patterns. I don't have a reflector board with me because I'm in a hotel room. I just laid my sheet down on the floor next to the sliding glass window or sliding glass door of my hotel and it was super bright light so I closed the sheer, you know how every hotel comes with a sheer curtain and then the blackout curtain. Just closed the sheer to make that light a little bit softer and on a white sheet with window light, that's what I was able to photograph. I'm gonna be mean for a second. I just get so many people that say to me over and over again I don't have the budget. I don't have the money, I don't have the equipment, I don't have the window, I don't have the light. Whatever it is that's stopping them from really pushing their business forward and it's an excuse. If I can take a picture that looks like that in my hotel room with nothing around me then you can do that at home and you have the opportunity at home to build things and to create things which we're going to do, with not a lot of money and not a lot of expensive equipment, create something really beautiful. I'm sorry, I get really passionate about that. You can do it. Here's another one. This is Paper Bandit Press and we're gonna photograph some of their items later. Two more from My Mind's Eye. Another thing I really love to do when I'm shooting top down is to use different wrapping paper textures as a background and so anytime I'm at like a boutique or a craft fair I always look for great patterns that will work in the back. Something simple and clean that's gonna support what I'm photographing and not distract but also the really important thing is to look and make sure it has no sheen to it. You don't want shiny wrapping paper. This is like the expensive by the sheet stuff you can get at like Paper Source or a craft fair and you can see, again, it's creating really bold graphic and this is a great way, if you are shooting home decor or you are shooting party goods, you can still do it top down, it doesn't have to be a whole set you're creating to have a really beautiful image and so little tiny things just like you're seeing today can be really beautiful and then again I love adding a human element like someone was actually there and a part of that scene so I will add that in as often as I can and coffee, tea, people like it on Instagram, they just do. I don't know why. How many cups of coffee can we see? I don't know but we love it and so I don't even drink it and I love the pictures of people's coffee. Okay, but what if I need to photograph something from the side because it hangs on the wall? What can I do? Create a flat scene on your wall. Right now, currently, on My Mind's Eye, this is our most liked image and it was one I created while I was doing a Periscope on how to decorate for a party in 10 minutes and could I do it? This is a set of doors in my bedroom. Like it's my headboard, I was standing on my bed. No one knew that, now you do, that's embarrassing but use what you have, right? That's my headboard, I knew it would be pretty with these and so I did it and then I just layered it so that it was going to be flat and I could take it with my iPhone and no one would ever know that that was an iPhone image. I'm showing a landscape, like how does that apply and the reason it applies is because this is one of the situations where having everything in focus is what we want. When you're shooting landscapes you want that depth of that image. We've got a little bit of blur in the front but that was actually because it's moving from the wind. If you keep that in your mind, scenes that I want everything in focus, that is going to help you as you're using your phone. The image on the right is flat again so I created another flat scene hanging on the wall and photographed it that way so that there's not a whole lot of depth that will show that I'm using an iPhone. Here, there's so much depth but I wanted it all in focus, right, I want those doorways. That's a huge part of the purpose of it and so it totally worked to use my iPhone and this was dark. I should just tell the story because it's random and funny. This is actually from a trip to San Francisco a few months ago with my family and any time I go on vacation I bring stuff that I know I can photograph wherever we are because I know on social media it's gonna be really cool if I'm like here's our stuff in San Francisco or here's out stuff at Lake Tahoe or wherever we went. It drives my husband crazy. He's like we're on vacation and I'm telling my kids to hold a banner across a doorway so that I can take pictures. They just know that that's part of life now and it's okay so just encourage the people around you to know that that has now become a part of their life and you will support them in their parts of their life when they're at rehearsal for lots of hours. This is actually Fort Point I believe is what it's called. It's under the San Francisco Bay Bridge. This is a military fort that I just set up a party in. The guard was there so I know it was okay. I wasn't like sneaking around. I don't recommend that but I had gone here as a small child, I remembered these doors and I was like this would be amazing with our banners. I brought them, I waited for 15 minutes till no one was standing in any of those like 18 doors going down the entire building and took a picture with my iPhone and this is the result. It takes planning and it takes thought but that's what it takes to create really interesting imagery. Okay, one of the things I really wanna point out with your iPhone and later, when we're photographing with your DSLR, is that perspective, when you have straight lines, really, really matters when you have something that is square because if I lean to one side or the other it's going to start to collapse and create a different shape and so you have to be really careful that you are directly above whatever you're photographing, so centered right above it and you can see that as you turn or adjust your phone but because of that, when I photograph an item like this I oftentimes will do slight adjustments and take several pictures so that I know that I got one, hopefully, that is the right perspective because your camera, you don't necessarily see every thing and so it might be slightly different than what you're seeing so I will adjust just a little bit so that I know and I wanted to point out this background is a piece of art from Target. So it's like a big giant wood piece of art and I use it as a tabletop. There's always cool things around that you can find and create sets with. What would you say the main subject of this is? The plate, yeah, so if you were selling ceramics or you were selling plates or dishware, don't just show it, style it. It makes it so much more appealing. Okay, we are gonna shoot now with this so let's do this. We have a question. Yes, lots of questions, let's do it. On the previous image, if you were selling the napkin, would you choose a very plain plate in that case? Let's go back to it and look at it. Let me think about it. If I was selling the napkin and I was using these same pieces, I would move the napkin to the center of the plate and then probably crop in right around the plate so we get a little bit of the blue and I don't mind the pattern on the plate. As you saw before, I love mixing patterns. You just wanna make sure the scale is different and so this works because these are big and this is little and it almost creates a repetitive complementing pattern. If this was like plaid and tiny and then I put that on it wouldn't work. If it was big plaid it might. I'm always looking at scale and that is actually something we didn't address so I'm really glad you asked that but the scale of patterns is how I choose how to match patterns. I want something big and something little and then they won't compete but if I have two little or two big they're really gonna compete with each other but at the same time a white plate would really place the focus on that or maybe even like a dark blue plate or a yellow plate because it's a complementary color. I'd definitely play around with it a little bit but I feel like, again, I love it when something points to the next thing. This has a little dot and this has a big dot or patterns like that. I'm glad you asked that, yes? And just a quick question. For folks who don't have iPhones per se, can you do this with other types of smartphones. Absolutely yeah, they're gonna be just wide angle as well. All iPhones come with a wide angle lens. Maybe not exactly 35 but close and so all the same rules apply. You can shoot in the exact same way, yeah. I'm just shooting with an iPhone today because that's what I own and it's not even the new one. It's what I've got. I definitely don't, I really do want a new phone because of the video capabilities but I'm not like someone who thinks oh, to create a better picture I need to go buy the next big thing. No, as long as I know how to use what I have then I can create great images. It doesn't matter how cheap it is. Edward Weston, who's one of the most famous, world renowned photographers, art photographers, bought a five dollar lens in Mexico and that is what he shot 50,000 dollar images on. If he can do that then why can't I? Not that I'm comparing himself to him but I'm saying if you study and you know the light and you know the styling you can create something beautiful anywhere.
Class Materials
Bonus Materials with Purchase
Ratings and Reviews
a Creativelive Student
This class taught by Candice was amazing. She teaches in such a step-by-step, easy to understand pace. She shares so much of her own tips and tricks she uses to create beautiful images without spending a fortune or having all kinds of expensive equipment. Having the DSLR lessons included was really great for anyone who wants to do more than the camera phones are capable of. Learning the basics of how to use a DSLR is confusing for most people, but Candice broke it down in the simplest way possible. Social media is all about imagery, so if you want to put out the most beautiful eye-catching photos, then you want to learn how to use more than the camera phone. I don't have a business where I need to take photos of things I sell and I still enjoyed her class so much. As a photographer, I am going to use her ideas and insight when I photograph things for fun. There is so much to gain from this class. I would highly recommend taking her class. She is a wealth of great ideas and information and has that friendly personality of someone you'd want to sit and have coffee with.
yomichaela
A wonderful class to get you going with craft/product photography. Candice provides (and shows) fantastic examples and it's really fun to watch her work through a shoot, moving items, etc. to create the final image. She also covers some basic photography tips which is very helpful. Great class! I definitely recommend to others!
Melinda Malamoco
I loved this class! Candice is so personable, clear and relatable. I would want to hang out with her and be creative! I have been taking pictures for YEARS, and for my Etsy store for over two years, and I still learned a lot in her class. The lessons are set up in a way that you can follow, take what you want and don't worry about what you don't need. I will say that I got a TON of ideas for how to better display my brand, what my personal style is and how to be consistent with it. I so recommend this class for anyone who has small business or just wants to be able to take better pictures of their products. Okay, off to build a prop kit!