Shooting 3 Setups: Creating the Backstory with Images
Lesson 7 from: Craft Photography FundamentalsCandice Stringham
Shooting 3 Setups: Creating the Backstory with Images
Lesson 7 from: Craft Photography FundamentalsCandice Stringham
Lesson Info
7. Shooting 3 Setups: Creating the Backstory with Images
Lessons
Session 1
1Introduction to Craft Photography Fundamentals
04:59 2What Your Visuals Say About Your Brand
04:56 3How to Become a Photographic Author
10:44 4How to Use Natural Light for Your Product Photography
10:00 5Setting Up Your Photo: The Basic Rules
09:07 6Becoming the Viewer to Take Better Photos
10:30 7Shooting 3 Setups: Creating the Backstory with Images
34:32Shooting from Top Down with an iPhone
19:49 9Shooting Paper Products with an iPhone
10:54 10Shooting Jewelry with an iPhone
19:01 11Editing on your iPhone
15:28 12Finding Your Brand's Aesthetic
18:39 13Find Your Product and Customer Target: Exercises
11:12 14Figuring Out Your Audience
08:46 15Interview with Gilit Cooper of The Bannerie
08:45 16Branding Beyond Instagram
19:47 17Looking for Natural Light in Your Home
19:36 18Building a Styling Prop Collection
08:22 19Creative Backdrops
13:52 20The Essential Product Photography Props
11:18 21DSLR Basics
02:39 22Understanding Shutter Priority And When To Use It
26:29 23Understanding Aperture Priority And When to Use It
37:16 24The Basics of White Balance
12:52 25Photographing Jewelry
37:27 26Setting Up a Bedroom Set and Photographing Pillows
19:59 27Photographing Greeting Cards
06:53 28Shooting Products on a White Background
17:24 29Top Down Photography on a White Background
13:06 30Shooting Products on a Black Background
07:23 31Shooting Reflective Items
12:20 32Shooting with Backlight
04:01 33Top Down Photography: Shine & Reflection
24:50 34Basic Editing in Lightroom
31:37 35Batch Editing in Lightroom
06:00 36Editing Jewelry in Lightroom
10:01 37Editing White on White in Lightroom
06:54 38Editing Shine and Reflection in Lightroom
17:03Session 2
Lesson Info
Shooting 3 Setups: Creating the Backstory with Images
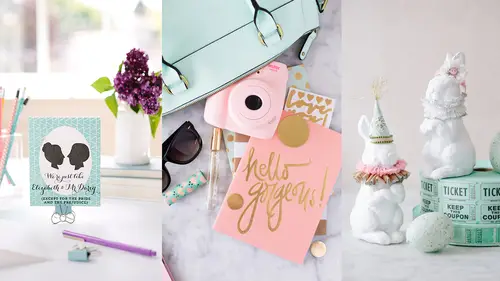
We are going to shoot, and I'm really excited about this shoot, because, I don't know, I love it. So we're just gonna, (woman laughs) we're gonna do it. So the first thing I'm gonna' show you, and actually, we will be talking a lot about this item. Favorite item in everything photography I own. Five dollar white foam core board. It's your best friend when it comes to photography. I am like the biggest hacker. I will make something look amazing. You can give me a piece of white foam core board and a newspaper, and I will make something beautiful out of it with my camera. And so we're gonna' do that, we're gonna' show you that. And what we're gonna' do is we're gonna' photograph again, kind of what we've done in the slides, are one item that someone could be selling, and how they would sell that to a different consumer with a different story. So we're gonna' sell granola today. And we're gonna' start out with a customer who has a white table. Now, I don't know if it's because I'm married...
to a theater professor or not, but I really believe in creating a backstory when I am storytelling in my imagery. So just as an actor would in a play, they're given a specific time period in someone's life, and they have to decide everything that came before that, so that when they're acting in this play, they're presenting something real to everyone around them. So they create this backstory, and it's completely made up, right? It's like, "His Dad hated him when he was a little kid, "so now he always has this teddy bear on his bed "that comforted him when he was young." Right? Whatever it is. So as crazy as that might sound, and I realize it sounds a little bit crazy, I start every set that way. So, what is my brand, and who am I selling to? So in this case, I'm selling granola, and I want to sell it to a high-powered executive. Do I think of granola and a high-powered executive? (quiet laughter) Probably not. Those aren't two things that connect so, how do I connect those to sell to that audience? So I'm gonna' start with stark white, and we've placed the granola in a really linear, clean bowl, and we're gonna' place it on a very graphic, clean plate. And actually, I'm gonna' set it this way so I can not stand in front of you and photograph it. Okay, so I mostly photograph in my kitchen on a table just like this. My windows are not this big. (quiet laughter) This is an amazing window, but definitely not this big. And I kind of would align the table just a little bit with the window so I'm getting some good side light. And you can see that in the shadows right here. Okay, I'm gonna' add a pretty clean and graphic and simple napkin with a clean ring. I am going to add some rose gold silverware, 'cuz it's expensive and I think that he would have expensive things. Okay, I believe that he's super healthy, high-powered executive, so he's gonna' have a green drink. Clean little container for his milk, because he would not pour the milk out of the jug. He would put it on his table in something nice. And then, what is he doing while he's eating this granola? He's reading the Wall Street Journal, 'cuz that is who he is, and he has to see where his stocks are at before he gets to work. Right, and I could leave it wrapped up, but actually if he's reading it, then I would probably spread it out a little bit. And I don't want this whole thing in my image, 'cuz it'll start to take away. I just want it to be on the edge. Just like a little peek of who he is. So I'm gonna' set this. I'm gonna' move it a little bit. And this is my set. So I have added only elements that I think that this person would really use in their life, okay? And I'm gonna' shoot it top-down, because generally, okay, so it used to be in food photography that everything was from the side and they would rarely ask for top-downs. Now, a lot of times in magazines and online you're gonna' see food bloggers and food photographers photographing from the top. Why do you think that is? 'Cuz if he was sitting down, he'd kind of be looking at it from the side. Well, it's because of this awesome thing. (chuckles) Okay? The average person now is taking pictures of their food with their phone. And they don't get down here and do it, right? When you see your friends post their beautiful breakfast on Instagram to brag to you that you're eating cereal at home with your kids, they are doing it from above. So now, in advertising, we're seeing more and more from above, because that's what's relatable to the average person. So they feel comfortable with that. Okay, so I'm gonna' shoot this like I was shooting it for Instagram. And we're gonna' talk about why top-down is so great for iPhones as well. When we start talking about iPhones. I'm short, I don't know if you've noticed. So I have to shoot everything top-down with a step stool. Okay, and she is turning off the lights. And here's the reason why. Light, different types of light has different color. We'll get more into this, but the light coming from outside has a very blue tone, and your tungsten, your average lights, Are gonna' have a very orange tone, and when those compete it's really hard to edit because there's not one or the other. You're fighting with both colors in there, and it's just never gonna' look good. So we want to use natural light. Okay, can you guys see that? Here we go. Alright, so you're seeing what I'm seeing. And here's the other thing. You're always gonna' need things closer than you actually think you are. Every time you set up things. So, they're gonna' feel really tight in there, and that's okay. And I really love just having elements that just sort of peek in. Okay, so we're gonna' photograph that. And I'm leaving it in square. I prefer to shoot square as opposed to rectangle and then cropping it for Instagram if I know that it's only going on Instagram. If I think it might go somewhere else, then I am gonna' shoot rectangle and crop down. But it's harder to see that. I totally knew I was gonna' fall. Can we get one more foam core board? So I feel like the shadows are too much here, because I want this to be really high key and clean. So I don't want a deep shadow, so we're gonna' pull this in, and I might have Kate hold it, yes. (Kate mumbles) So we're just gonna' slide it in. So the way reflectors work is, we just want it to be opposite our light source to fill in the shadows. So wherever my light is coming from, my reflector goes the opposite direction. And then even if I needed to add in more this way, I could add in another board to fill in even a little bit more, but I think we're gonna' be good with just this one. Okay, and you can see that my iPhone sees all that white, and it kind of is under exposing. So I'm gonna', when you tap, you have our little sun icon and you can get brighter or darker. So we're gonna' get just a hint brighter, because what I care the most about in this image is the granola, and making sure the granola looks good. So you'll notice this is a shallow bowl, and it is full, so that there's not that deep-set shadow. And I'm actually gonna' tilt this, so that now it's coming into the bowl. And we will probably edit these later so you can see that, too. Just gonna' take a few closer and farther away so I can decide what I really like. Which is exactly what most people tell you not to do. And I say, "It's digital. "Take as many as you want." And then I change the elements just slightly because I don't want to have to come back and reset it up if I'm like later, "Oh, I wish I would have just moved that a tiny bit." So I'll do some slight variations to see exactly how I like things to be. Like, do I want this spoon in it? I don't know, let's try it. And this is how I work. And honestly, I could do this for hours and be perfectly content moving stuff around and taking another photo. But as a business person, I can't do that. So I have to be realistic, and once I get close to what I want, then that's it and we have to stop or I literally could just keep going and going. Okay, so that was our first shot, our executive. If I wanted to sell this to a business executive this is how I would do it, 'kay? Now, if I wanted to sell this to someone who lives in the country, maybe it's Fall and they want to go to a cabin for the weekend and eat this rich, amazing granola, then I'm gonna' totally change, now, the image. So in my mind now, this person has gone from an executive, CEO type, to my Grandpa at our family cabin. Okay, what would he like? First of all, my Grandma would set the table for him, so it would look really pretty. And I want to bring in Fall colors, 'cuz I want it to feel deep, and warm, and rich. So I'm actually gonna' use this dark table, and I'm going to use, this is just a throw. I'm gonna' use it as if it was like a place mat or a runner. So I'm gonna' let it hang probably right about here. Thank you, okay. So I've changed the bowl now, and I'm actually gonna' steal the granola from here 'cuz I don't want it to be so far down. And don't, if you are photographing food or small items, don't be afraid to arrange it so that it looks prettier, right? No one's gonna' eat this. If someone was, I'm really sorry. And so I can make it so that it looks the way I want it to. And I don't want any deep, dark spots. I want it to be nice and even. Okay. Then I've added, I'm gonna' add some blues in here, just to get some contrasting colors. And I'm using a plaid plate. I love mixing patterns. And we've put it in a copper mug 'cuz we're going with these warmer tones. And we're gonna' arrange that. And remember, these are ideals, right? So we're making this, we're thinking of our customer, but we're thinking of what our customer would like, not necessarily what they have, 'kay? So we're gonna' align this. And different kind of patterned napkin, again bringing in those blues. And I'm still using that wood element. So you can cross things over if they still apply, just in a different, unique way. 'Cuz wood in a cabin would be totally normal. Okay, and then if this was someone at a cabin, and they're drinking a warm, cozy cup of hot chocolate or coffee by their fireplace in the Fall, they're probably gonna' need something to read. So this would be the element that I would add in, to kind of tell a little story about who this person is. And that would be my cabin set. So we're selling, same item, but to a completely different person than what we just sold our white set to. And look at how pretty that looks. And again, I like having elements cross out. So here, what I'm noticing is, see the fork is crossing through the line of the bowl? I don't want to do that, so I'm gonna' just adjust slightly. And if I just look at it, it doesn't look like it is, but from the camera's angle it does. Still, so they're slight adjustments but they make a difference in the overall composition. Now it's feeling far away. Okay. Now, one thing to point out. I am wearing green, and there's a spoon in this photo. Can you see me? Hey! Yeah, you can. So generally when I know that I'm gonna' be photographing something reflective, I will wear black. Because then it's just a black accent as opposed to a bright green and white accent or pattern. Yes? I love seeing everybody get their pens out, and writing that down, "Wear black". (laughs) Yes. I did have a question. If you could show again how you adjusted the brightness, Yes. That was a quick question a lot of people were asking. 'Kay, so wherever your main focus is, and in this case it is the granola. I would just tap right on there, that little sun and square icon comes up. Then you slide it. You can slide to the left to go lighter. You can slide to the right to go darker. And I actually like it slightly darker here 'cuz I want it to feel moody. And notice we're not bringing in the reflector here, because I want it to have shadows. I want it to feel a little bit richer. So I'm gonna' leave those shadows in. Now I might adjust this slightly, by making it feel a little bit more used, like someone was actually here. And another thing I would play with is sort of offsetting things too, and see, see how I like that. But I like the whole set. And sometimes what I do also is include a chair, too. So whatever chair they would've been sitting in. So I'll just step out a little bit, and then reach over so I'm getting the edge of the chair. I don't want that here, 'cuz it's not as pretty. And I like a little bit of the table. I like it a little bit farther away, so gonna' do that. And this is really what it's all about, and where I think people think that it doesn't take time, right? They think that the professional photographer just gets it right. And I can tell you honestly, that's just not the way it is. I can have ideas in my mind that I think are genius, and it takes me hours to set up, and then I realize it's just not working in a photograph. So, I think it's really important to point that out, because I don't want anyone to feel like, "Well she knows what she's doing, so it's easy." I always, I'm always experimenting. I'm always trying new things. I'm always slightly adjusting, and again, I literally could just play with this set for hours, and be completely content to do that. But I do not have time. No one has time for that. So I'm just adjusting. Do you have a question? We were just remarking how much better it looked. (laughs) when she moved it slightly. Yeah, so just tiny movements, I'm gonna' put this back, make a huge difference. And in fact, the mix of patterns is good but it might be getting a little bit too much. I might even just cross over the same. So napkins and fabric styling have always been my downfall. It's so hard. (quiet laughter) Because you have to, they just look so big compared to everything else. So a lot of times I'll have the napkin kind of open and just peeking in so we know it's there, and it adds a little bit of pattern, but... Let's look at this again, but I think it's gonna' feel really big, I do. And Candice, we do have a question as well. Yes. Yes, I have a question going back to the reflective surfaces. I know you mentioned wearing black, but I'm wondering if you have any other tricks with reflective surfaces. Yes, so we are gonna' photograph some reflective items later in class. But generally what I would also do if I'm still reflected, I'm still wearing something dark, I use black foam core board, and I cut a hole, and I put it over the camera lens, and then it fills in whatever that reflective item is, so that we're not getting funny reflections. You can also adjust and move angles slightly to get the reflection that you want. Maybe you do want a little bit of reflection from the window, 'cuz that would be natural to have that. But, it just depends on what you're photographing. 'Cuz if you're photographing something like a framed piece of art, you need to photograph it straight on. So you have to really play with that, and we'll try that, we'll do it tomorrow. Okay, I'm gonna' take one more photo, and then we can move on, 'cuz I just like it. Okay, I'm gonna' point out one more thing that really is bothering me. And that is, I didn't give enough space at the bottom to give weight, or space beneath my subjects. So let's see how heavy it feels right there at the bottom, and there's a straight line of (mumbles) of this, almost the bowl, but this and the silverware, it's completely cutting it off. So what I would really do, move this for a second, is just shift this blanket to be up higher, so that I can have another inch or two below the silverware. So weight becomes really important, and I always want everyone to look at the bottom of their photographs to make sure that there is some space there. A lot of times in portraiture, in still lifes, people don't leave that space at the bottom. They cut off the foot just barely, or there's an inch just below the foot. And when you don't have that weight there, it feels really uncomfortable watching it. So look at the difference just a little bit of space below the silverware makes. And right, so this is real life. I mean, this is really like, this is how I would shoot. So I just want this barely coming in. It's just getting to be too much. I like that better. Much. Maybe I just want a hint of the spoon in there. And really, the fork would go over here, right? Missing that, right? I always get it wrong, and the chef at Handmade Mood is like, she shakes her head and is so embarrassed every time. But I'm pretty sure this is how it goes. Someone in the audience will tell me if I'm wrong, right? Okay, so spacing. Spacing is just something that you really have to play with. So see, to me, looking at it, it's not behind the bowl. When I hold my camera up over it, it is, and it just looks wrong. So little, little things make a big difference. Now I think I've finally got it. Alright, we are good on this log cabin. Okay, so let's find our next customer who we want to sell to, who we want to tell a story to. Question? Yeah. What is the best time of day to get the natural light to be even? 'Cuz I imagine later in the day it will get some orangey tones, or what do you recommend for that? Different colors, yeah. In the morning the light's gonna' be more blue, and in the evening you're gonna' get a warmer light. If it's just one light coming in, you can adjust that in editing. So if it is a little warmer you can make it a little bit cooler. For as far as nice, even light, it just depends on what direction the window is facing. And we'll have a whole section on that, when to use what windows in your home. Yes? Before we move on, could you just go back to your phone and show us those images again? Just the last few images. Yes. Okay, so sometimes It's auto rotating. On the iPhone, yep. But we will kind of scroll through. I wonder if you flip it, will it, on it's side, will it, yeah, no. No, it's still doing it. I'd have to, I'll go in and Alright, well... flip them when we edit Yeah, sounds good. in our iPhone section. But yeah, oh, I kind of like that one. I like the space on that one. And so that's why I give myself options. Because I also think, what happens to me a lot is while I'm shooting, I'm just like, "This is horrible. "What was I thinking?" And I just, I don't even want to edit them. I don't want to look at them. But then I come back to them like a week later, and I was like, "Oh, I was kind of awesome that day." Right, I didn't even know how cool I was. So give yourself some space if you're feeling really frustrated, or something's not working. And don't just stop taking pictures. Take the pictures, you set it up. And then come back to them later. Even if it's ten minutes later, and I look back through my phone, I'll be like, "Oh, that's what's wrong." You know? So sometimes you do just need to give yourself a little bit of space. So we're gonna' hurry and do the last one. (Kate mumbles) Sure, yes, I would love that! Okay, I call this last set "Austin Hipster" (laughs) because I'm from San Antonio, Texas, and I love Austin. So don't think I'm saying that in a negative way. But if anyone were to compete with Portland, it would be Austin. And they definitely have a visual aesthetic, and a funny little quirkiness that Texans love. So that's what we're calling this one. And this is literally how crazy I get when I'm getting into backstory. So we're only doing half a table set, but I've done this set full, so for the guy and the girl so it was a hipster couple. (laughs) And I'm gonna' turn this, 'cuz, Ah, no, I like the grain that way. Okay, we're gonna' talk about how to create different tabletop too, which will be really fun. But okay, in my mind, and what I see at the farmer's market and the flea markets are these cute young girls buying mismatched dishes, right? To have that quirky element, okay. But I buy my quirky dishes from Home Goods, 'cuz it's by my house. (laughs) So you don't have to go out to the flea markets if you don't want to. And so she is layering things with her unique patterns and color sense, right? And then, she has something that doesn't go at all, 'cuz that is hipster, right? I'm probably offending a whole bunch of people right now. Hopefully not. (Kate mumbles) Yeah, do we have? She would drink green juice. She totally would. Okay, and that literally is what I ask myself. So she doesn't drink coffee, she drinks tea. Herbal tea, 'kay? 'Cuz it's better for her. And she doesn't just eat normal granola. Hers is organic, from the farmer's market. Okay, and we've got a little farm glass. But mostly when I'm working with top-down, I'm thinking of what it looks like from above when I'm buying props, if I know that it's gonna' be top-down. Okay, we want to add in even more pattern. The more pattern, the better, in her life. And we're gonna' leave this napkin just straight down. Okay, and so I'm always thinking, "What does she do? "What is her job? "What does her boyfriend do? "Do they live together? "Are they eating this breakfast together?" You know, "Is he on the other side of the table "teasing her about setting a full table?" Those kinds of things. Or, "Is he wearing suspenders "and he loves that she does that?" Right, so I'm thinking about every little piece of the story. And I also am thinking about balance. So this is feeling really heavy, so I want something over here too. And again, I might move that just so we have some on each side. 'Kay, she likes flamingos, 'cuz they are super in style right now. And she finds it ironic that she likes something trendy. Okay? (laughter from audience) So, I mean, I think through all these things, and this top page is messed up so I would just pull that right off. More pattern the better, 'cuz she's wearing like 50 patterns, you know she is, you've seen her at the farmer's market. And we're gonna' add in, I mean, so this person to me in my mind is like Zooey Deschanel, right? She's a little bit quirky, but she's a little bit classic. She likes cute, nice things, and she's willing to invest in it a little bit, but only in a Anderson, quirky sort of way, right? She doesn't want to look like she's actually investing in it. She wants it to look like it's effortless, okay? And this is the person who I want, and who I know would buy granola. So out of those three options, this is probably the one that I feel like that consumer would connect the most with, and I'm always thinking about that. So let's hurry and take some pictures of this. This isn't sharpened. I actually would sharpen it, and I would probably start a to-do list on the pad. So what is she gonna' do that day? Get my dog groomed, or pick my cat up from the vet. Apparently she has a lot of pets. But that's, I would make a list like that. Go to the Farmer's Market, pick up my dog from the groomer's, that sort of thing. She clearly does not have kids. Alright. And you'll notice, you've got to be really careful when you're photographing round shapes and square shapes, that you're getting it round. 'Cuz if I go too far over it's gonna' start to become an oval shape as opposed to a circle. And I want to see the place evenly around it. Okay, and I actually, can we add the reflector in on this? 'Cuz I want this to be nice and bright as well. And I might even go so far as to add a plate with a pastry just barely coming in. So that we have just a little bit more of an element of like someone is sitting across from her. (Kate mumbles) Slightly, yeah. Okay, so just like that. Okay, will you take that away? Do you see the difference? 'Kay, so I'm gonna' take one with it away, and then I'm gonna' have you bring it back. (laughs) I'm just gonna' boss you around for a minute. And I don't know, I'm feeling like, Does the napkin really go on the right, or does it go on the left? Anyone know? (audience mumbles) On the left? We're gonna, it goes on the left. 'Kay, we're gonna switch it. Look, none of us are Martha Stewart, so it's alright. But you have to consider, would your customer, would that bother your customer. Because we did a photo shoot for a grocery store, HEB in Texas, a table setting for Christmas, and we had to re-shoot it because we set things up in the wrong way. And then it was the same day, but the Chef of the three of us came in and was like, "What did you do? "This is totally wrong?" Because I had the cup on the wrong side, which I actually think it goes over here too. So let's pretend like I didn't make a bunch of mistakes today. (mumbles) Okay, so this would be something I would research before I started shooting. And that's what Pinterest is good for. 'Cuz you know you can search proper table settings and Pinterest is gonna' tell you. We just switched this up, and that's okay. I'm gonna' turn this in here. That feels better. Okay, let's bring the reflector in and watch. Do you see that, how that changes those shadows? I'm gonna' brighten it just a tad. And I'm gonna' straighten these out, 'cuz that's not good. Maybe bring this in. There we go. 'Kay, I think we got it. I might come in just a little bit tighter. Actually I really like it tighter. Because, again, I like those elements kind of on the edge, flowing out. And let's try one like that. Okay, I think we're good. We got it. So this would be our Austin, you could call it Portland if you want, but it's a little brighter than Portland, I think goes. Austin likes their bright colors, so okay. So this is our set. If you're from Austin and I've highly offended you today, I'm sorry. I love Austin. But this is why, I wanted to show this because this really is how I approach every shoot I do. Who is looking at this, and what is their story, okay? On one hand, And then who is this, 'kay? Whose purse is this? Whose bowl is this? And everything that I put into that image helps tell the story of who that is. And you've heard me say several times, "Who is this?" Not, "How do I sell this granola?" I'm not thinking about the product as much as I'm thinking about who is gonna' buy this product. And how do I show them that this fits in their life? And when I do that, when I do that I connect with them, and I tell them, "I know who you are. "Look at this, I have set your table, right? "And there's granola on it, so you should probably "have granola on your table, 'kay?" And so it's just the psychology of it, and it's more of a human approach to a product than just making a product look pretty. And that's how you get a social media following, and that's how you connect, thinking about those people.
Class Materials
Bonus Materials with Purchase
Ratings and Reviews
a Creativelive Student
This class taught by Candice was amazing. She teaches in such a step-by-step, easy to understand pace. She shares so much of her own tips and tricks she uses to create beautiful images without spending a fortune or having all kinds of expensive equipment. Having the DSLR lessons included was really great for anyone who wants to do more than the camera phones are capable of. Learning the basics of how to use a DSLR is confusing for most people, but Candice broke it down in the simplest way possible. Social media is all about imagery, so if you want to put out the most beautiful eye-catching photos, then you want to learn how to use more than the camera phone. I don't have a business where I need to take photos of things I sell and I still enjoyed her class so much. As a photographer, I am going to use her ideas and insight when I photograph things for fun. There is so much to gain from this class. I would highly recommend taking her class. She is a wealth of great ideas and information and has that friendly personality of someone you'd want to sit and have coffee with.
yomichaela
A wonderful class to get you going with craft/product photography. Candice provides (and shows) fantastic examples and it's really fun to watch her work through a shoot, moving items, etc. to create the final image. She also covers some basic photography tips which is very helpful. Great class! I definitely recommend to others!
Melinda Malamoco
I loved this class! Candice is so personable, clear and relatable. I would want to hang out with her and be creative! I have been taking pictures for YEARS, and for my Etsy store for over two years, and I still learned a lot in her class. The lessons are set up in a way that you can follow, take what you want and don't worry about what you don't need. I will say that I got a TON of ideas for how to better display my brand, what my personal style is and how to be consistent with it. I so recommend this class for anyone who has small business or just wants to be able to take better pictures of their products. Okay, off to build a prop kit!