Lessons
Session 1
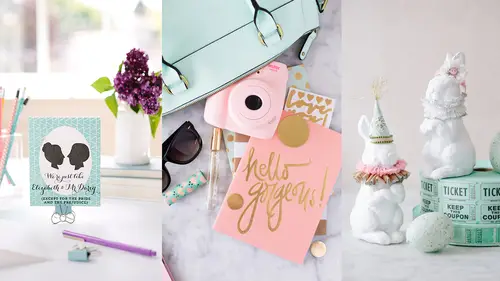
1Introduction to Craft Photography Fundamentals
04:59 2What Your Visuals Say About Your Brand
04:56 3How to Become a Photographic Author
10:44 4How to Use Natural Light for Your Product Photography
10:00 5Setting Up Your Photo: The Basic Rules
09:07 6Becoming the Viewer to Take Better Photos
10:30 7Shooting 3 Setups: Creating the Backstory with Images
34:32Shooting from Top Down with an iPhone
19:49 9Shooting Paper Products with an iPhone
10:54 10Shooting Jewelry with an iPhone
19:01 11Editing on your iPhone
15:28 12Finding Your Brand's Aesthetic
18:39 13Find Your Product and Customer Target: Exercises
11:12 14Figuring Out Your Audience
08:46 15Interview with Gilit Cooper of The Bannerie
08:45 16Branding Beyond Instagram
19:47 17Looking for Natural Light in Your Home
19:36 18Building a Styling Prop Collection
08:22 19Creative Backdrops
13:52 20The Essential Product Photography Props
11:18 21DSLR Basics
02:39 22Understanding Shutter Priority And When To Use It
26:29 23Understanding Aperture Priority And When to Use It
37:16 24The Basics of White Balance
12:52 25Photographing Jewelry
37:27 26Setting Up a Bedroom Set and Photographing Pillows
19:59 27Photographing Greeting Cards
06:53 28Shooting Products on a White Background
17:24 29Top Down Photography on a White Background
13:06 30Shooting Products on a Black Background
07:23 31Shooting Reflective Items
12:20 32Shooting with Backlight
04:01 33Top Down Photography: Shine & Reflection
24:50 34Basic Editing in Lightroom
31:37 35Batch Editing in Lightroom
06:00 36Editing Jewelry in Lightroom
10:01 37Editing White on White in Lightroom
06:54 38Editing Shine and Reflection in Lightroom
17:03Session 2
Lesson Info
Batch Editing in Lightroom
So what I wanted to show you then is, we took a lot of pictures during that time period, right, that were all the same basic exposure. So now what I can do is hold down Command and just start clicking on any other image that was from that set that's the same exposure. I'll just pick those for now. And do you see how now it says Sync? I press that and this comes up. So what's cool about that is, let's say I had to fix the lines on that, but then later I fixed the board, right? So if I now adjust them all this way they would all be crooked again. So I don't want to do that, but I do wanna' apply all of the exposure and the color that I did. So I can just take off whatever I don't want to apply to the other images, and leave on whatever I do. So I'm gonna' take off the crop and the lens corrections, because I want to do that individually, and then everything else I can sync. Now watch these images as it goes. Do you see them changing? So now I can go into any of these images and I've adju...
sted for them. And as long as the lighting and the exposure was the same, they're all gonna' be corrected now. And I can keep them selected and go in and save them all at the exact same time. So I can resize them and save them all at the exact same time. It saves you hours of work when you've photographed 10 pieces of jewelry on the same set, and you want to upload those all to your shop. Then I can edit them, resize them, send them to whatever folder I want to, all at the exact same time. And it just makes such a big difference in my work time. And so here's one that we did the selections on and here's one that we didn't. But let's say I want to do it on all the rest of them. Easy, just hit Command again and then start choosing. So whatever edit you want to from one to the other, pick that first, the finished image, and then go and click in all the others and sync. And you can see it just went in and applied those. So I want to go into the very end of these where we sort of decided that we had gotten it right. And so these were at the end when we were kind of playing around, and I think that one's good. It's a little bit off-centered and it was supposed to be centered, So I'm just coming in a tiny bit to keep it centered, and my lines were already much, much better by then, so I don't need to correct those. I would just go in again and do some simple edits. This was already a lot bluer, and do you know why? Because as soon as we finished that lesson, we turned out the overhead lights and I took some more without the overhead lights. So that's why when I applied those edits it went blue, it went really blue, because it already was more blue. But I love it, I love how it looks right now, so I'm not going to adjust that. I'll adjust my contrast a little bit, my shadows a tiny bit. Tiny bit of clarity, maybe a tiny bit of saturation so I get some blue in the marble. Sharpen it up again, and that's it. I feel like it looks super good. This image was like an image that we were just doing to show what apertures were and it's so pretty. I'm really, really happy with how that turned out. So again, just to kind of show you, then I would go in and export it, and the other option is, if I had just exported stuff the way I really want it to be, I can just click Export with Previous. It won't even open up that panel. It will just save it in the same way that I had saved all the rest of them. So same sizing, same kind of name. It'll just give it the next number. And you can just go with it like that. But I want to change the name 'cuz it's not a candle, I don't want to put it in a subfolder of candle. I just want it to go in images, and I would rename it to soap. So original. It's already the size I want it. If you didn't want to resize it, you just wanted to save it full-sized, you would just click that off, save it the full size, and click export and it's sending it on its way. Do we have any questions so far? So we do have a question about, we were talking about lenses earlier and whether it would automatically detect that. A question had come in with five votes. "Can you use Lightroom even when you're using an iPhone "or a point-and-shoot camera? "Does it matter what type of camera?" No, you can bring anything in. So in the same way you export, you import. So you would just click File, click Import Photos and Video. You can also edit video in Lightroom. And then just click on the folder that you want your images from, wherever you've saved them, and bring them right in. And what you're seeing here is a panel that is available when you're shooting raw. So these are raw. It might be slightly different if you're not shooting raw. But it's really close. And that's how I would edit that image.
Class Materials
Bonus Materials with Purchase
Ratings and Reviews
a Creativelive Student
This class taught by Candice was amazing. She teaches in such a step-by-step, easy to understand pace. She shares so much of her own tips and tricks she uses to create beautiful images without spending a fortune or having all kinds of expensive equipment. Having the DSLR lessons included was really great for anyone who wants to do more than the camera phones are capable of. Learning the basics of how to use a DSLR is confusing for most people, but Candice broke it down in the simplest way possible. Social media is all about imagery, so if you want to put out the most beautiful eye-catching photos, then you want to learn how to use more than the camera phone. I don't have a business where I need to take photos of things I sell and I still enjoyed her class so much. As a photographer, I am going to use her ideas and insight when I photograph things for fun. There is so much to gain from this class. I would highly recommend taking her class. She is a wealth of great ideas and information and has that friendly personality of someone you'd want to sit and have coffee with.
yomichaela
A wonderful class to get you going with craft/product photography. Candice provides (and shows) fantastic examples and it's really fun to watch her work through a shoot, moving items, etc. to create the final image. She also covers some basic photography tips which is very helpful. Great class! I definitely recommend to others!
Melinda Malamoco
I loved this class! Candice is so personable, clear and relatable. I would want to hang out with her and be creative! I have been taking pictures for YEARS, and for my Etsy store for over two years, and I still learned a lot in her class. The lessons are set up in a way that you can follow, take what you want and don't worry about what you don't need. I will say that I got a TON of ideas for how to better display my brand, what my personal style is and how to be consistent with it. I so recommend this class for anyone who has small business or just wants to be able to take better pictures of their products. Okay, off to build a prop kit!