Lessons
Day 1
1Class Introduction
32:47 2Crappy Lighting Conditions: Direct Sunlight
27:47 3Crappy Lighting Conditions: Fluorescent and Mixed
21:00 4Crappy Lighting Conditions: Low Light
29:21 5Crappy Lighting: Dappled, Backlit, and Overcast
12:32 6Setting Your Camera Up for Crappy Light
27:43 7Shoot: Fixing Fluorescent Lighting
06:16Focusing and Shooting Modes
18:35 9Shoot: Mixing Daylight and Tungsten
23:16 10Getting Started with Flash
43:30 11Shoot: Low Light without Flash
19:43 12Shoot: Low Light with Flash
16:49 13Recap and Q&A
16:37 14Crappy Lighting Condition: Backlight
33:16 15Crappy Lighting Condition: Low Light Outdoors
24:10 16Shoot: Direct Sunlight
37:20 17Shoot: Direct Sunlight with Shade
05:47 18Shoot: Direct Sunlight with Flash and High Speed Sync
25:35 19Shoot: Dappled Light with and without Flash
28:57 20Shoot: Open and Covered Shade
11:29 21Shoot: Overcast without Flash
23:50 22Shoot: Overcast with Flash
30:04 23Recap of Shoot
1:40:16 24Scenario Kit: Event
27:44 25Scenario Kit: Wedding
20:56 26The Next Step Slideshow
24:52 27File Managment and DNGs
12:02 28Creating Color Profiles
27:56 29Noise Reduction in Lightroom
12:59 30Using a Color Checker
23:32 31Post Production: Basic Adjustments
25:19 32Post Production: Smart Objects and Color Processing
25:29Day 2
Day 3
Lesson Info
Shoot: Open and Covered Shade
One of the options that I talked about for a bright, sunny day was to defuse the light and then you actually can if you have nothing on you like you're just like I don't know what to do there's nothing here but you have your reflector you could just put the black side down and block off the light in the head like you could do that you could just block off overhead light and then they're like lighting their faces where ever the lightest coming from around them so leased it would get rid of the bad direction of light. Um, but my favorite solution, which is kind of a mix between the two, would be to take the subject and put them underneath, say, a porch overhang for example, something that blocks off overhead and then all the lights coming from the front, the problem with a porch and if you've ever photographed this is let's say the porches covered in the top so there's no direction of light there's no um bright light on the face but it's open on the signs have you ever done this where yo...
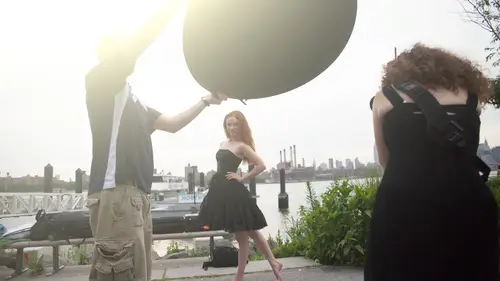
u actually have kind of cross lights let's break down either side of their face and not in the front? So the goto thing, whenever I photograph a bride, whatever it may be as I put them in a doorway think you can always find a doorway that leads to outside on a bright, sunny day and I say that loosely ok, maybe not in the middle of a park unless you on the stand the bathroom which might not feel craziest idea um but the reason that's so great is if there are no lights on in the doorway behind them if they stepped back into the doorway it blocks overhead light it blocks light to the left and right and that acts as negative phil if there's no light in there and see what that negative phil does, it darkens on the left and right I uses for beauty I've done several beauty editorials like this I'm actually one of my site called organic where I put black foam core on the left and right and used a window and what it does is that negative phil shows their jaw line in their cheek bone so it really, really it's flattering to somebody's face the negative fill in both sides and so it's walked off overhead negative phil and then all the light flat and glowing from the front doesn't look as good on a guy because it is flat light it's not bad, I mean especially if the guy has, like, a really cute baby face, you know it looks cute yeah, it looks even baby here and like whatever little little kids I photo of kids this way is you know have them sit in the doorway but we have someone have them not run away behind try to try to corral them but I'm gonna take a shot right now with her right here and you're going to see I'm gonna take, uh take two shots here. Oh, this is this now is opening coverage ain't perfect. Okay, this's this's multi things, but at the same time oh, you have my camera ready? Got it? I'm gonna boost. All right? Okay, so I I'm gonna have you removed that for a second. Well, you know, you could just we'll just use this. Okay? Can you guys see everything all right? I'm gonna have you go stand back in the shade there, right? Right. Okay, great. And just don't feel any light on your face, okay? Perfect. All right, this is awesome. So great. Thank you. And take one step to your right. Great. Okay, so at at very, very minimum what we have here can you see? Ok, shame of this back little fellow in a building it's an intense one super one. Okay, this is a big clam, okay, claire, I'm gonna have to hold that in a minute, I know I know that you were okay um so I very minimum this is what I was trying to talk about earlier that was such a pain because it was too much phil and it was too beautiful this to me is pretty close to what I was talking about with open shade so I'm gonna have you guys human really, really close and I want to show you a few things every step right back to the doorway right there. All right, so here we go. So for it's not covered uh take one half step to make sure no under that overhang take one more step. Okay, so there's nothing above her head if I'm standing right next to her it's open sky above and so if I look at the highlights like I have to pay really close attention I see light on her nose light kind of here on the side of her face on her cheekbone and then shadows in both their eyes on both of her eyes if you looked come here. Look, um, if you look you can nancy catch lights in her eyes here in here that's actually from this filling in, but it's not filling in as much as it was before when I was trying to demo this, so I'm going to show you how right now you can see some of the open sky and if you can actually see with your eye the difference in color temperature you can see on this side of her face it's warm because the bright sunlight is reflecting off of the concrete here it reflects back in it's nice and warm however on the other side the source of light there's no phil it's theirs you know foliage over here it's actually the cool blue sky so she actually has mixed color temperatures right here on her face and natural light so you could shoot this at least he's out of direct sunlight look okay, so that is pretty there's some direction like they're all right, but watch what happens if all ideo as I back her up this is it just into the doorway so I'm gonna have you not fallen just back up so you're standing there on the perfect and takes the back maybe like two more feet. Okay, so here's how I think about it now that she's backed up there isn't a direction of light from the left or right it's all coming from straight ahead. And so when she's standing right at the edge of the doorway the door seems pretty big it's like a big light source, so is nice and flat with a big broad light source like a big soft box in front of her the further back that she would walk the door seems smaller, so if you think about it like light in the studio, it becomes like a smaller light source, which is more directional and more contrast e and so there would be more focused on her face but darker on the side, most markets in the front of her face and darker on the signs and also more contrast the directional light. Somebody can take a picture here, but there's definitely more of ah ford uh, direction of the light, which is flattering for women. Beautiful. Take a look between these two so you'll see a massive difference is there anyway, you could bring those two up side by side. The last two that I took the first one was taken standing. This is the distance, but twenty two of them. So one I've got the reflection that swarm from this side and the blue daylight from the right hand side and now it's completely frontal when I step her back and then I'm just gonna take one more minute backup even further should take a few steps back right there, perfect and you'll see just a little bit more contests the light but not too much it's pretty similar at that distance I have used this set up for every single wedding I have ever done ever, and I've shot two of my favorite beauty editorials like this where I had them stand in a doorway I used um black filled toe left and right and it's just gorgeous glowing light from the front so I absolutely recommend this for portrait ce and for photographing children's too especially kids like the ones that like I've had children that don't like sitting in front of studio strobes you know they aren't candidate to sit there and smile there are a lot less aware of it it's basically window light but you're shooting from the other side of the window and it will be frontal versus may be turning to the side for more shape if you're inside with the window this is need because you can't shoot through a giant eight foot by you know four foot soft box would be in the way so it's need to see this and I was a lighting guy yours like try to reverse engineer what you're seeing and it's like how the heck did they get that shot it's like there's a giant soft box to the front so yeah I love this like a pretty awesome yeah looks great okay cool do you want if we do one more set up before we break okay last set up before break because that'll actually be everything that I need to do before drab light when have you come out for one more thing um could you could actually have the black fabric right here and we won't move okay, I am going to use black fabric has nothing to do with this light set up I'm trying to pretend that there's no phil here because there is film we don't want it so we're just going toe put the black fabric on the floor this is from before when I was talking about how you can defuse the light with the parabolic and it was really nice because when she was sitting over on the bench the concrete beneath her was filling in normally if it's a really bright like direct sunlight day kind of like this directly overhead you pop up that diffusion on the parabolic umbrella it softens light but doesn't change the angle so the one solution I said was that I had her sitting there I got up on a little step stool if she looks up towards me her eyes were not catching the light that works great if you have a step stool and if you get up in a higher angle but that's not always practical so another solution is to add phil you add the sparkle back into the eyes you add the catch lights so what I'm going to dio is I'm going to pop up that umbrella to defuse the light and then we're going to fill in from the side this actually for kind of commercial style portrait ce is my other favorite so I guess I saved the best two for last for shooting in direct sunlight it would be one trying to shoot in that cover doorway in the second would be the diffusion with phil from the side I just I think they give the most pleasing visual effects so we're gonna give that a try right now perfect would you stand just so you feel the sunlight right there perfect okay so as you can see not such nice light on her face let me take one sample okay and would you grab a weight feel perfect and I'm gonna have between you had just a little bit more towards me good the bad light sorry she knows she's like us like okay john may I have diffusion please we just pop open that umbrella great you look great in me perfect okay and yeah that's why for a fit and I got just the corner of it they're alright for that and actually have you dropped that someone do one without the phil and one with phil little lower and let's see if we can use to pull the hair from your face seem like someone trying to shut your eyes and I can't see it ok great and this is with the phil here's with negative phil and your head towards the light just a little bit because there's still a direct chinna light even those defuse all that's perfect right so I'm gonna actually move with that light so I have some flat light look right at me and phil for me good perfect. A little over great nice beautiful quality late in the face very soft I like the one I like the ones with hair in front of her face those are my favorites so nosy you look very dramatic and fashioning I like it cool. So I think I have I think that summarizes pretty much everything for how we would approach the bright and sunny days or any leftovers that's I mean that's everything I could give my tool kit besides the fact that yes, I also use the scrim jim with the white diffusion material six by six foot worried by eight foot um but we actually use that to show you how you could take out the diffusion and add a silver reflector and use that instead yeah, way kicked the sons but it's done. But the only reason we would go bigger is someone came from the uh the online and asked that how would we do three quarters or full body? The only thing we would do differently is go to larger size screams and reflectors if we had larger groups or we needed to shoot a little bit wider, eh? So we would do the exact same things just make a bigger from or people um but that's it like the strobes would get bigger or the reflectors would get bigger but otherwise is the exact same science to overcome into all these different ways.
Class Materials
bonus material with purchase
Ratings and Reviews
Victor van Dijk
Besides all the more or less 'technical, theoretical stuff', the greatest thing I'm taking away with this outstanding course is the plain joy and FUN of trying all sorts of (crappy) lighting solutions!! Speaking for myself, and I suppose also many others, as an 'advanced beginner', I strongly tend to end up to my eyeballs in all technical nitty-gritty, gear 'n' stuff, that I totally mis out on all the sheer FUN of trying out, and often 'muddling through' all kinds of lighting setups! Such a joy to see the fun exchange between Lindsay and Erik! Really catchy. There should be more classes and courses like this, redirecting students to what it's actually all about: sheer creativity and fun! Having said that, Lindsay and Erik demonstrate that there is hardly any crappy light situation that can't be overcome by creative thinking. And more often than not, it doesn't have to be high-tech or difficult! They really showed an exhaustive list of crappy light situations AND their solutions. And I highly commend Lindsay and Erik for their fun energy, and even more important, pragmatism and frankness. I recommend this course to ANY photographer AND videographer, no matter 'beginner' or 'highly advanced'! Lighting is the basis of it all, and most of the time, it isn't perfect...! I highly re
Julie Addison
I thought I understood about light before I took this course. How wrong could I be? I have re-watched this course over and over and I just love it. Quality of light, direction of light - so many crappy light situations. Learning how to actually set a white balance instead of purely relying on the camera presets and learning colour correction by the color checker was also invaluable to me. This course is so affordable. I would recommend it to anyone from beginner to advanced as you will get more out of it than you think. I love the way Lindsay and Erik work together. No right or wrong way - just showing the differences in their styles to accomplish the same end result. Well done guys. Now to have more courses by Erik would be great. Again, can't' thank creative live enough and Erik and Lindsay for this course. Love, Love, Love It!!!!
a Creativelive Student
I hope I can tune in tomorrow. Erik and Lindsay, you guys were awesome today. Some of the things I needed some refreshing on but you definitely had a way of educating. I thought the demos were great and really validating. Light is a difficult thing to keep on your good side, especially with me, someone who primarily uses ambient and available lighting scenarios. This course is great and I'm planning to tune in tomorrow because I really want to see what you have in store for outside. Best of luck guys!! -Sim