Lessons
Class Introduction
06:28 2Pre-Shoot Planning
11:57 3Backgrounds for Shooting
02:57 4Props on Set
09:11 5On-set Shoot Workflow
07:11 6Image Stacking On-set
14:45 7Image Coverage: Replacement Objects
30:37 8Post Production Workflow Set-up
17:25Lesson Info
Editing The Background
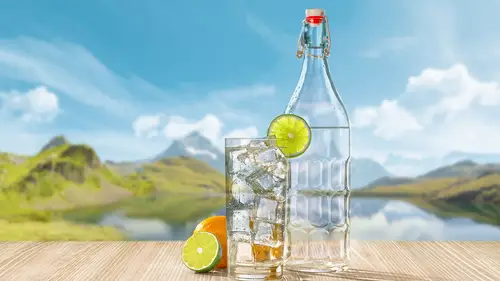
I hope I'm not wrong on this. But I thought this was a really handy thing to look at for how these work. Do you remember I talked about type? And I said, where's the type? Where is the type? There is gonna be type. So I will often my starter files I will grab a logo and I will put it in. A logo, I mean the word logo. And I will put it in, and I will start moving it around. And put it on top. Not in the folder. Does that irritate you guys too? That it's hard to get it out? And I will start looking to see if there's any issues. Why is that? Because I've done this so many years that I know if they want a logo here, it's gonna be impossible to see. And I wanna pre-think. Pre-think what might possibly change. If someone puts a logo over that, it's gonna be a nightmare to read. So as a little caveat, stick a logo in there. Just so you have an idea of what's coming. And then turn it off. It's no big deal. It can go away. Alright I'm gonna go ahead and deconstruct this file now. And take a loo...
k at what we did. Cool? First off the sky is a Adobe Stock sky with some color corrections. The background that we built. This was the background of choice. I'ma turn the mask off. Isn't that sweet and nice? Absolutely not big enough. Absolutely not big enough. So what I did is I did extensions. How did I do that? Is I grabbed the left side. And I Command + T. And transformed it to the left. I grabbed the right and I 'Command + T'-ed it to the right. Lil stretchy stretchy, right? It's gonna be a blur. Don't do extra work when you don't have to. Do not do extra work if you don't have to. And as I said, there's an extension course here at CreativeLive. But what happens is fill in the space. And then okay it's going to be blurred. There's a little lump here. I'm gonna fill in a little lump. That's all I need. I'm serious, that's all I need. And then a big lump on the left. Because we looked at the glass. So I took this shot. And when when we did the extension, we just needed another little mountain range. And it's no big deal. I think sometimes folks think with composites you have to do a really big ho-dee-ho-doh. A little mask. Ho-dee-doh-doh, that's a technical term. Cool, and then it's masked in. And then a little hue saturation, and lightening. And that got done afterwards. And then we need to blur it. I talked about that. File construction. If your file gets too big, you would save this out as it's own file. In the meantime I've merged everything. And I just want to show you how to do that. Command + Option + Shift + E puts everything on the top. Right, no big deal. Why do I make it a smart object? Because I mentioned earlier, I am not the decider. My clients are the decider. So if I'm gonna blur it. Well how much do you blur it? I don't want to have to keep resetting the code. If I make a smart object, I can say Gaussian blur. Okay, how 'bout five? That looks nice. And if I wanted to darken the top, which I did, I did. I didn't make it a smart object, so sorry. Please make it a smart object. Then you do your blur. Gaussian blur. And then with smart objects, what's awesome, is two weeks later when the client says, I want it blurred 15. Well, alright. Blur it 15. No big deal. And you have it. And you don't have to keep re-making the wheel. Alright, Alt background. We talked about that briefly. If your client has an alt background that they want. And I just did that same mountain. Only I blurred the holy heck out of it. And I did a little G for gradient. I just have an alternate background in case when they put the tabletop in and think they want, we're not in the Swiss Alps we're in the Italian Alps. Or we're in Washington, D.C. We're not in Switzerland. No big deal. Do you remember I said, I masked out stuff early? This is why I mask it out early. So that I can use it quickly. Alright, so let's go take a look. I'm just gonna put a gray background on the back for right now. If you guys are okay. In fact I'm gonna duplicate this out. Do you guys know this quick key? If you hold the Control Key, you can duplicate your image out as to a brand new copy. And not accidentally scrub your file. (gasps) Isn't that great? And I'm just gonna hide all layers. No, I'm not. I'm gonna put that back on. Delete hidden layers. So that we can talk about this. Let's take a look. Do you remember that shadow I made on the file? Let's take a look at what I've got going in here. The base file, bear with me for one second, here's the base file. Do you remember I said, I shoot things on white? For highlights and shadows. This was our base file. And what I did was, well how you gonna mask this in, and show your background? It's gonna be kind of a pain. For the base file, can you believe that's all I used? What I then had is a copy. What I then have is a copy of the shoot on the mode called multiply. So what is brilliant you guys, if you put this on multiply, you don't have to mask all this white. Because on multiply white disappears and black shows. Right? I still have to mask the main object out. That path? I still have to use the path. But the rest of it, I don't have to mask out. Okay? Now on this bottle and the other bottle. Just gonna turn that mask off. The base was a little too cool. Pardon me, the base was too warm. For whatever I was doing. And so I wanted to neutralize it out. That's what the hue saturation is. I have this on multiply mode because I have it on multiply mode I have to link this. Okay? I have to link this. Otherwise it'll contaminate everything underneath. Let's take a look. Here doesn't this look weird? When you look at this, doesn't this look like a really weird composite? But it's gonna work.
Class Materials
Bonus Materials with Purchase
Ratings and Reviews
Sean
Super Lisa is the best teacher. She makes learning Photoshop fun. Great course. Lisa has a great teaching style. She mixes in a great speech cadence, great voice up and down and pausing, jokes, and is extremely knowledgeable and fun to watch. Awesome course. Learned a lot from the course.
Anne Dougherty
I love Lisa Carney’s classes! She is casual yet precise, and she thinks like I do! The workflow logic of her process is brilliant. Really brilliant. I started working in PS version 1.something, as the publisher I worked for was just computerizing their department, and I was a total novice. But right from our first day working digitally, we had to create images and files that our novice printers could successfully print from. Lisa’s logic/approach is so familiar! Making things work on a deadline is an incredible way to learn time-saving techniques, and I wish I’d had Lisa crunching solutions with me. I am new to the newest PSCC, but all off her process made sense to me. She moves fast, so it might be a little tough for a total beginner, but she stops and explains things very clearly once she’s gone through it a time or two on a file, so, hopefully everyone can get things solidified for themselves. Now that I am retired and doing my photo work just for myself, her compositing techniques are helping me get to my end results much more quickly. I wish I had a Lisa sitting alongside me, with a glass of wine, while I’m experimenting with my creative composited work. Thank you so much for having her as a CreativeLive instructor/mentor.
user-af7c94
I took advantage of Photoshop Week and caught this class live - and loved it! I own other CreativeLive food photography courses, but I really liked the way Lisa and Christina taught the image shoot segment in this one. They show us a little glimpse of how the retoucher and photographer work together, in real time, on the set and I like that. Lisa and Christina are also very giving with their knowledge of how things work behind the scenes as well. Though, the main reason I bought this course was for the info Lisa shared about file naming and file version organization. There are a lot of video's on how to perform functions in Photoshop, but almost none about correctly naming, and organizing your versions. Now, I've got a real base to start from. Thanks :)