Lesson Info
3. Introduction to Newborn Portrait
Lessons
Class Introduction
14:28 2The Power of Portrait Photography
06:52 3Introduction to Newborn Portrait
08:30 4Find Inspiration for Newborn Portrait
11:09 5Create The Scene for Newborn Portrait
05:58 6Prepare & Pose Newborn for Portrait
18:03 7Shoot: Techniques for Photographing Newborn
08:58 8Newborn Image Review
08:57Introduction & Find Inspiration For Child Portrait
13:03 10Create The Scene for Child Portrait
05:17 11Prepare Set for Child Portrait
05:48 12Shoot: Capture Child Portrait
11:40 13Image Review for Child Portrait
11:45 14Introduction & Inspiration For Teenager Portrait
09:05 15Create The Scene for Teenager Portrait
06:15 16Building Set for Teenager Portrait
14:01 17Shoot: Portrait with Teenager
10:43 18Shoot: Pose Teenager for Multiple Looks
14:23 19Image Review for Teenage Portrait
08:11 20Introduction & Inspiration For Adult Portrait
11:31 21Creating The Scene for Adult Portrait
06:25 22Lighting for Adult Portrait
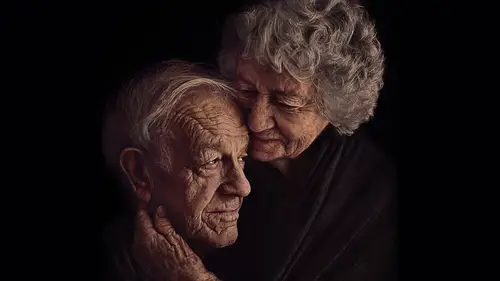
04:51 23Tell Your Subject's Story
04:38 24Shoot: Lighting for Double Exposure
16:22 25Introduction to Senior Portrait
08:39 26Create Storyboard & The Scene For Senior Portrait
10:26 27Connect With Client to Create Portrait
16:06 28Shoot: Lighting for Senior Portrait
08:10 29Shoot: Be Creative on Set
15:09 30Image Review for Senior Portrait
14:23 31Portrait Shoots Recap
04:08 32Global Adjustments in Camera Raw®
05:37 33Editing In Photoshop® CC: New Born Portrait
24:41 34Editing In Photoshop® CC: Child Portrait
15:35 35Editing In Photoshop® CC: Adult Portrait
11:32 36Editing In Photoshop® CC: Teenager Portrait
11:28 37Editing In Photoshop® CC: Senior Portrait
13:46 38Introduction to Entering Print Competitions
02:14 39Process of Print Competitions
06:17 40What to Consider For Print Competitions
17:00 41What Judges Look For Overview
07:14 42Image Impact
03:42 43Creativity, Style & Composition in Images
14:04 44Entering Photography Competitions Q&A
22:50 45Image Lighting
05:43 46Image Color Balance
03:56 47Technical Excellence in Images
07:56 48Photographic Technique
10:15 49Storytelling & Subject Matter
09:28Lesson Info
Introduction to Newborn Portrait
Our first little subject and newborn is three weeks old. She is about nine pounds and I've got this beautiful set up here. So what I've done is I have the supportive section in the middle where she is going to be positioned, I've got some additional supports over there. My idea is once we bring the background on top here is that I will stand very safely up here to take that shot. So its an aerial perspective so that's where I'm going to be to actually take that photograph if you can visualize that. And like I said, I've used a couple hundred paper cranes and we have hot glue gunned those to the backdrop. So I had to sacrifice a backdrop but that's okay. Because usually when I'm creating pieces like this they're one of, they're unique, and I've hand painted backdrops, especially the one, the regional photo with the owl, I painted that backdrop specifically for that shoot so I'm not going to use it for anything else because it was for that shot. And for me, that's probably the most impor...
tant thing when I'm creating set ups like this is that they are unique, I've not done them before. Sometimes I have clients come in and they're like, oh, we want that. And it'd be my big, giant white flower with a baby in it. And whilst I am creating unique set ups for each individual person because it tells their story, sometimes you do get people that go well but I want it. But, yeah, when it comes to, you know, creating something like this and having that vision and bringing it to life, when you start, you can often change directions. So you can have your first, you know, preconception, conceptual idea and then it'll start to evolve throughout that process from the beginning, right through to that catcher. So I originally had an idea where all of the cranes would come straight down and then as I started to play on that, I'm like, oh, I like how it goes this way. So don't ever feel restrained that it has to be a certain way. Let your imagination fly and just go with whatever you think looks great and what you're comfortable with. And that's what is always gonna make those images unique. In the photography industry, it is hard to stand out. It is really hard. You know, we struggle in our businesses to get clients in the door all the time but what I found throughout creating all of those photographs is that has made me unique and its made me stand out and people find me, they go out of their way to find me. So when you allow yourself to create and not, you know, constrain yourself through your fear of what other people think and if you focus purely on your own ideas, your own clients, and telling their story, you're just gonna blow up. You know, your business is just gonna explode because it's you and no one else sees it like you and that was probably the biggest thing that held me back from creating for a long time. It was oh, no, people will think that that's stupid. Like, and I grew up with, you know, being told everyday, what will people think. You know, look at your hair, what will people think. Go and get dressed properly, what will people think. So it took a long time for me to go I don't care what other people think, this is me. And I'm going to create what it is that I want, what I love, and what I'm most passionate about. So, you know, for anyone out there watching, this is me. It doesn't bother me if other people don't resonate, don't like it, don't love it. This is the way I express myself with photography and to really nourish my own creativity. So I think we're pretty ready here to kind of start getting set up for our newborn shoot and I'm going to explain that process of bringing this over. But like I said, we've got our heaters on so it's nice and warm in this space, our baby is being fed this morning prior to coming to the studio so I always communicate with my newborn clients, the mothers and the fathers, prior because it's really important that when that baby comes in here, or, you know, at the beginning of the shoot that they're well prepared and they understand what's about to happen because they might see a drawing, they might see a photograph but they don't know how it's created and especially for newborns, you've got to make sure that you're giving them that peace of mind that safety is at the forefront of everything that you do and they're comfortable, you know, with you creating set ups like this. So that's probably one thing that's different when you're photographing a newborn is that all of those safety elements have to be really, really focused on and it's the same with a child and things like that but you can communicate with a ten year old. You know, and when you are creating these set ups, you're gonna make sure that you can communicate, ask the right questions, and know that the child fully understands what it is you're about to do. But a newborn, you've got to put so much more thought into it so I've been chatting with mum prior to this and she's really aware of what I'm going to do, what I'm going to create, and she knows my level of experience, and she knows I'm gonna treat that baby like I would treat my own, which is really important so that care goes into it. Because often, this is the first time in those first few weeks that they're leaving the house with that baby and seeing their baby in a stranger's hands, like she doesn't know me from a bar of soap, and I've come from the other side of the world so I've got to build that relationship with her, that trust, to be able to deliver what it is that I wanna deliver. So yeah, I'm ready to start getting organized here. What do you reckon, Kinna? Sounds great. (laughter) Okay, so I've got Garret here with me. He's going to help me bring a few things across. I might start with that little soft one underneath. So I've got this little pillow here and because I've got such a big well. In the middle here, it's too deep for the baby for what I want so I need to create some support. Have you all seen the photographs of newborns on a block, where their hands are together in there. It looks, the illusion is created that it looks like they're being held up in the air. So that's very similar to what I want to create here. So I need to put enough support in here to keep that baby in the position that I want it in. So that deep well, I need to fill a little bit. I'm going to have the baby's head here and bottom here and then the cranes are gonna come up here like it's being lifted up. So that support needs to come up and around the head so that the head is elevated above the body. Okay, so I'll keep those close by. And we've got a beautiful wrap bib but what I might do is bring the backdrop over. We'll start with this one in your hand. So cause we've got black boxes, I need to make sure that we can cover those and you can't see through. And we'll just line that up over the center of that hole so I have cut a hole in it. Because as I've pushed down on the fabric and the well, the weight of the baby, what it was doing was wrinkling my blanket so to keep the blanket nice and smooth, to eliminate a lot of that post production work that I would have to do. I've sacrificed it and cut the holes to create that circle. Plus its also gonna allow me to easily place my hands in there to adjust support so I can add more or take away. Alright, so that's what it's gonna look like. And you know, when you are creating images like this, don't ever be disheartened when it doesn't work. Because its all part of that process of creating that helps you grow and evolve and then realize, well, you know, that didn't work, that's okay, next time I'm going to do it this way. And that's the thing, you just gotta have fun and play. That process is probably the most rewarding part of all.
Class Materials
Bonus Materials with Purchase
Ratings and Reviews
user-2c88c4
Among a sea of wonderful teachers here at CL, Kelly is the cream of the crop. All of her classes are outstanding and this one is no exception. Amazing teacher. Amazing class. Amazing education. If you are hoping to stretch yourself to create deeper more meaningful stories in your images, or are feeling the pull of print competition but need some direction, this is definitely the class for you. Thank you Kelly!
Melissa Soto
Kelly Brown is a true inspiration. She has been my idol in this industry since I began. This class was amazing. I love how honest, authentic and genuine she was. But most importantly I loved her wise direction and teaching style. Kelly brown thank you for this gem. You helped light a fire in me. I’m so excited to start telling amazing stories with the skills I have learned from this class.
Marjorie Stevenson
Just loving this class! Kelly is one of my favorite instructors. She is very good at articulating her ideas and carrying them to an absolutely wonderful end product. Her images are always stunning. I love that she always puts safety first with her models. Thank you Kelly for sharing your creative visions with us.
Student Work
Related Classes
Portrait Photography