Lesson Info
2. Button Layout
Lessons
Lesson Info
Button Layout
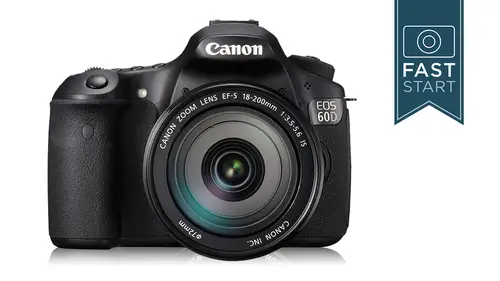
All right, so let's get started with going through the camera itself and starting to discover what all this camera khun dio so let's, get your cameras out in front of you and we're going to go ahead and start right on the top, and we will start with the the on off button right here. We already turned our camera on, but turning it off and turn it on a zit comes from the factory. There's ah number of factory default settings and one of the things that has turned on which I think is a good thing is there is a automatic censor cleaning when you turn the camera on and off, there is an ultrasonic sensor in there filter that shakes the sensor and knocks off dust and has been a big boom to helping prevent dust from getting on the sensor cause any sort of dust on the sensor is going to become a black speck when you take a picture. Now, when you turn, the camera on the camera is on, but it's only going to be on for about thirty seconds before it goes to sleep. And so if you're working with the c...
amera in this class or out the field and it kind of goes to sleep on you. The quickest and easiest way to wake it up is to press halfway down on the shutter release, and the camera might start the auto focus or something, but it will come back to life with that half press on the shutter release. Next up, right next to the on off is the mode dial it's the dial over on the left side of your camera with the letters and pictures on it, and it's got a lock button in the middle so it's locked in wherever you put it. You have to push that lock button in to turn the dial and that's a nice feature to have, because once you have it where you want it, it won't accidentally slip on you when you're taking it in and out of your camera bag. Or is you have it hanging around your shoulder, but this mode I'll is really important. So let's, take a closer look at what it controls. First off, the mod ill is controlling the waist, shutter speeds and apertures or set on your camera primarily, it can also control some other things, so let's go through what it offers one by one to start with is the full auto mode if you didn't know anything about how to use the camera you could put it in this mode, take pictures and get reasonable quality results. They're probably going to be properly focused and properly exposed. They may not be the most creative pictures in the world, but at least the camera is going to do do everything that it can to help you take simple pictures, but I don't recommend using this mode for most people because it is so very, very generic and basic and what it could dio you can outsmart this camera if you know a bit about photography, if you were in a museum or someplace where they don't allow flash or it's not going to do any good, the mod right below it with the lightning bolt and the arrow through it is thief flash off mode so it's the exact same as the full auto mode, it just simply turns the flash off. There is a creative auto mode, and this is one of the features of the camera that we are not going to be fully exploring. The creative auto mode is a way for you to learn more about photography if you didn't have access to taking the class on photography, and it's got its own built in learning systems to help you set the camera up. With easy terminology personally I think it's probably better just to take a photography class and start diving full on into the manual modes of the camera but that is there for those who want it and then there are the icon modes we have portrait and landscape close up sports and nighttime and these are not only setting shutter speeds and apertures but they're also affecting the way the motor drive the focusing the meat a ring and a variety of other functions on the camera operates once again if you didn't know anything about photography and you were shooting sports he would be slightly better off sending it in the sports mode than in the full auto mode but personally I think most people would be better off learning a little bit about how to shoot sports and then she needed in one of the other more manual modes finally as we turn the dialled way around we have the little video mode and if you want to shoot video you do have to be in the video mode on's camera you can't shoot it from any of the other modes you have to turn the style all the way to video and we will be talking about video throughout this talk as we come across various functions features in buttons that control video turning the dial over mohr to the manual side we're going to turn up to the p mode which stands for program this means the camera is going to set shutter speeds and apertures for you and nothing else what's going on with all those other little icon modes is that the camera well I'd like to say put child safety locks on a lot of the features and menus and so if you are in the portrait mode and you want to change the so it may not allow you or you want to shoot j peg or raw images and raw images instead of j pick it won't allow you there and it won't allow you into certain menus by being in the program mode we have full access to all the menus and all the features of the camera it's just that the camera is setting shutter speeds and apertures and I think for anyone who's finished this class the p mode is a good simple mode if you want to keep it in a quick and simple mode just to get a fast shot I think that's a great place to be then we get are getting into the more and more manual mounts the first off is the time value tv time value not for taking pictures of the tv time value where we get to select the shutter speed now we have a dial upon top here called the main dial that we haven't talked about officially yet but if you want to change the shutter speed you would turn this dial and so I'm gonna change it to the fastest shutter speed that this camera has on it, which is a thousandth of a second and you do that by simply turning the dial when we goto aperture priority avie aperture value you'll use that same dial to control the aperture this time and in these modes you get to select one thing the camera will figure out the rest and this is where a lot of photographers like to be so that they have some direct control over the aperture shutter combination, but they have a little bit of automation help and so personally of the avian tv mode I prefer aperture value as do most photographers it's a very easy way to select the depth of field and by way of that also affecting what your shutter speed is so it's a good, simple way of having some input but having some help us well and then finally we have the emmett mode for full manual, and if you want to select shutter speeds and apertures, you could do that, but you're going to need two dials one for each operation and so the top dial is controlling the shutter speeds and now another dial on the back of the camera that we haven't talked about yet, which is called the quick control dial is used for controlling the aperture so as you hold the camera in your hand you have easy control for both shutter speed and aperture right at your fingertips barely have to move him at all very good system further up on the dialled is b, which stands for bulb and this is a manual mode where when you press down on the shutter release and I will go ahead and do this, the shutter will stay open for us long as your finger is on the button, so if I hold it down for three seconds it stays open for three seconds. This is impractical for actually doing it with the shutter release here it's really designed for use with the cable release so that you can leave it open for two minutes or ten minutes or several hours, but with a digital camera like this, you're probably going to be best at keeping it at five minutes or less, but you would want to get the cable release to use with the bulb for nighttime shots and then finally we have the c mode, which stands for customs and this is a really cool mode because you get to go in and program everything that the camera does in this mode. You know how the, uh, sports mode down here we'll choose a faster shutter speed, a faster motor drive? Well, you could do that yourself, but you could set the camera very specifically to the way you want it to work program it for the custom and when you turn it to the custom it's at the shutter speed the aperture you want the meter in mode dr mode and anything else you want to change in the camera can automatically be there. So if you use something on a regular basis, you do it type of some type of photography that you constantly doing and you have to make a lot of changes teo to get into that mode, you can program that in the custom mode, and I'm going to show you where to program that in when we get into the menu system. So as we get back into the rest of the camera, we have our hot shoe on top. This is where we mount accessory units on the top of our camera there's a lot of things that you can mount up there it's a very strong mount. For the most part, you'll be mounting e x flashes from canon and that's, their siri's of flashes that are designed for digital cameras. They have three very good models. I will tell you more about those later in the top of the camera we do have a pop up flash we're going to get into more on that in a moment and over on the right hand side we have our shutter release we talked about pressing that halfway down to wake the camera this is obviously where you press to take a picture but also it's where you press to get the meat oring and focusing on the cameras so if you want to take a picture you'll notice that it is a two stage press when you press halfway down the camera will focus and then when you press all the way down it'll take the picture and so be aware of that halfway press on the button right behind that is the main dial and this is the dial that we will use to change most settings on the camera it's the primary way to change features and functions as we move around to the various features of the camera we have a large lcd panel which is giving us our most important information and in front of that our four buttons that are very important controlling features that we change on a regular basis. The first one is thie f which controls the auto focus of the camera uh kind of kind of point ahead here there is actually an auto focus manual focus button on the lens if it is in auto focus then you compress the autofocus button up here and change from three different settings let's talk about auto focus for just a moment we have one shot eh I focus and a servo one shot is a good general place to be its fur still subjects what will happen then is the camera will when you press halfway down on the shutter release, will find a focus and will lock in on that subject and will stop moving, which is really good for general photography if you're photographing something that is not moving. Next is a I focus, which is an auto detection system that will automatically try to figure out if your subject is still or moving. I don't like this one because it's a bit unpredictable as to what it's going to choose. Finally, we have a servo. Aye, aye, servo is for moving subjects. If you're into sports photography, you're going to photograph race cars or people playing soccer football, any other sports people walking down the street, a servo is the mood you want to go to him. We'll talk more about that when we talk about shooting sports photography it's very important that you change the way your camera focuses to do that, so the next button in the lineup is the drive mode we used to talk about the motor drive that would drive the film. In this case, we're talking about what happens when you press the shutter release does it take one picture or does it continue to take pictures and so to change it, you will just press the drive button and then turn the main dial and you will have a bunch of little options in there some of your options air single shot this is good for general photography you press the button you get one picture for sports mode there is a continuous high speed and when you want to take continuous pictures but not at such a fast rate the high speed mode is going to be shooting pictures at about five point three frames per second. The low mode is at three frames per second so you could choose how many frames per second you want to shoot? We also have a ten second self timer that doubles as a remote. So if you plan to use the wireless remote you could do that as well with this camera it also has a two second self timer so that you have a shorter delay between the time you press the button and the time that fisher is actually taken. The next button in our lineup is thie s o button I s oh by the way stands for international standards organization which is really not important it is basically the sensitivity of the sensor and here we will have the options of everything from auto and then starting at one hundred going up to sixty, four hundred and then beyond that and h and that h is basically double sixty four hundred so in this case twelve thousand eight hundred now if you want the best quality image from your sensor you want to set it at one hundred lowest numbered setting is where you want to keep the esso set. The reason that you can set it higher is that as you said it higher your camera records less light but still gives you a good picture out of it good, but not as good and so in low light conditions or when you need faster shutter speeds or more depth of field you might need to bump your eyes so up to a higher level so as I said, you want to keep it at one hundred for the best quality, the downsides of using higher numbered esos is that your camera gets less information to the sensor and you're going tohave some artifact ng called noise as you can see here a twelve thousand eight hundred the camera is going to have a lot of noise and this is undesirable it doesn't look good and you probably don't want to take a lot of pictures here unless you're not so concerned about the quality of the pictures other than just getting the pictures uh and so I try to keep my eyes so as low as possible and I change it as necessary the auto mode I am not a big fan of either because it's a little bit unpredictable as to where the camera's going to put it, I think if you're somewhat serious photographer you should choose where you want your s o to be and it's. Pretty simple started at one hundred, and they bump it up as necessary that the next button in the lineup is a button with a little symbol on it, which is theme eatery in button. And this is determining how the camera reads the light coming in through the lens. There's, different patterns that are used. And some of the options you have in there are evaluative, which is a great general purpose mode that I would keep it out for most of my photography, there is a partial mode, which is a small spot in the middle. Ah, spot mode, which is an even smaller spot in the middle and a center waited mode, which is a traditional large fat spot in the center. That is the way that most cameras used to read light before we had more sophisticated metering systems like we have today, uh, I'm not gonna spend too much time on the meter in system, but in general, I would probably leave it in evaluative for most metering situations. Next to those is the light button. If you press that button, it turns a small light on in the l c d c you can see what's going on in there in low light conditions. Moving around kinda towards the back side of the camera there's a little marking right by the corner of your flash there and that's the focal plane that's exactly where the image sensor is in your camera. There might be some unusual circumstances were you need to measure the exact distance between your subject and the focal plane and that's where you would measure too. All right, let's, move around to the back side of the camera. Well, obviously we have a flip out screen on this camera, which is kind of a new feature which is nice. It rotates in many directions. You do? You want to be careful with it and not force it into a position? It's not used to. So I'm gonna go ahead and flip it around so that we can see it right here. It's, a very high resolution monitor it's got about four hundred dots per inch if, eh, you have an iphone for you think that has a great display? Technically, this one is a little bit higher resolution than an iphone. As we look at some of the buttons on the back of the camera up on the top left that little blue garbage can is a way for you to do delete your images when you play your images back, you'll hit that a couple of times and you can delete an image we have our on off button we've already talked about right there and then moving over to the right hand side when you set up your camera this is a pretty important factor is the diop ter this is the focusing of the viewfinder and when you get your camera you want to make sure that it's adjusted for your eyes if you wear glasses you might be able to adjust it so you don't have to wear glasses when you look through the viewfinder and so when you look through the viewfinder, look at the focusing brackets the markings on the ground glass or look at the information just below the frame of the of what your camera what you see through the through the lens and you want to focus on that don't worry about what your lenses focused on you want to focus on either the brackets or the information below the framing next up we have the live view movie record button if you want to use the live you function and I'm going to go ahead and put this camera in the live view mode right now I've got over exposed subjects so let's go ahead and change this here and susan maybe you could pull that chair out of there just so that camera to see what we're looking at here and so we can see exactly what our camera sees by looking at this you find her now this is a ah, nice feature tohave for some situations, but not for everything it's an uncomfortable position to handhold the camera, but if you are working from a tripod, it does make for a comm being it way too compose and look at your shots because you get a look at the screen with both eyes. Now if you are in the movie record mode, I'm gonna go ahead and switch it to the movie record mode here it automatically kicks us into this live you mode and when we pressed the button right here that we're talking about the live you movie record but there's a red dot next to it and if I press that we'll get a red dot in the frame and we know that we are recording a video at this point and then we press it once again to stop and so we'll talk more about the video motors we go along. One of the things that's most important about it is the focusing system thiss camera is designed primarily for still photography he it's not designed for video, it can do video, it could do very, very good video, but one of the disadvantages with an slr especially this one is that the focusing is not the fastest in the world it's not great for action tracking focussing in general if I'm going to use this is a movie camera I'm probably going to record or I'm probably going to set my focus ahead of time manually, but if you do want a re do you want to use live you mode, let me focus on something closer up I'll use my remote right here it has a bracket in the middle that we can focus on and you can see it takes a moment for it tio lock in now if I focus on something in the distance it takes a couple of seconds so it's not nearly as fast as if I was using it in a traditional style, so if I was to turn this off and do this real time if you can hear the beep how fast it isthe it's very, very quick when you're using it in the standard millet, but when you go into the live you mode it's using a different focusing system that is not as fast and so that's the live live mode there is also a quick mode that you can change it into I'll show you in there when we get into the menu system how to change that and what happens then is it pops the mere back down goes back to his traditional focusing system, focuses on that and then comes back the problem with that is that you lose sight of what you're doing while it's focusing and that could be a bit of a problem it also has a face detection tracking system if you want to track faces, it actually consents what a face looks like and follow its movement back and forth, which can work for a few situations. But for a lot of people, I think focusing manually ahead of the shot in video would be a better system and so some other thoughts on shooting video and using the live view mode you are limited to twelve minutes at full resolution, so if you want to shoot at the full resolution video on this, you're only going to be able to record about four gigs worth which in this case is about twelve minutes at the end of the twelve minutes it's going to stop recording, you can press the record button and start again, but it just can't do more than twelve continuous minutes at full resolution uh in the er you find er see if we could do this for camera to hear there's an information button we haven't officially talked about yet, but uh let's go ahead and focus here you compress the information button and that will pull up additional information about settings that you have on the camera, including even horizon level to let you know that you're straight on or not or you can clear off all the information to have a very clean you find her and so that's the information button for pulling up more or less information any time you are shooting movies, you can just simply press down on the shutter release and get a still picture it's primarily a still camera for taking still pictures and they want to allow you to take pictures at any time you want. So even though you're right in the middle of a movie you khun take a still picture it will then take the movie clips on either side of that still and stitch him back together and they'll be a momentary gap in that particular video when you took the still shot when you are looking through the cd on the back of the camera it is trying to give you an exposure simulation of the like that is coming into the land so if you're overexposed or under exposed it's going to show you in the viewfinder and as I said before focus then shoot for most movies it's just works a lot better because the cameras too slow to focus while it is shooting video. All right, next up on the back of the camera is thie f on button and this does exactly what pressing the shutter release halfway down does and the reason that there's too but this is that if you want one of the custom functions that will get into towards the tail end of this class is that you can turn off the focusing in the shutter release of the camera that way every time you take a picture the camera isn't trying to refocus and you can independently select it with your thumb back here. Uh and some people like to do this it's traditionally more advanced photographers that air using their camera on a regular basis and they want to separately focus and take pictures and it just allows you to have a little bit more specific control over the camera next to that we have the little asterix button, which is our meter lock as well as our play zoom out the first part about a meter lock. As I said before, when you press halfway down on the shutter release, the camera is reading the light when you read the light and you find the light reading that you like if you want, you can lock it in by pressing down on this button and that's what the meter lock is about it's locking a meter reading in now the blue portion the anything in blue on this cameras we saw in the garbage can earlier has to do with playback and so if you're playing an image back you can zoom in and zoom out and this button here you will zoom out the button next to it is how you zoom in, so if you take a picture and you want to make sure that it is sharp, you can zoom in and magnify it quite powerfully to see if you actually got it in focus but on the very right that button is also used for selecting the focus points in the camera this camera has a nine point focusing system it's a more advanced system than the lower level rebel cameras. Some people are interested in the lower level rebel cameras and they want to know what what difference will one of the differences is that this has a better auto focus system in it they both have nine points but in the rebel systems just the center point is a cross type sensors sensor that is sensitive to both vertical and horizontal lines in this camera all nine points are cross sensors so they're very good at a variety of subjects with a variety of detail and so you can select either all nine points or you can select one individual point you can see it looking through the viewfinder or right here on the top of the camera. If I press that button we can see that we're selecting different areas by pressing that button and turning the main dial and then one of the options is of course selecting all the points for very, very general photography. Selecting all the points might be good, but you also might want to try selecting just the center point those air two of my favorite systems in there for that so there's our nine cross type points next up let's look a little bit more closely at the cluster of controls on the back of the camera first off is the information button by pressing the information button that is going to pull up information what a surprise ah variety of information and you're you can select what information is brought up in this and we'll go through a menu setting where you can customize what information you get to look at the menu section is where we get to look at a lot of the main features of the camera that you can go in and control and actually that's what the whole second half the class is about getting into that menu section there is a queue button and this is for the quick menu uh this is a way for you to quickly change the most sought after features of the camera you can see we're quit our quick menu is up right now and these are the features that most people want to get in and change on a regular basis and so we're going to get in and we're going explore that very soon over on the right hand side we have a card light and when you take a picture the camera is recording the information to the memory card that light will come on and so if you shoot a burst of pictures that light mate stay on for three, four, five or ten seconds if you're shooting video for a long period of time, it made stay on a little after you stop recording video because it's still recording the information to the memory card you want to make sure you don't turn the camera off, everyone really do any harm because the camera will stay on anyway. You don't want to take the battery out, certainly, and you certainly don't want to try to take the memory card out when that card light is on the camera's working and needs to finish that working before you make any major changes. Next up is our quick control dial we had our main dial on the top of the camera and here we have our quick control dial turns in both directions and is used for changing a variety of functions on the camera that we will use on a regular basis a cz we go in and out now when you were an aperture priority or shutter priority simply turning that dial changes thie exposure compensation it allows you to lighten or dark and a picture. And so if you want to take a picture and you want to take a darker version of it and a lighter version of it and you're an aperture value or time value, you can simply turn that back dial and you can go to the minus side or you can go to the plus side to make it darker or brighter, and you could do it up two three stops in either direction and so it's a quick and easy way to get a lighter version or a darker version. Two penny on what your needs are now write within that is a little touch pad it's called the multi directional controller, and this could be touched in any of eight different directions, and you can use this to navigate within the menu system will use it in the quick menu to navigate from rhoda row to select different features, and then, of course, within that is the sad button, and anytime you make a change and you want to enter it into the camera, you have simply press the set button down at the bottom is an unlock button. This is normally deactivated, so as you get your camera from the factory it's deactivated, there is a custom function that I will show you later on. Where if you just are the type of person that bumps this quick, control this quick control dial on the back and you're constantly bumping that you can turn it off, and that unlock button would then unlock the dial for a few seconds so that you could get in and still actually use it. And so if you're finding that you're bumping this and you're making changes that you didn't want to change you might want to take a look into that feature, and we'll go through that and it's in the custom function section next to that, we have the blue playback button. As we mentioned, anything in blue has something to do with plain and image back. And so if you want to see you an image that you have taken, that is where you would play it and so that's the controls on the back side of the camera. Next off, we're going to move over to the left hand side of the camera and to start with the most important button over here, I think is the flash button and there's a lot of things to talk about on flash. First off. Why should you use flash? Well, uh, if you use this camera at slow shutter speeds you might get a blurry picture on. This is a bad, blurry picture. Now there are a couple of options. One is you could set that s o to a higher eso so that you could get a faster shutter speed. But the problem with that is that you might have a very noisy or grainy image. The built in flash allows you to take pictures in low light conditions at low eso. And so some things to think about on flash is that flash is only good for so far, it's not good for shooting pictures of things that are very far in the distance, so you can see the penguins that are right in front are nice and fully illuminated by the flash, but the ones in back are not receiving very much light, and certainly those mountains in the background are not receiving any light. Eso be aware that if your shooting pictures with the flash subject's need to be pretty close in front of you now, obviously when it's really, really dark is when you can use flash and could be a big help, but the other time it is nice help is when you're shooting people pictures, outdoor during normal daylight, cloudy day and so here's a picture without using the flash. And then we're using a little bit of the flash to kick a little bit of light onto our subject, and so we filled in those eye sockets and added a little bit more light to the contrast on that face, and we've improved it a little bit and so it's a good thing to use anytime you're shooting people pictures outdoors and when you least expect using the flash on a sunny day. Sunny day is a horrible time to shoot portrait pictures of people because of shadows the shadow areas get to be very dark and then you lose a lot of detail now you could use that exposure compensation that we just talked about on the dial on the back of the camera toe lighten the picture up but then we have lost detail in the highlights by adding a little bit of phil flash we can simply fill the shadows with more light and achieve a better light balance over the entire frame and so using a little bit of phil flash under bright sunny skies he may look a little funny to your friends but you will be the one coming out with nice looking photographs and some more little notes on flash the camera is limited as to the shutter speeds that could be used with flash one two hundred fiftieth of a second is the top shutter speed you don't have to worry about making a mistake here because your camera won't allow you to set the wrong shutter speed with the built in flash but be aware that it won't allow you anything higher than that in general you want to be within about twelve feet with the on camera flash if you need to take pictures of things further away you khun try ah higher eso but better yet would be trying one of the more powerful well flashes that cannon makes there is something called flash exposure lock and if you are getting kind of funky exposures with with the flash there is a way to lock the flash exposure in ahead of time using the asterix button or the auto exploded the exposure lock button that we talked about before red eye reduction is in option that you can turn on and off we will go through this when we go into the menu and the custom functions of the camera the good thing about red eye reduction is that your subjects will have less red eyed that bad part about it is that your pictures are all going to be delayed about two seconds when you take a picture s oh it's a uh it's a tradeoff that you'll have to make a decision on flash exposure compensation is a way for you to lighten and darken the flash power because it's the flash power is automatic cameras figuring all that out but you can power it up and power down and I'm actually going to show you how to power it down in an upcoming section and there are many more functions that control the flash that we don't have time to get into but I will show you where you can get into controlling them in the menu system so continuing around the left side of the camera next up we have the lens mounting index this is that white dot where we nowhere to mount the camera up to and so this is an e f s lands which has a white square on it we have our little speaker system those little holes in the side of your camera suppose you might want to be careful about getting water in there and then inside our cover door that we can remove we're going to have four connections in there. We have a place to hook up in external microphone the camera receives very moderate sound if you're going to shoot video if you want to improve the quality of it you could hook up an external microphone hd my port this is for connecting up to current hd tvs. You can use the a v port to hook it up to general avie products he's also a usb port for downloading the images. And then there is a remote shutter release if you want to hook up one of the cable remote ce that I'll talk about in the accessory section on the right side of the camera not too interesting it's just simply where the memory card goes takes one sd cards will talk a little bit about the sd cards in the accessory section as well and on the front of the camera we of course have r shutter release talked already about that and right down here is the red eye reduction self timer and emphasise light and sew it does a number of jobs is basically a light that comes on number one to help reduce red eye. It will turn on for about two seconds before you take the picture. It's after you take the shutter after you press the shutter release but before the picture was actually taken, it is also used to let you know when you have the self timer activated. How soon it's going to fire? What it will do is it will blink at you about once per second, and then, when it's ready to take the picture, it'll stay steady for two seconds. It's also an emphasis light, and so it is, in essence, a little flashlight that turns on and helps illuminate your subject. Obviously, this is not good for a very long distance. It is only good for subjects that are very, very close to you, but that is something that you could turn on and off as well. We have ar e f lends mt. This takes two different types of cannon lenses, e f and f s lenses and their special mounting marks as to how to line them up to most quickly and easily mount those lenses on the cameron they're slightly different. The microphone for the camera is right off to the side. It's a convenient microphone because it's right there you don't have to do anything to make it work, but the problem is and video is that it picks up sounds of you holding the camera, zooming the land's, focusing the lens things like that and that's. Why you may wanted external microphone if you're serious about shooting video and then finally for releasing the lands is our lens release button there inside is our mir that we talked about being an slr single lens reflex that's what's reflecting the light upwards down at the bottom are our contacts, which connect up with the lens contacts and these you want to make sure they're clean and unobstructed any sort of dirt or debris depth of field preview is this little button kind of hidden around the corner side of your camera that is not labeled and it's ah it's a button that is not two important these days because we can actually just take a picture and look at the results. But depth of field preview allows us to see what the lens sees when the lens has stopped down to its taking aperture so I'll play this actually a couple times on the left is a video clip and keep your eye on this right now when you stop the lens down, it stops the aperture down to the working aperture in this case it was about f twenty two and look over into the right hand side. We got our pirates over there, and we're changing to maximum depth, the field, and you can see how more of them come in focus, and I'll do it one final time so that when the lens who stops down you can see through the lens more depth of field now the problem is, is that when the lens stops down it's allowing in less light, and so when you're looking at your pirates in this case, they're going to get darker, but they will be sharper, and you have to look for the sharpness and not be concerned about the fact they're getting darker. The camera will compensate when you actually take the picture with hopefully the right shutter speed that you have said, or that the camera's helping you set. And then finally there is a remote sensor on the side of the camera, and if you want to get one of the wireless remote ce that's available, this is what needs to see that remote and so that's the front of our camera. Now we're going to look at the lands, and I have the kit lens that is supplied with sixty d this is thie eighteen two, one thirty five f s lands from cannon on the side of it is the stabiliser on and off feet your camera has a built in stabilizer so that if your hand holding the camera it's going to help compensate for your handheld movements for general shooting, I would leave this on. If you're going to shoot on a tripod, you want to turn it off. There's, actually, problems that can occur when you have the stabilizer turned on with the camera on a tripod. So leave it on for handheld, but turn it off for use on a tripod. Right above that is the auto focus manual focus. Switch. If you want to manually focus that's, how you do it, you flip it over to manually focus, and then you can turn the focusing ring on the lands. The main zoom ring is for changing the focal length, which is in which is changing the zoom of the lands or changing your angle of view out in front, we have our manual focus. We changed it into manual focus here, and this is where we would change it on this particular lands. If you want to use other filters on this land's a uv filter, a polarizing filter, it takes a sixty seven millimeter threat. And that's what? This is threaded right here in the front of the lens for you may notice a couple of bumps on the outside of this lens and that is a bayonet mount for a hood mount from cannon I recommend using a hood with all lenses and there is a specific lens hood for this lance, talk about that in the accessory section the focal length is recorded right there as to where you are on the lens and the focal range is listed right there in the lands of as well and there is our f s linds mount that white square on go ahead, take this lens off. You can see it right there. Um I have a request from grab gabriella if you could just please if you could just go over the off button again, go backto on button again, please could you just ow the on button because there was a couple of button was the request alright, so that one more time they f on button is the button on the back of the camera where your thumb is and so I'm going to do this alive here. So if I focus on something in front of me and I used the shutter release and I press well, I have to be have the cameron autofocus, how about that? And I pressed halfway down the camera's going to focus and you can actually hear it chirp and I'll focus on a couple things another way to do that is with the back of the camera and so I'll do it over here, so maybe camera to conceive me and so if I focus so I can use my thumb to focus or I can use my forefinger now it's kind of redundant there's two buttons that do exactly the same thing and what we can do is we can turn off the focus in the shutter release button, which is a menu that we will get to and I don't want to move ahead to that right now but there's a way to turn that off that way whenever you press the shutter release button the camera's not trying to refocus what that does by turning that special custom function on is it means that you really never have to turn your lens into manual focus if you don't want to because you khun take a picture any time you want without refocusing it's a it's a handy little feature it's a bit of a more advanced feature but the auto focus on is just a secondary way at least right now to focus when we get into the menu system, then we could start customizing the camera to do something more hopefully that explains it thank you there was a question earlier from charlie j uh john, can you give us tips on how to overcome the apparent lag from shutter too two photo being captured in the lively mode in the live you mostly? Yeah. Overcoming that shutter leg is mostly focusing now if there still is a leg beyond that so one of the quickest ways is to manually focus if you put it in life, you let me go ahead and take this camera and put it in live you put it in manual exposures set a reasonable shutter speed of let's say to fiftieth of a second. Can I get a proper exposure in here? I'm gonna need to pump up the I s a little bit here a little too high there. Let's, try this and so focusing in this case actually, I haven't a manual focus. Where am I going to do auto focus? First you can see how long it takes, you know, almost took five seconds to get an exposure out of that change the esso up here a little bit more. And so if I flip this over to manual focus, I can actually zoom in with my plus minus because we can use that presuming before or after the shot, I think I need to turn stabilization on there. And now when I take a picture it's virtually instantaneous, being in manual focus nail it does take a moment for you to be able to take a second picture so it's hard to take two pictures in a row so it is not good for sports so you can get that delay down to virtually zero but getting the second shot off he's going to take some time and that's just because this camera is not designed for shooting with the live you mode in a fast manner next question pj would like to know willis still picture taken during video have the full resolution or just nineteen twenty by ten eighty the still picture during video will have the full resolution so whether you haven't said it j peg or raw which we'll get into it will be the full resolution there's a slide for that yes coming out folks and there is a related question too that jon from terra go bra uh did I hear correctly that if you shoot a still while recording video it will interrupt the video it will interrupt the video let's let's go ahead and shoot some video here a creative lives so I'm going to flip this over to the a video mode and I'm gonna zoom in and I'm focused manually because that's just the way I liketo work back off a little bit and so I'm gonna pan from the bottom to the top I'm going to start recording now I'm going to take a picture right now but I'm going to continue panning up and I will stop recording and so now when I play this back see her red light is on movie has been stopped we have a still image and we have a movie which I will go ahead and play hopefully camera to khun get this and so I'm gonna go ahead and play this movie once again and you can see that I took a still picture right in here there's a cut and it cuts to the second video as we continue upwards so it took the two video clips stitched them together but it also gave me a still image and placed it right after the movie so I could go in and have that full resolution still image or that video I'm shasta would like to know if there is a grid block grid screen option I got ten times grid screen option I love I love the great screen in there and that's one of the changes that we can make when we get into the menu section it's one of the custom functions for changing that what we see in the viewfinder so yes, you can have an electronic grid to help keep the horizon straight you khun you can see those sorts of things as well as composition it's nice to have and there's actually two options on it will you be showing that like yes? Okay when we get into the menu says we'll get into that later shasta there is a question from clay d seventy nine I'm not sure if I'd fully understand it but how configurable is otto eso auto eso is somewhat configurable yes you can you khun select and we will get into the menu when we do this exactly where and how to do it you can select in the top s so that it would use so if you don't want your camera to go up to sixty four hundred you can stop it at thirty two hundred which is a nice feature to have but I still don't like auto esso and so I would highly recommend not using it um children ninety nine would like to know if it's possible for free to talk about how to clean the sensor um is it recommended to use the home kits or is that we're sending back to the manufacturer? There is a function in the camera for doing near lockup in cleaning the censor yourself and this is something that should only be done by people who feel confident that they can do it without causing a problem it is something that can be done well the first thing that can be done is getting a bulb lower which I will talk about specifically on the accessory section where you can lock the mirror up clean the mirror housing by blowing air in here and blowing dust out of the sensor and that's something everyone khun dio beyond that then that step is to take a special I call him q tips, but they're way too fancy really be justify calling q tips and putting some alcohol solution on it and cleaning the sensor itself, rubbing the sensor clean and wiping any dust or smudge that might be on it. It can be done by anyone, but you should feel careful with small tools working on a very expensive sensor. You can send it to a local camera repair shop for cleaning, and it might cost you anywhere from twenty five to one hundred dollars, depending on what they do and how much they charge. So there are tools and accessories you khun by for that, but be careful about doing it because you can damage the camera, and there was a perhaps related question from clare of r a uh, how long does the auto sensor cleaning take when you start the camera? How long will it delay your first shot? Well, when you turn the camera on let's, go ahead and do a little test. Here we'll turn the camera off, and if we turn the camera on, we're doing going through a sensor cleaning right now took probably about two to three seconds, but if we if we do it again, turns on there and we try to take a picture, the camera will interrupt the sensor cleaning to allow you to take a picture virtually instantaneously so it's not really going to slow up the progress of anything but if you let it do its own job it'll take about two seconds and it does it both at turning it on and turning it off I'm here how to question um do slow stlede slow speed cameras focusing cameras mean that they're not good for covering weddings or for photojournalism when you say I'm not exactly sure what they're saying but slow speed cameras slow speed focusing camera okay this camera is really fast and focusing when used in the standard through the viewfinder focusing mode using the live you it would be terrible for sports photography would be very difficult for most wedding photography and so I would use it I would not be using the live you in those two types of photography because the focusing system would be slowed up quite a bit when you have this camera set to continuous focusing the fast motor drive you can shoot more than five frames per second keeping track of things and focus when you going to live you it might be one picture every two seconds so five frames per second or one picture every two seconds you decide what do you want? Okay, we have another question from wilbert cs how to clean the faa focusing screen please answer because I ended up scratching mind by trying oh my well that's a difficult one that is more of a repair shop problem see the thing that's going on in here? Well, maybe switch to the above camera is that in here we have our mir and then further up in here is our focusing screen that we don't have any access to it's really far up there and they're in traditional cameras and some cameras you could take that focusing screen out but that's not something that you can do in this camera and I don't know what you did to scratch your screen but naughty shame on you and the good thing is her this person is that it's not gonna affect the picture quality itjust effects what they see through the viewfinder because that has nothing to do with aboutthe light coming through the lens going straight back to the sensor that's just what they see so it's not gonna affect picture quality but to get that fixed you're going to need to have that sent in and have that replaced at, uh somebody who really knows what they're doing on fixing these cameras. Probably a cannon authorized repair center mr rizza, I said I'm curious as to why my little point and she could go down to the esso eighty but these awesome deals dsr dsr lars can um even though the comparison in quality seems obvious with the dsr would be better how did they get that number? She's just carrying yeah, that s o is the native sensitivity of the sensor and what it means by the fact that her point shoot goes down to a t is that it needs a little bit more light, then this camera to achieve its best quality, which is actually saying that it's probably not as good because it does that it's not necessarily meaning that it's going to be a better image because it goes lower because I s so one hundred eighty comparing them, you can't really compare them unless they're the same camera in the same sensor, and they're two completely different sensors. There could be some cameras out there with s o fifty that's much worse quality, not all eso won hundreds are the same is the first thing to go to keep in mind and there's a lot of other factors going on, but that point and shoot that's just the lowest setting on that particular camera. Back when we were talking about whether andrew kena says hi, how long can the sixty d work in low temperature? He or she is joining us from russia low temperatures. So the camera, I think, if I recall correctly, doesn't have any specific temperature ranges that it won't work under the problem is, is that the battery get sapped and you lose battery power and that's the biggest problem is just keeping power going. Everything gets really cold, and actually the camera works pretty good under cold conditions, so long as it has power. And so if you are working out in the cold, the recommended way to work is to take your battery and keep it very close to you, so keep it in a pocket next to your body as much as possible to keep that warm, you may need several batteries to depending on how long you're out there, and if that's, if you have a warm battery to power the camera, it can probably work for quite some time. And I haven't heard of anything where got so called the camera was damaged, other than the fact that if it gets, you know, fifty below or something pretty ridiculous, things might become more brittle on the camera and you could potentially, you know, break a device er a thing on the camera by not being careful with it, but the camera itself doesn't really have a minimum temperature that I've ever heard of. Um clady, seventy nine, asked if if asked if he should shoot movie mode when shooting, but I can't speak today, not sure okay question is, um in movie mode, you're shooting in pee mode right in the movie mode yours in general shooting in an automatic mode and we can actually go in and make some adjustments on that that we will see factory default is that it's automatic but we could get in and change it so we'll be getting to that later okay I'm sorry to be deferring questions but it's just more logical when we get into the menu system you'll see everything step by step just so they know that their question will be answered in the future stay tuned stay tuned folks I thought I had one more question for you oh I think we're probably beginning to this later as well, but I'll ask it for now anyway uh jesus had asked what kind of focusing mode would you recommend if shooting live music singer in a very low light situation? So this is back when we're talking about the different focusing mode right? And we talked a little bit about the different modes and there was if it's a singer on stage they're probably not running forwards and backwards too much unless their name is mick jagger, so I would probably have it on single focus to focus on where they're standing or sitting at that time and then as faras the focus points I would probably use the center point so that you could make sure that it stops on the singer and not the microphone in front of them or the bass player who steps nearby, off to the side or something like that. So you could be specific about where you're focusing. And so that is the focus point mode, which is this button here in the top right of the camera, where you can select which point you want to focus on. And I would choose the center point. And, yes, we will talk more about that as we go along.
Ratings and Reviews
Tom Reyes
I am so thankful with this class, truly happy with my investment and privileged with the things I've learned. John Greengo knows photography like the back of his hand. He's way of teaching is basically the reason I got hooked with CreativeLive. Detailed, professionally done and given the right amount of time. Like him I'm a visual learner. Rather searching for the best free tutorials in Youtube, this class actually saved me loads of more time to learn Photography. Looking forward for more classes. I feel very confident now in handling my camera and in doing photography itself. Cheers!
a Creativelive Student
Thanks John for such a great class! I have been studying photography on my own for over a year and purchased my Canon 60D when I began, and I can say with confidence that I finally feel like I now have what I have been missing....a foundation to build on! I am no longer afraid to put my camera into Manual and get shooting!! I have taken the "Photography Starter Kit" and just finished your course on the Canon 60D, and both were very well organized and incredibly informative. I am a very visual learner and love the way you teach. Thanks again for a great start, and I will be watching more of your classes! Thanks Creative Live!
Sharon J
John Greengo is a fantastic teacher. He speaks clearly and gets right to the point--no mumbling or rambling in his courses. John's slides are nothing short of amazing. The only feature of the 60D that I would have liked more info about is back-button focus and shutter-release options. Having said that, I suppose it would have taken too much time to delve into that topic. That wee niggle aside, I thought the course was worth every penny. I would highly recommend any of John's courses.
Student Work
Related Classes
Camera Guides