Lessons
Lesson Info
Tools & Materials
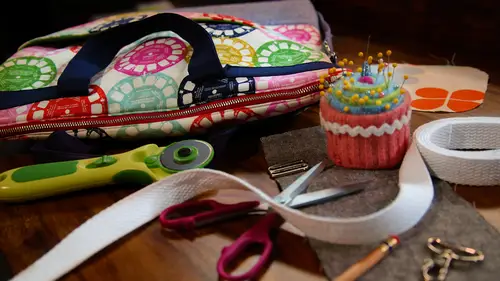
Hello, my name is bets white welcome to build your own tote interior details I'm a sewing pattern designer and author of three selling books I've been sewing since my mom taught me when I was a kid. I love making bags and sharing tips and tricks that will get you great looking results, even if you're somewhat new to sewing a bag is a great project to hone your skills in this class, we're going to learn how to customize the inside of any tote bag with pockets, zippers and other details. If you're going to make your own bag, why not add the details to make it work for you? I have three different bags examples, each with a variety of features that you can use an altar and anyway, that you'd like before we get started with customizing our interiors, I want to go over what tools we're going to need to use during the class. I'd like to have a pair of shears for cutting fabric and also a smaller pair of scissors, for we're terming threads pinking shears if you have them are really great, they...
have these little jaggi teeth and that's great for taking care of curves or getting rid of excess bulk without your seem allowances frame, then there's a rotary cutter and matt in a ruler for cutting big rectangles and, uh simple things. Some people are really great with the rotary qatar. Some people prefer shears. I use a little of both. Um also, you're going to want to make sure you have a seam ripper for mistakes or cutting holes. And then I also have this tool called all, and it has a little point and that's also great for, um, poking holes for hardware and things like that, then aspires marking tools. This is pretty standard sewing marker it's, a disappearing ink marker. And this one has two different ends. One disappears with water and the other one disappears with air. This is a chalk liner tool which has a little container of power talk inside and then a wheel. And then when you, uh, mark on darker fabrics where maybe this tool won't show up, the white chalk will show up, and then you can just dusted away and it'll be gone. This is a fricassee on penn. You could just find it at office. Supply store it's not really meant to be a sewing pen, but the marks that you make with it will disappear with the iron. So it's basically friction in heat sensitive. So that's a nice tool. Um, this tape is called wonder tape and it's a double sided tape. Where you can remove the paper backing and I like to use that to position zippers and velcro and things that are a little more challenging depend and keep in place until you so it then as faras turning tools I have um this little point turner for working out the points of corners and this is a tube turner where if you so a skinny strap you can use that toe work the strap right side out then I also either use a bodkin or safety pin, which is great for threading something through a casing like an elastic and then as far as their basic things, we have standard thread and I usually just use a universal needle sometimes a heavy duty needle if I'm stitching with denim or something that's more heavy um and we have different sorts of needles there's a top stitch needle which has a bigger eye and there's a stubble needle, which is great for doing parallel lines of stitching. Then of course we're going to be installing a zipper, so I have a zipper foot for my machine and we're gonna have some hardware like this little snap hook for one of our features half inch elastic and some velcro take measures always a good idea pins painter's tape this great for marking the base of your sewing machine to kind of remind you of where your seem allowances and then this farce pressing goes. I have a press cloth, which I'd like to just use scrap of cotton, quote, wait, fabric. And then I like to use a spray bottle. Um, it works, justus well, if not better, than having esteem in your iron. And then there's also spray starch, which is great for just having a nice, crisp finish.
Class Materials
Bonus Materials with Purchase
Ratings and Reviews
Liz Hanes
I loved this class! Betz is very relatable and she explains what she is doing and why she is doing it! I think that it's really important to know why something is done the way it is. I think anyone who is considering bag making or wants to improve their bag making skills should take this class! Thanks for offering it and thanks to Betz for teaching it
Judi Nicholes
I love this Build Your Own Tote bundle and the totes she makes. I am in the process of making them all! Her instructions are excellent and as a result, my totes have turned out great!
Christine See
Excellent course! Explains, in detail, many techniques for sewing bags. This includes different types of pockets (inside and exterior), adding hardware, etc. Very thorough explanations with up close shots of how it all goes together. A great class to learn how to make your bags look professional!