Assembling the Boutonniere
Lesson 5 from: Boutonnieres & Attendant BouquetsFullosophie, Christina Stembel, Rhiannon Smith
Assembling the Boutonniere
Lesson 5 from: Boutonnieres & Attendant BouquetsFullosophie, Christina Stembel, Rhiannon Smith
Lessons
Lesson Info
Assembling the Boutonniere
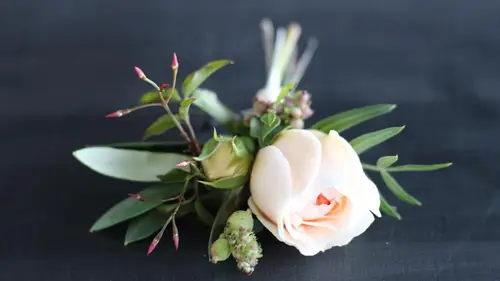
All right, I'm gonna take it away and show you how to a symbol a boo near s o the first thing to think about with here boot near isr what types of materials you need so when I'm building a bit near, I'm pretty much looking for three types of materials. I need my focal flowers, of course. So in this case, I have this beautiful gardenia I wish you could smell, uh, this gardenia smell so great, and then I have a little ridiculous, but to also add a little focal, but I'm always looking for some type of foliage. Tio be the backing for my boat near so in this case, I have this all live in this other little bit of of ruskin's greenery, and then I'm looking for a little bit of filler material. I love using berries. I have these little jasmine buds also, just to give it a little visual interest. So that's an example of how I pick out the materials and I'm going to do an entirely different one today and show you howto wire the flowers but the same concept. I have some greens here I'm using cem r...
osemary so that's my foliage and then my focal flower here is this beautiful rose this helios rose on dh, then I have some other little buds this is called pretty in pink it's ah related to pro dea s so we're going to use that as a little visual interest too um and then the first thing that I'm going to do is process and prep all of my materials so like we covered earlier removing all of these bits of greens and stuff that will block up your food near on dh then I'm also gonna wire all of my focal flowers that are going to be using and this is really important so that the, um boot near doesn't just break off. So all of these flowers in here and this one that I've made have floral tape and wire in them, so I don't have to worry about the heads breaking off you can see I'm pulling this and it's not going anywhere because it has a wire in it and it actually helps that lets you adjust the boot in here a little bit so that way you don't have to worry about it too much. So I'm going to start with a piece of my floral wire and there's a couple of different ways that you do this um with roses or anything that has a really fix tim, the best thing to do is what's called piercing through the stem, so I'm going to pierce through this time with the wire until it comes out on the other side so it's probably hard to see perpendicular than to this to the stem itself exactly yet perpendicular, and then I'm gonna bend the wire down, and then I'm going to keep the wire in place so that it doesn't just pull through the stem with just a little bit of floral tape. Now a lot of florists like to use the floral tape all the way down the stem, and that certainly has benefits. It will lock in more moisture if you're making the boot near a couple of days of in advance, but I personally prefer to show off the natural stem, so I like to leave the stem exposed and use just a really small amount of floral tape just to kind of cover that wire and keep it in place. So that's an example of how that's wired in place and then another method for wiring your flowers. It's what's called the shepherd's hook, so I'll show you a sample of that with a little ridiculous bud, you could break it off. And so when you're making your boneyard, this is a great opportunity to use up any flower bits that might have broken in your time of transporting him home or something you really don't need much to make a boot near so just a couple of dollars worth of flowers on dso for this method, I'm actually going to stab through the flower and basically make a shepherd's hook once I get kind of closer to through the flower so bended over like a little shepherd's hook and then you put that back into the flour and then again we're going to take a little bit of that stretched floral tape in raffa around the stem try to get it in the center of the but as well yeah, definitely and then you ripped that off and then you can see so I've wired that it's nice and securing in place so I got that ready and then I'm gonna trim these and you can if you have wire cutters use them if not, you know, you can definitely make do with your scissors on dh now before a why are all of the bouquet together? I'm just going to kind of place it and make sure it's how I want it and so then I got my little bit of filler so what the filler material is you don't really have to wire those it's just your main flowers like anything that you're really worried about, like if it were to break off and then you're boom years going to look terrible. Those were the things that you really want a wire through tio just secure everything so that actually looks like you kind of just put it all together very quickly like, what are you thinking about when you're actually placing all these flowers together that's a great question so I always put the foliage at the back because basically I want to protect the flowers so that when they're on the person shirt or suit jacket on that the flowers they're gonna have a backing and be protected and then I usually so I do have a little method to my madness so I usually like to put the smaller fires at the top and then have the biggest flowers towards the bottom of the arrangement tow add the most like weight to the bottom of it it just feels a little more balance that way if you have the biggest things at the bottom and I think of it uh triangle yeah definitely when you're when you're doing it you want to be bottom heavy basically it's like that in almost everything with flower arranging if you it's too top heavy it's just gonna look disproportionate yep and then as you're putting it together kind of play with it I mean it doesn't it's not set in stone adjust the flowers raised the heights and then once you have it to where you like it you're going to take one more piece of wire and just clutch it around the booty near so I'm literally just taking this piece of wire wrapping it around I like to do it three times so it's nice and secure I'm going to bring that wire back down and then I'm going to take another piece of my floral tape to just kind of secure and hide that wire on dh then I'll give it another cut stretching the tape and then I'll be covering all of this tape with a ribbon at the end again some florists like tio wrapped the tape all the way down that's just a matter of personal preference again I like the look of natural you know very kind of garden fresh from the garden feel so I'm just going toe leave those stems exposed also leave the wires exposed to because I just have a few pieces of wire and they're so it shouldn't be too bad and then I'm going to cut this all of the same length try to cut it flush so it looks nice and uniform there we go s o then the last step for the booty near is going to be to put the ribbon around that so that it just polishes the booty near nice um so I have two different types of ruben that I'm going to use them this one today um the first thing I'm going to use is this really pretty velvet ribbon and I'm just going to use that to hide all of the floral tape and show you how that is done get some of this stuff out of the way and you probably don't want to cut it an inch to an inch and a half below the bottom but yeah, our rose and and a half longer than that yeah, we've plenty of room you can always cut shorter later so air on the side, you know, leave it longer at first and you can always cut it shorter if you need it's hard, hard to go the other way around. So I'm going to get my glue dots ready for the ribbon and I like to cut these in half just so that it doesn't like make it too bulky because these things can get kind of thick, so I usually cut these little pieces in half, and I'm just going to use a few to put this ribbon on. And so the first thing I do is peel off one of these house of the glue dot, and then I'm going to put it on the back of the ribbon and then peel off the other side of this, uh, sticky paper and then I'm going toe make contacted the very back of the boot near so that you can't see this seem so that's. The idea is that you want to hide the scenes. I mean, when we get into the bridal bouquet, I even take it a step further to kind of finish the seams, but the boot near since it faces the back, I don't have to worry about it too much so when I wrap it all the way around, have wrapped it around twice, toe hide all of that tape, and they came down just a teeny bit lower on the second time to hide all of that tape, and I'm gonna cut, basically making sure him at the back of the boom years so that you don't see, like, a funky seem, um on the front of it. So I want to make sure that that is on the very back, and I just cut it carefully, okay? And then I'm going toe put this back down to keep it in place with another little glue dot on the inside, pick off any little frame bits and then that'll keep that part nice and in place, and then the last step is I'm just going to make a little not with this thinner ribbon to kind of finish it, but also holds the first ribbon in place keeps it nice and secure so you could do a bow if you want it's just a matter of personal preference. Um, I like to just keep it simple on dh make it look as unfussy, it's possible, but again, just a matter of personal preference, and I'm just going to tie a knot twice so that the nut doesn't go anywhere and then cut this I try to cut the ribbon at an angle again just you know, so it looks a little more polished and finished so I cut it a nice angle, cut both sides and again feel free leave it longer at first so that you can always go back and cut it shorter if you need tio but then that's all there is to it then you have a nice finished completed boot near on dh then I'm going to ask christine and help me pin this on so we can show you just before you do that I have you have a question so you know when you're doing this if your if your bride that wants to do more than one you have multiple attendant how would you how do you approach doing? You know, five at a time that's a great question so why're everything first, so always process and prepare all of your materials first um so that way you know you have enough, so you're going to think about well, I need this much foliage and I need one rose one rin oculus and one of these blushing brides in each boot near so make sure you lay out the materials for each boot near first why are all of your flowers first you might break one it's better to know then that you have it all ready and prepared on dh then I typically trying to make the groom one a little bigger and add an extra flowers, something there again that's a matter of personal preference, you can use more flowers or less flowers in this certainly saying much bigger boot nears so that's just a matter of personal preference. So good question and you see how it takes both of your hands while you're doing it. So if you had to, like, stop and you're trying to, like, hold this the same time and cut a new bud and wire new but it's very difficult certainly can be done, and then I have I usually I have white pins and black pin, so it's just depending on what the person's wearing and what's going toe, uh, match better with what they're wearing, so try to get these out of hand, okay? So if you add more flowers, you may have any more than two pens, you know, if it's really, really bulky, so that's here and I'm gonna pin it right where its heaviest so you can see its heaviest, obviously right here. So I'm dependent right behind that without stabbing myself. Hopefully, um so when your opinion that you wanna pin it so you don't see it, you're going to try to make it so you can't see it, um I've been the first one like I said right where it was heaviest you can see it's hidden right buying the rose you're going to go into her sweater or into the suit jacket first, then take it into the back of the boat near go try to get as much of the boot near in the pin as you can before going to the other side and going into the sweater and back out of sweaters so you're not poking her, which should be I think the other one I'm gonna put behind the ribbon can't even think what it's called behind the ribbon maybe the same thing into the sweater into the ribbon of this one's hard to managing may break some, but I'd like to do it here just cause it makes it really secure but she has a lot of tape on this one area yeah try to avoid putting the pin like where the tape is yeah we're the glue that we got is that yeah it's hard to go through that take another one yeah, you can see the glued a at the end of it right here that's gonna make it really difficult and try to take it away from their body and injured you I probably should have mentioned that too when you're tryingto tio someone ok there we go and I got the ribbon without the blue dot it's just great but so this when you saw because it's so narrow you can see the pen so I'm gonna go upwards so you can't see it and there you go. All right, now I'm nice and festive to make my bouquet like you do them a day or two ahead of time great question so to transport them over here if you're stem is long enough, I literally just put this in a couple of water overnight I made this yesterday so that will do it, but another thing that we do because we're delivering by bike messenger and that would get really messy see slosh around town on a bike, we put it in a little plastic baggie and then we breathe in the bag and what that does that like puts condensation in the bag and then you tie it off and then that little bit of condensation you could also put like a little wet piece of cotton ball or paper towel, but that little condensation you're basically making a little hothouse for it that's enough to keep it moist enough for, you know, definitely a couple of hours out of water or something. So good question some overnight some people but it then in the refrigerator um and that keeps it fresh overnight as well that way when you're selecting one other quick thing when you're selecting flowers for your boot near umm sometimes just don't work for boot near some are for a myriad of reasons so some are just too big um I had to make a sunflower mounir once it was the hardest thing I've ever done in my life I had to go find that tiniest sunflower could find without it just being a bud but they're just they're too big to make a good bit near so you're looking for petite flowers they're small in size and then also you're looking for flowers that can let live without water for a longer time so um like veronica I've seen people use veronica because you know it's a beautiful flower but it has about the staying power fifteen minutes outside of water so it's not a good choice for boot near so you can google it find out good boat near flowers are ones you know how they dio outside of water but you're looking for hardier flowers roses are actually pretty hard even though they look delicate so that's my roses air used so often spray roses can last forever so people will oftentimes use like a butt of a spray rose and it you also see that in floral crowns before that reason because it lasts a long time outside of water but you're not going to want the really delicate delicate flowers that are just going to die really quick to have any other ideas of the ones that diet really quick people want sometimes I'm well, I mean, we pretty much use roses for any personals that that's what they're called in industry. Anytime you make a booty near or bridal or attendant bouquet, they calm personals, but pretty much for any personal we make. We're typically using roses because they're really hardy flower that you don't have to worry too much about. So if you can find roses, that's a pretty good place to start. Yes, something like once it look a little bit more natural anyway, and want succulence, or just ones with the econ, atia or the pots and things like that, and those will last for days, you could make them, you know, we go ahead and it's still be fine, so but just be careful. The wind you get because you don't want all the pictures, just total drooping, but on them, definitely.
Class Materials
bonus material with purchase
Ratings and Reviews
Student Work
Related Classes
Floral Arranging