Lessons
Class Introduction
01:02 2Understanding the Night Sky
08:18 3Planning Your Shoot
03:05 4Scouting Your Location
08:47 5Gear Essentials
08:44 6Camera Settings
08:51 7Astro Landscape Composition
08:50 8Light Painting
01:28Time Lapse
13:25 10Photographing the Moon
05:30 11Photographing the Aurora
04:05 12Photographing Meteor Showers
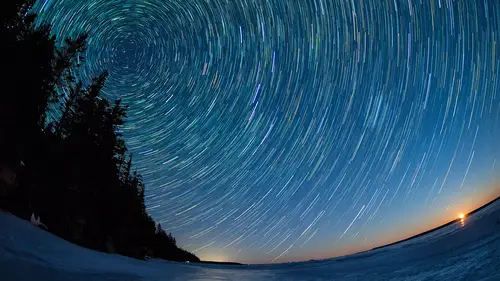
04:08 13Star Trails
07:04 14Capturing Panoramas
03:50 15Shooting Multiple Images for Stacking
05:36 16Getting Creative
04:56 17Post-Processing - Astro Landscape
06:23 18Post-Processing - Stacking
10:22 19Post-Processing - Light Painting
06:22 20Post-Processing - Cloudy Skies
11:59Lesson Info
Time Lapse
Once I'm out in the field shooting at night everything seems to slow down and I'd like to be able spend as much time out there as possible. And one of the things that I love to do is to actually capture a whole series of images over several hours and then create a movie out of them afterwards, a time lapse. And, so, I would start that process in the same way that I would just take a regular shot. So I'm using the same kinds of settings for a regular astro shot and once I'm happy with that composition and I feel that I'm gonna get some interesting movement of the milky way or other stars in the sky or the aurora I'll initiate a time lapse sequence. So with the Olympus cameras we've got a built-in intervalometer that will allow me to shoot a whole series of photographs at whatever interval I'd like whatever delay time I'd like and so on. If you're using a camera that doesn't have that, there are intervalometers that you can buy that work quite well. But it is nice to have one built-in to...
the camera. First decision I have to make is, well, How long do I want to shoot? How many shots do I want to take? Considering each image is at least a fifteen second exposure usually maybe 20, 25 seconds depending on the lens you're using. That's going to mean I don't necessarily need as many shots as if I were doing a time lapse during the day. But I'm usually setting it up for, you know, five, six hundred. Once I've determined how many shots, so let's say I chose 600, how do long do I want to wait before that first shot is taken. I can wait one second or I can wait 24 hours once I press that shutter release. Because I'm already out there my delay is pretty short I might build in a two second delay if I'm not using a cable release and then it begins shooting. So now I've got, lets say 600 shots it's delayed by two seconds before it begins. The next decision you have to make, is well how much time is going to elapse between each shot. Well, we want to capture as much much movement as possible so we want to make that interval as short as possible, one second will do it. So there's a one second delay in between each shot. One of the decisions that you have to make though with a time lapse is whether or not you want to want to keep noise reduction on or turn it off because with noise reduction on a 20 second exposure is going to double the length of time and suddenly you're at 40 seconds. So there will be 20 second gaps in between all of your images. Now, with some of the time lapse videos that I've shot, that's fine. There is still enough fluid movement of the night sky that you don't really notice that there is a gap in between each. If you turn noise reduction off then you have to take and apply noise reduction in post to all of those. Let's say you shot a dark frame at the end you would have to apply that dark frame setting and subtract that noise to every single image. That's a lot of extra work. And I've had really good results by leaving noise reduction on. Once those three, four hours are done, well, now you've got to actually build the time lapse at home, in post on your computer. I upload all of those images. Then, I'll go into Lightroom apply whatever changes I want to one of those images. I don't usually with one at the beginning or at the end of the time lapse. I'll find a nice image, somewhere in the center of that sequence and I'll work on creating the best image that I possibly can with Lightroom. Once that's done, I can apply all of those settings to all of the rest. So it's really easy to do. I can sync those settings to the other three, 400 shots and now those images are ready to be exported. Once I've got all of those exported, I'm going to bring them into the Olympus software. The Olympus Workspace works beautifully. I bring all those in there and now I'm ready to build the movie. And, so, Workspace allows me to determine what my playback rate is and if I'm going to fade in or fade out a scene. It's a fairly simple program but it's robust enough that you can create a nice time lapse video clip out of it. And most videos are being played back at 24 frames a second, 25 frames. It depends on, you know, just how quickly I want that movement to happen. I've gone down as low as 12 frames per second. But usually I'm at around or 24 frames per second in my playback. That exports as a movie file and then I can either just leave it like that or I can bring it into another piece of software and add special effects or a soundtrack add some text if I would like. And for me, I like to keep to keep it simple. I've got iMovie on my Mac. That's what I use. So, if you're out there and you're enjoying the night sky anyway try shooting some time lapse shots. One of the things that I'd actually, will often do is I'll set up two cameras with two different lenses and I'm getting slightly different perspectives and let's face it, if I've got camera that suddenly has a battery die on me or the card is corrupt I'm not wasting all of that time because I've now got a back up. So I'm always shooting with two cameras. I happen to live in an area where I can set up a camera and go home and actually get some sleep while this is running. I'm not worrying about anybody taking my gear but they're fun to create and definitely fun to watch. So give it a try. Like in every night sky shot, pre-planning is really important for time lapse shooting. So, I got here early enough that I could still see the features out here in Joshua Tree. And so I set up two cameras. I've got this one that I'm considering sort of my main camera and then about 50 feet over to my right I've set up a second camera with a different lens. So I've got the seven to 14 nice wide angle lens here f/2.8 is the widest aperture and I've got the E-M1 Mark II next door with the 12 millimeter on it. Sometimes people ask, well why would you use two? Well, for a couple reasons. Number one, if I'm going to commit to a two or three hour time lapse sequence I want to make sure that I've got a back up. I don't want a battery fail, a card to fail, and then have nothing in reserve and so that's why I set up two. And the other thing is, it's kind of nice to have a totally different perspective when I take the collection of photos from this camera and the collection of photos from the other camera I can put them together and not only do I have a slightly different vantage point but I've also got a different focal length field of view that will allow me to create a more interesting end product. So let's go over the camera setting that you would use for a time lapse and go through some of the menu items. All right, so we're just finishing up the astronomical twilight there's still a little bit of daytime glow left out on the horizon but I think we're getting pretty close to the types of settings that I think will get us through a time lapse sequence. My initial settings would likely be exactly what I would do for just a single shot because I can take any of these images later and just use them as a single shot if I want. So if I go to the super control panel here... All right. I've toned down the ISO a little bit often at night I shoot at ISO 32 hundred but we are going to fair amount of light reflecting off of those clouds and therefore I don't need as high an ISO I've still got a custom white balance of 36 hundred, in this case. I like the range between 34 and 38 hundred Kelvin. Shooting in RAW. And got my manual focus I'd already done the pre-focusing and I did that while it was still a little bit of light out 'cause there aren't as many stars to actually lock focus on and now lets go through the process of setting up the time lapse Hit menu. Time lapse features are in camera one. There's the icons for setting up time lapse. Click OK there. Go to interval shooting time lapse. Turn that on. Go aver again. And these are all various settings that you can use. The Olympus line of cameras has a built-in intervalometer, which is really nice. If you're not shooting with that you can buy another intervalometer that you can hook up to the camera and it will do all of the same kinds of things. But I have control over how many frames I can shoot. At the moment I've got it set for nine from an earlier shooting scenario that I was running. Then I'm gonna move over here and I can go anywhere from one to 999. I'm gonna start my setting that to 600. Now, I don't know that run a full but, you know if I were doing this for several hours I might use several hundred shots. I'll make it an even 600 here. We'll click OK. All right. Now the neat thing here is the information screen at the bottom will tell me when it will start and when it will end and so you can see with 600 shots at the moment I would be starting at 11 o'clock tonight and finishing at five AM tomorrow morning So that's six hours of shooting. So I don't need that based on the settings. I've got a start time of five seconds I can change that to anywhere from one second to 24 hours I'm gonna put it down to two just so that if there were any camera shake I can just kind of step away from the camera and an interval length again I can go from a one second interval up to 24 hours per shot I want the minimal amount as possible. One second. I'm gonna leave it like that. If I would like to I can have the camera build a movie for me. If I don't want to be doing any of the post processing and then assembling all of those images into a video on my computer, I can have the camera do it right for me. So I could go time lapse movie and turn that on. And then it'll tell you here that based on these settings it will create a movie of exactly one minute. So it's gonna compress six hours of shooting into a one minute video And we'll definitely be able to see lots of cool movement in there. And I can also change my movie settings as to what resolution and what my frame rate of playback is going to be. Again, I've got lots of control here. I'm gonna go back to that because I do like full control I don't really need the camera to make the movie for me. If it does, while it's building that movie I can't use any other features and sometimes building the movie can take several minutes. And so I'm gonna turn that off but it is easy to access and easy to create. So there we go. I've got 600 frames, start time of two seconds, an interval length of one second I think we can start the process. So I'm gonna set OK. I just continue clicking OK until I've kind of worked my way back out of the menu. Once I press the shutter release half way down on the screen it gives me an icon that clearly indicates that now I'm in time lapse shooting mode and its got a nice little count down meter here. And I can keep checking on this to see how many shots are left in the sequence. All right. So let's get this camera rollin' And then I can get the other camera started as well. So here comes the two second delay. Here comes our first shot. I checked exposure prior to us starting so I'm not going to see a final exposure for each shot here after it works through noise reduction. Now, I typically leave noise reduction on for my time lapse because my exposure is short enough that when it plays back you're not gonna notice huge gaps in between each image if you want no time in between or just that one single second in between you can turn noise reduction off but you will get a noisier image and you would have to resolve that in post.
Ratings and Reviews
Lana Froemming
I purchased the Creative Live + Olympus Step Outside Conference Bundle some time ago, and it has taken me this long (too long) to view the astrophotography class. Although not a beginner, I have been using Olympus gear (EPL5 & EM1) for about 7 years now, I have only dabbled in astrophotography – and as a result, blown my fair share of what should have been killer shots. When I did give it a go, I obtained most of my settings’ tips by combing through Peter’s blog posts and then racing out the door. Although I feel that I know my camera pretty well I still learned so much from this course. I appreciate that he walked the viewer through multiple night time photography events including shooting the milky way, the moon, aurora, meteor showers & star trails as well as talked about the different camera features including night sky panoramas, in-camera multiple exposures, live comp & time lapse and presented a variety of lens choices and why (plus so much more). What I love about Creative Live is that once you purchase a “class” you own it and can return to your classroom over, and over again. I also appreciate that they work with experts who are also amazing teachers. Peter is one of those.
Doug Marshall
Some classes are just fantastic and this is one of them! Peter Baumgarten is a wonderful presenter of his extensive knowledge, experience and passion for the subject. This is a course I will return to watch again and again. Highly recommended if you are like me and are interested in getting into astrophotography and landscape.
elizabeth chambers
To my way of thinking this was the best photographic genre instructor featured during the Olympus Step Outside series. He may be a more seasoned instructor than the photographers demonstrating landscape and bird photography. Whatever the reason, I thought he seemed to understand his audience particularly well. Great advice and the post processing was interesting. Likely because of my familiarity with Lightroom, I found the post production done by the bird and landscape photographers rather mundane whereas the astro photography post production was new and interesting to me.