Lesson Info
6. Using Puppet Warp on Type
Lessons
Lesson Info
Using Puppet Warp on Type
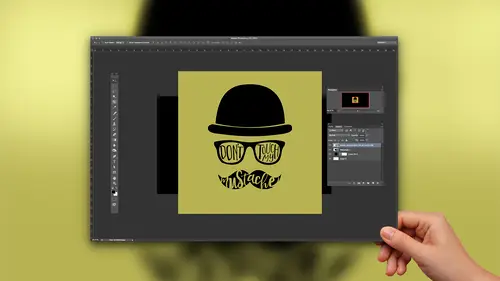
All right, so once I'm happy with that, that is looking pretty good, but I still want to be able to warp it just a little. Now, public work is different than warp warp. Um oh, let me show you a quick example of warp warp just because we can Eso hears the word turning. If I get my type tool on, I have the Kern ing layer active. I can come up here and there's this warp right here. So if I click on that, you can do all kinds of really silly warping like bold and you can, you know, bend your type and you can bold it or you can bold it negatively. You can do like twist. It's kind of fun, like silly looking stuff. But, um, that's not what we're gonna do here. That's just warping. So we're not doing that, But that's what this is. We're gonna go back, and we're gonna do puppet warping, which is, like, way better. But in order for that to work, this needs to be a smart object. In order for this to work the way that I want to use it, we have our shape, but we need to make it a smart object. So I...
'm going to right click once again. And this time I will choose convert to smart object. And now that that's done, we can come to the edit menu and we can choose Puppet Warp. Ah, Now this is how this works. So it works by pinning things, and then you can grab them. So if I want to pull, for example, the bottom of this M if I want to stretch it downwards, I'm gonna pin it at the top. So it stays just like just like in real life. When you're stretching things, you have to have resistance. So I'm gonna pin it at the top so I can then pull. Then I'm gonna come down here and click and drag, and I can pull this m just how I want it. Then I'll move over to the U I'm going to click and click. Then I can go back and forth and stretch this up and I can come drag this one and stretch it down. I'll click over here and you'll notice it's, you know, melting everything with it. Anything that it's touching. Any letters that are overlapping they become, I guess like one unit. So I'm just clicking Teoh, push and poll all of the text around, so I'm going to grab this T. But if you've seen like I got inspired for this, I saw some stuff, you know, Pinterest have all kinds of fun type things. And I saw something in my instagram other day when I was prepping for this course of some really fun type. It was like some drawing, and then the type was in it and, you know, took on the shape and it's all distorted and stuff. So unless you're gonna hand letter the type yourself, which is awesome in its own way, but that takes a lot of skill and practice and everything. So unless I was going to go do that, I thought, let me show you guys how we can do it in photo shop with the puppet warp. I'm gonna leave that for a minute. Ill brewed this over, so I'm just clicking Teoh anchor things down. So then I can pull them and will stretch this. Let's go over here with it. It's just going to kind of go off and then I'm gonna grab this H and I want to connect it so we'll do that. Maybe I want to move this over a little bit and maybe I want to move that. This is where, uh, my perfectionism gives the best of me. Okay, let's pretend we love it. I will accept it off. Um, okay, but now we're going to reverse it out of the mustache. So right now we have a black mustache with white letters on top of it. What I would rather have is a mustache that basically have holes through it. Where The Texas. So we want to basically cut out the mustache, cut the letter shapes out of the moustache. That is a case where we could have maybe sort of used the, um, horizontal type mask tool. But what you get when you use this tool, let me not have it. There we go. What you get is, um, crazy dingbats. Let's do it in the same font for comparison. What is it called? Happy sunshine? No. Hello, sunshine regular. Um, So what? You get all make it bigger. Issue can see. Once you commit it, you get marching ants in the shape of letters. So That's nice, because you can use it to create a mask. However, how would we now puppet warp Fifth and you can't You can edit it as much because it's not vector. I mean, it's empty. It's just marching ants in the shape. But then the other thing is, once you're done with it, once you've made your mask, you can't really edit it either. You can't go back because it's gone. It's just was ants. So even for these tools, I don't even use them. I would still just use what we did. And now we can turn this into marching ants by command, clicking on this layer. This is the mustache text layer. So I'm going to command or control. Click right on the thumbnail, and it loads it as marching ants. And now I don't even need this layer anymore. I'm gonna get rid of it, and I'll go down now to the mustache itself down here. And instead of just adding a mask which would do this, which is actually still pretty cool. But instead I want the reverse. So I'm gonna hold all or option and click the mask. And now it knocks those letters out of the mustache. How fun is that? Right. So I will all spare you from redoing all of this. We can just add my don't touch my, uh and don't will turn that on. There we go. Um, so I won't create these for you here to save some time. But then I added this text the same way. So I added the text. I converted it to a shape. I manipulated it with the selection tool. Then I converted it to a smart object. And then I puppet worked it so that it looks, you know, really hand drawn and on, and it fit within the space that I needed it to. And there you have it. So that whole design was done with type.
Class Materials
Bonus Materials with Purchase
Ratings and Reviews
Monica
I loved this so much. It's short and sweet and gave me exactly the information I was looking for. I wanted to start designing printables for my Etsy shop and didn't know I could do what I wanted to do in photoshop (which I already had as a photographer) and I was so happy to find out I don't need to upgrade my Creative Cloud subscription.
Shelley Messersmith
Kahra does an excellent job of conveying what could be boring material by using real life teaching. I learned so much and the course instilled a desire to use the techniques and learn more about typography. Thanks for the great lessons and the enjoyable course!
Amanda Zarifah Photography
Watched the live broadcast of this course during Photoshop Week 2016 and am really happy that I did. I learned a lot of new tricks with type in Photoshop and really appreciated Khara's teaching style. Thanks for offering this!