Lessons
Lesson Info
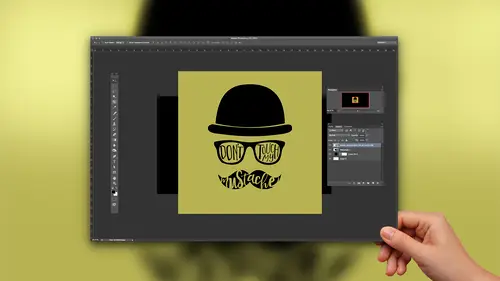
Designing with Dingbats
Let's do another design this time with Ding bats, and we're going to take it to another level. And we're going to talk about Puppet Warp for our type. And I'm going to show you how you can take a glitch or dingbat. And if you want to edit it also, you had edit. So talk about unlocking potential me. Now you can just customize it even more. Oh, did it again. Okay, uh, here's what. We're gonna make this fund graphic. Don't touch my mustache. Bonus points If anyone in here or on the Internet knows what this phrase is used for. I forget. It's like a memory device for something. So if anyone at home knows, you get bonus points, so figure it out while we work. But don't miss what we're talking about. That's hard. Okay. By the course, I guess. Okay, So this is what we're gonna create. We're going to start with that mustache. So this is actually the sponte that all these little ding bats are from. This is a freebie. Um, and I linked to it as well in the bonus materials. It's called Hit. I think...
it's a free me. I don't want to speak, but I think it is. Can't type so sorry. Lots of scrolling Adobe Get on that, Um, it's called hipster icons. I think I got it from de font dot com. So yeah, it's great. So we see all these little icons. There's lots of mustache is, of course, are very hip right now. So I forget which mustache I was using. But I think we can take an approximate guess. I want to say this will be the front. So I'm just gonna make click to make my type and then double click. Teoh put this out there on. Of course, that is smaller than I would like. That's OK. We'll do all that stuff later. Right now, I'm just gonna dump all the little glitz out, and then we'll style um, and make him how we want. But that'll just save a little time. And also, when you are working with text, sometimes people get tempted. You know, they're trying to create some cool design piece and they start typing, and it's not the font they want and they go Oh, and then they like, delete it and they try to pick the font before they've got the text, and I think that's really hard and sort of backwards. So what I always tell people is get it out there first and then style it, then crafted, then adjust the letting and change the color and fix the fund in the spacing and all that. But get it out there first. So I'm going to practice what I preach, and that's what we're gonna do. But I want these all on separate layers. So I am going to commit that. Then I'll make another one over here. We also want a pair of glasses, these ones right here. I'm going to double click to get those, and we also want ah ah, hat. And when I looked through this, there's like all these different hats, but they were not what I wanted. Um, like, see this hat right here? If I make these bigger, maybe can see. And now I have to take up my whole screen with the cliff panel. So some of the like this hat is great, but it's not at the right perspective for what I want, so that's not gonna work. So if I scroll back at some point here Hopefully, I can see both on camera. There is a another glitch that have the hat that I want this guy. But it also brings a beard and a different mustache and different glasses. And I could have just used this, I guess. But I like I like to be difficult, I suppose. And I wanted a different pair of glasses and a different mustache. So I'm gonna you this, But we're gonna pick it apart and edit it. Okay, so this is pretty good. So far less organized are mustache first. So I'll grab my move, tool, and I'm gonna commander Control, click on the mustache, Teoh, make it active and I'll make it black with alter Option the wheat. And I'll scale it to the size I want by command or control T and shift dragging from a corner. And I'm just eyeballing this. It's all subject to change. That looks pretty good and will repeat now for the glasses. Eso all I still have the move tool all Commander Control. Click the glasses to select that in the layers panel because clearly this is not very discernible. I guess if I was really gonna worry about it, I could rename these. Now I know this is glasses. I can double click and type glasses, and now we'll know we'll make that black as well. Alter option delete and commander Control T shift drag. Now I have to wonder what size glasses goes with that size mustache. Does that look right? I'm trying to imagine a nose in there. Probably about like that. I don't know. I'm gonna roll with that. That looks good. And I'm gonna hide these momentarily. This is our mustache that makes this our hat. I'm gonna hide those so I can work on this guy, and I'm gonna scale it up first. So command or control teeth and shift dragging so we can see what we've got. And then all press enter or click the check Mark two committed. So I don't like you can see why. Didn't want these glasses, right? Or the beard or this mustache? Not as fun. So, um, I want just the hat, but I want to maintain the vector nous. So if I converted this to pixel by right clicking and choosing rast arise type that would take the type and just melt it down into pixels So let's just do that. You'll notice the tea is now gone. Now we just have pixel. So that means I could pick up their race or tool. And I could just erase everything groups carefully. Right when you got to be careful, we gotta use a hard brush. Or I guess I could make a selection. Uh, that's gonna have to be carefully drawn. Either way, it's kind of pain in the butt, but I could erase these things and be left with that. But then I'm also left with just pixels and not vector information. So I'm gonna I'm gonna back out of that to back out of stuff. You probably figured out, Commander Control V right to back out of multiple things. You add the salt or the option key, Um, And then to go forward, you let go of the altar option key, and you trade it for shift. Or you can use the history panel a little bonus tip for you. All right. What we want instead is to keep the vector, and we're gonna do that by converting this to a shape object to shape. So I'm going to right click on the hat layer in the layers panel just on the bar. Not the tea, but just on the blue area here, going to right click and I'm gonna choose Convert to shape. Yeah, And now that this is a shape, you'll notice the tea's gone. But it does have this little icon here that lets me know it's still vector information. So basically a path still, but it's easier to edit at the shape than it is as a path. So edit it. Now. I come over to my, um, to a bar, and I want Actually, there's two arrows here, the path selection tool and the direct selection tool. And I believe I want the direct selection tool in this case. So that's the white one. And with it, I'm gonna click and drag to. This is called Marquis selecting. So I'm dragging a marquee around the things I don't want. So the glasses, the mustache and the beard, and now they get selected, and I can see that they're selected because they have all the annoying little dots around them for the path. But these dots are dark and the winds are light. You see that they're either full and these are hollow, I guess the anchor points. So that tells me that this part selected and I could just hit, delete and it's gone and it's still vector so nice for us on. And then I can just select a different tool and I'm done with that now. So perfect. Now we still have our vector hat. It needs to be black, so we'll do that. So again, ult option delete. Because I already have black here. So that's so much handier. You can see that much handier than going up and changing it, getting the type tool in all of that. Okay, so now let's put this together way got to move our glasses and our mustache down and clearly are has a little too small. So, Commander Control T and probably these can be made a little smaller. The good thing is that this is all going to be creditable forever because it's vector. Okay, now we're ready to add our type, although this whole thing is type. But now we're ready to add actual letters. So we're going to start with the word mustache down here and we'll zoom in so you can see so impressing Command space bar, which lets me to click and drag so I can zoom in. And then I can hold space bar and drag to reposition within my frame. And it's it's really handy to do that. You can also use Commander Control plus or minus Teoh. Scooch the very technical term. Scooch in or out. So I do. I use them really in combination. Sometimes I click and drag. And then it wasn't quite scooch it enough, so that all scoot more. All right, so this looks good and I'm going to switch to white type this time. So before I even type, I'll get white ready. So hopefully the text will come out already white, although we're gonna use it as a mask later anyway, So it doesn't matter, but we'll get the type tool. And it didn't look at that came out black. But if I switch these and switch again, it's making me a liar. Okay? Never mind. Fine. Photoshopped have it your way. I'll come into the color picker and I'm just going to type six, which is the hex code for white. So if you are trying to get white from the color picker Instead of trying really hard to click in the corner or typing and tabbing over here, you can just hit F f f f f f and then you get white. But I didn't want it for that. I want it for my new text. Oh, my gosh. Okay, uh, let's add our type first. And then I guess we'll change it. So I'm gonna click. I see what's happening. It's not. It thinks I want to activate that layer. So let's do this. We'll click over here so it can make a new layer. It thought I was trying to select the mustache. We'll add it first and we'll move it over, All right. We don't want hipster icons, though. We want a font called sunshine. Hello, sunshine regular. And now we can make it white. And we're gonna type moustache and I'll just Oh, another thing you can do if I want to move this. But I don't want to set it and then move it because then I want to maybe keep editing it. So you save yourself a step while you are active in your type. You can move it by pressing the command key. You and holding it. You hold the command key and you will temporarily be able. Teoh, move that type so I can do that Moving in place. Uh, I'm gonna just select all and will scale it up to. Basically, I'm gonna hold command and move it again. I basically wanted to fill the mustache, like, more or less. It's OK, that is overlapping because we're gonna adjust that with our puppet warp. But I wanted to fill it pretty nicely. And then when I am pretty happy with it, like you think this is, this is fine. Then I'll go ahead and commit it. Okay. Now I need to, uh, convert this also to shape, because what I want to do is individually adjust each of the letters. I want to be able to take this m and rotate it, skew it and stuff. And right now, it's part of this whole type, so I can't do it the way that I want. So I'm going to right click on here, and I'm going to change this Teoh convert to shape. Okay, Not smart object. Just shape. Then I get this crazy, uh, all these points and again we lose the T and we see that this is now a shape. So let's zoom in space bar dragging. So I want to grab this M right now. I'm going to use the Black Arrow, I believe. Yes. So with the black selection arrow over here, it's called the path selection tool. I can now grab. Look at this. Just the end. So I'm going to grab it and control or command t, and I'm going to just scale this. I'm rotating it. So once you're in free transform, if you hover your cursor outside the corner of one of the boxes, you get this curved arrow, I call it the macaroni Noodle. Then you can click and been to rotate it. So I'm gonna spin it. I'm going to shift drag inwards and maybe shrink it down a little bit. I kind of do wanted to overlap the boundaries, though. Just a smidge, because I like, I like how that's gonna work when we mask this out. So I'm gonna try to have it touching a little bit those boundaries, okay. And that looks pretty good. So now I'll grab you and we'll tweak this. I'm not worried about like I do want to move the tail of this you But I'll do that with Puppet warp. So my main objective right now is to keep it. Uh, just so I have room for all the letters and everything. I think we'll have to keep this about like that. I won't obsess too much for the interest of time, so I'm just gonna work through all these letters somewhat quickly. See, maybe we can dio that good. Okay, We'll commit that. I'm going to grab the tea. So in real life, this takes a lot of time. I'm doing it quick on camera because we're on camera, but it's a lot of experimentation. So I guess just be prepared for that when you're designing anything. Really? Never as fast as it might look. Um, especially, you know, when I was preparing this lesson, it takes a long time to find You know what's gonna work? What's gonna look good and, uh, a lot of trial and error. So don't be discouraged if you're trying this at home, and it's taking you a long time. All right? So just want everything to fit in here.
Class Materials
Bonus Materials with Purchase
Ratings and Reviews
Monica
I loved this so much. It's short and sweet and gave me exactly the information I was looking for. I wanted to start designing printables for my Etsy shop and didn't know I could do what I wanted to do in photoshop (which I already had as a photographer) and I was so happy to find out I don't need to upgrade my Creative Cloud subscription.
Shelley Messersmith
Kahra does an excellent job of conveying what could be boring material by using real life teaching. I learned so much and the course instilled a desire to use the techniques and learn more about typography. Thanks for the great lessons and the enjoyable course!
Sean Aikins
That was a great class, thank you for putting it together CreativeLive and thank you to Khara for presenting!