Lessons
Lesson Info
Class Introduction
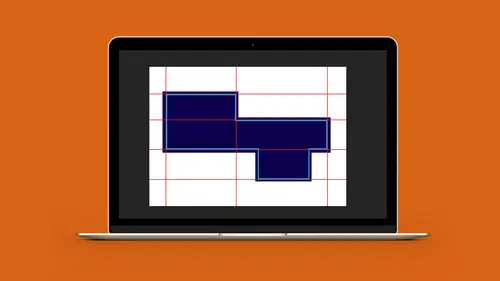
So today's class is going and showing you how to use Illustrator to design packaging, understanding the terminology with packaging, being able to set up dielines using a grid structure, and just getting a better handle on how to lay complex or simple packaging out. So what I have to start off today is just a brief overview of what we kind of look for in packaging, so we can get a better understanding of how packaging actually works. So, I've built this file in the Illustrator to give us an idea of some of the terminology before we actually jump right into building the entire piece of packaging. In a lot of cases, when you are working in some type of project, you may end up getting a dieline from the printer, and you can work with this dieline, put all of your artwork in, but in some cases, you'll have to go and create your own. And if you do create your own, this is what this video is all about. But if you do get a dieline from a vendor or printer, this will hopefully give you a little...
bit better idea of what you're actually looking at. So, this Illustrator file I set up to give you an idea of what all this terminology actually is. And when you look at something like this, to me, it looks really cook because I always love doing packaging in illustrator. And when you see something like this, it's like, "What dos all this mean?" Well, when it comes to dielines, there is no absolutely steadfast rules of what lines, weights, and colors indicate certain things, but there is a general consensus on what a dotted line is, what a solid line is. So, what we normally do is we put a legend in here, so that we know exactly what it is that we're looking for at, so that if we do a dieline built by somebody else, we may look at this and say, "Okay, a little bit different color, "but the concept is pretty much the same." So, what I've got is a multi-layered document here in Illustrator to show you what live, trim, bleed, fold, diecut, and glue or non-printing areas are, so that we can better understand what it is, and actually build our own dieline from scratch. So, first thing to start off, I'm gonna go through and shut off a whole bunch of these basic shapes right here. And what we have is what we call the trim, and this is what the file is going to look like after it goes through the press, and it's actually cut or trimmed out for the final stage of assembly. And this trim is the exact size, the exact shape. And when it folds or glues, you're going to use this shape, and it's going to come together. So, we also have the bleed. And the bleed are is anything that goes to the edge of our package, needs to go ahead and bleed off the edge. And if I was printing color, or I was printing a picture or an image, or a pattern on the back, and I wanted to make sure that we have that complete pattern, or image, or color, we would always extend this beyond the edge of the finished packaging just in case when the dieline was actually cut, if it cut slightly off or out of register, it's going to go ahead and not have to worry about having a sliver of unprinted paper behind it. So, the bleed is actually just a small extension, and, generally, it's an eighth of an inch. Sometimes printer will indicate a little bit more. If there is no indication of what the bleed should be, we stick with an eighth of an inch, sometimes a quarter of an inch, but they will specifically tell you if there is a different bleed than what the standard default is. So, that bleed are here is indicated with this cyan line, and that's where I'm going to build the artwork too. If anything is going to touch the edge, we have to extend it all the way to the bleed. Next is the live area. And the live area is anything that we're going to put inside this document that is going to be extremely important, so logos, words, descriptors, ingredient list, UPC codes. We don't wanna get this too close to the edge of the document simply because if anything were to happen, we wanna make sure that we have this live or this safety area. So anything that is very important stays within this safe or this live area. And generally, what I do is I usually do it about a quarter of an inch in, and the reason why I do that is from a design standpoint. I don't like to have anything too close to the edge. The larger the packaging, the more buffer or margin you're gonna have, and this is no different than doing a page layout application where you're going to have your margins around the page. This is exactly what this live or this buffer zone is. And in this case, it's indicated by a large dash line. So that's my live area. All the important items are gonna stay within there. And then we have our fold line. So as we go through the entire process, this is gonna end up being folded in half. And the fold line is indicated by just a small dash line. Now sometimes, we have a fold line, and other times we have a perforated line. Sometimes if it's a thicker substrate or it's going to be something that's gonna be torn off, we would have a perforation line. And this is a perfect example of why you'd wanna have some type of legend showing what is a fold and what's an actual perforation. And again, there's no industry standard that says, "Okay, this specific line weight or dash "is going to be just like this." it's always good to call it out in your file just to make absolutely sure. The second to the last that we have here are areas of non-printing or areas that have to get glued. What's important about this is we indicate the areas where nothing is going to be printed or put in here for other purposes. So, if I wanted to have something glued here, in general, if we print on some stock, the glue may not stick. So we don't wanna put any ink or varnish in that area. So we're gonna indicate that in a non-printing areas. So any artwork that we put in there, any color, is going to stay out of that area for production purposes. Now sometimes, if it does get printed in that area, we will have to go in and scuff that area, kinda like sand it, and so to have the glue be able to stick. But this is really important because if you manufacture something that you can't glue, and you put some content on there, ink or varnish, the glue can end up coming apart. And if you're doing something like a coffee cup, it's not a great thing to have. So this dash line here just indicates an area of non-printing. We use this quite a lot when we're building cards and we have a magnetic strip on the back of the card, because in the end, that card gets printed, and then the process afterwards has the magnetic strip applied, and we wanna make sure we apply it directly to the substrate and not over any ink. The last one I indicate here is the diecut, and the diecut I've indicated in green here. And this is actually going to be a hole that's going to be cut in here, so that in the end, this side will actually have a hole. You'll notice that when I put my bleed on and off, you'll notice the bleed occurs inside this circle here, and that's because I wanna extend the bleed an eighth of an inch outside my cut area. So my diecut area here is going to be a circle. And I want to go ahead and run the color or the pattern inside there, so when the circle gets cut, it's cut slightly larger than the printed area. So, that is my diecut right there and the non-printing area, my fold line, my bleed area, anything extends beyond the trim, which is the actually physical size of my finished product, and then my live area, which is what's going to have everything important kept inside. So, that's just a really quick overview of what you would see in a dieline.
Ratings and Reviews
Tomas Verver
Although I do not any Packging Design at the moment it's still a nice basic introduction course. As i love the teacher teachingstyle and a part of the subscruption it's a nice course. Atleast for beginners in this niche.
Kathleen Kamiya
This was my first technical class of how to create dielines in Illustrator. It was easy to understand and really helpful. The teacher is great! Thank you!
Pieter H
Great class!! Great teacher.
Student Work
Related Classes
Adobe Illustrator