Lesson Info
12. On-Location Demo Star Trails Stacking
Lessons
Introduction to Astro Landscape Photography (ALP)
25:29 2On-Location Demo: Composing, Focusing, Exposing & Mobius Arch ALP
27:44 3Post Processing: Mobius Arch
16:23 4Gear for ALP
28:09 5How to Use an Intervalometer for ALP
07:51 6Camera Settings for ALP
20:24 7On-location Demo Focusing Demo for ALP + SharpStar 2
33:06 8Determining Exposure for ALP
17:00On-Location Demo Lathe Arch Light Painting & ALP
17:02 10Post Processing: Lathe Arch
17:41 11How to Shoot Moonlight and Star Trails for ALP
16:17 12On-Location Demo Star Trails Stacking
07:09 13Post Processing: Star Trails Stacking
29:44 14On-Location Demo Panorama for ALP
10:19 15Post Processing: Panorama
23:56 16Close-out for ALP
01:23Lesson Info
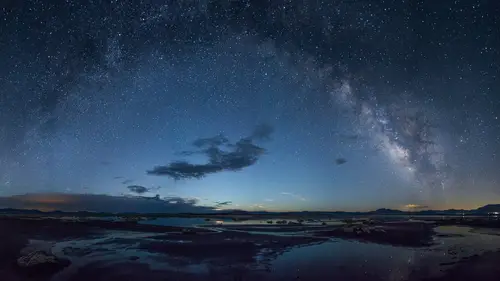
On-Location Demo Star Trails Stacking
Here we are; we're out at Lady Boot Arch in the Eastern Sierra, and we've set up a shot for stacking to get long star trails. I have already composed the shot, and I have focused the shot, and figured out the exposure. Using high ISO testing I have determined that for the ambient exposure, we need to do eight minutes, f/4, ISO 1600. And that's primarily for just the ambient lighting in the sky. Right now we've got these gas lanterns on, but we're going to turn those out and I'm going to use light painting with a combination of tea lights and my flashlight to light up the ground level illumination. So, the next step in this process is to set up our intervalometer for eight eight-minute exposures. So the next step is to program our intervalometer. So what I'm going to do is press the little right arrow here, and I'm moving the indicator there, the little underscore indicator, under the word long. I'm going to press set. Now the hours are blinking; I'm going to press the right arrow. Now ...
the minutes are blinking, and remember I decided we're going to use eight-minute exposures, so I'm just going to press up until we get to eight, press the set button. (intervalometer beeps) and now we have eight minutes. All right, and interval in between shots is default to one second; that's what we want to do. Number of shots, I'm going to press the set button and go up until we get eight. (intervalometer beeps) And ooh, you hear that annoying beep? We don't want that, so we're going to go over to the beep and turn that off. And now we're good; I'm going to go back to long, just to make sure that I've got my eight minutes. And now we're ready to go. Basically, I'm just going to press the start button and it's going to start counting down eight eight-minute exposures. And, I'm pretty much ready to go. All right. So, I'm going to turn off my lights. All right, to summarize, we have composed, focused, decided on our ambient exposure, programmed the intervalometer. Next thing to do is work out the light painting. So I'm going to move my camera bag out of the way. And, now we'll turn down these lanterns and move them out of the scene. I'm going to open up the shutter and walk around waving my light. There is a method to the madness. I'm just basically trying different lighting schemes to see what works. And starting exposure, looking at it, confirming, saying this is good, this is not so good, I'll just change it up a little bit until I get it the way I like it. Then open up the shutter and let it rip for the first eight-minute exposure. And we'll go from there. So I'm going to be using a couple of tea lights that we've placed around in various locations, and I've also got an LED light that I'm going to use to light up this bush in the foreground, and then an incandescent flashlight which I will use for lighting the overall rocks. So the LED light on the foreground is going to create a cool white glow in the bush in the foreground, and then because these rocks are naturally a warm orangey color, I want to use a warm light to light them up. It doesn't really make sense to light warm orange rocks with a blue light, so I'm going to use a yellowish orange incandescent light for that. All right, so let's get these lanterns out of here and we'll go to it. So, we've got everything nice and dark now; I've got my tea lights in position and my LED flashlight on the bush. Okay, shutter's open. I'm not going to light from the camera position; I don't want to linger too long because this incandescent light is fairly bright. All right, so now I'm going to do basically the same lighting from the other side. Like I said I'm going to come into the foreground and scrape the light, just low across the front. All right, back to the camera, if I can find it. And stop the exposure. I'm taking a look at here; I've got one really dark, deep shadow created by this light in the foreground. Everything else looks pretty good. So to avoid that hard shadow here I'm going to move around a little bit lower and not light it from quite such an oblique angle. So we're in the middle of our first eight-minute exposure here and I need to do my light painting, so I'm going to go back and do that. One of the most common questions I get in workshop situations when doing light painting is, how can you walk through the shot? Aren't you going to show up? And it's like, well if I were to stay in any one position for 10% or more of the exposure, you might see a little bit of a ghost image. Or if I were to accidentally shine the light on myself then I might show up. But as long as I keep moving, you really don't have to worry about being seen, because you're only in one spot for a very small percentage of the overall exposure. All right, so a little bit more than an hour has passed, and we've done our eight eight-minute exposures. The intervalometer has shut off the camera and that's about it. So now we'll take it into the studio and do our post-processing with Stack-O-Matic.
Class Materials
Bonus Materials with Purchase
Ratings and Reviews
user-1ff946
The classes are full of extremely important technical information that is delivered in a concise, clear manner. It is very difficult to grasp it all in one sitting. I have taken classes before in photography and I love the learning model with Creative Live .I can go back and review the information at my own pace and take notes as I go- I can even rewind and review if I miss something. This is a great collection of material and I would highly recommend purchasing the entire bundle - great job on the selection of fantastic teachers and putting together such a fabulous package on night photography.
Zorka
A tremendous amount of information crammed into one single course - it can be only done by CreativeLive! Along with having such a profound knowledge and skills in a particular field, Lance Keimig has an amazing teaching style as well - he is very clear, concise and thorough. I strongly recommend this set of classes to anyone who is interested to acquire some general (or expand their existing!) knowledge of astrophotography and night sky shooting. Last but not the least, I want to congratulate the CreativeLive for teaming up with an excellent instructor to create and deliver this STELLAR and production-wise very demanding course!