On-Location Demo Lathe Arch Light Painting & ALP
Lesson 9 from: Astro Landscape PhotographyLance Keimig
On-Location Demo Lathe Arch Light Painting & ALP
Lesson 9 from: Astro Landscape PhotographyLance Keimig
Lesson Info
9. On-Location Demo Lathe Arch Light Painting & ALP
Lessons
Introduction to Astro Landscape Photography (ALP)
25:29 2On-Location Demo: Composing, Focusing, Exposing & Mobius Arch ALP
27:44 3Post Processing: Mobius Arch
16:23 4Gear for ALP
28:09 5How to Use an Intervalometer for ALP
07:51 6Camera Settings for ALP
20:24 7On-location Demo Focusing Demo for ALP + SharpStar 2
33:06 8Determining Exposure for ALP
17:00On-Location Demo Lathe Arch Light Painting & ALP
17:02 10Post Processing: Lathe Arch
17:41 11How to Shoot Moonlight and Star Trails for ALP
16:17 12On-Location Demo Star Trails Stacking
07:09 13Post Processing: Star Trails Stacking
29:44 14On-Location Demo Panorama for ALP
10:19 15Post Processing: Panorama
23:56 16Close-out for ALP
01:23Lesson Info
On-Location Demo Lathe Arch Light Painting & ALP
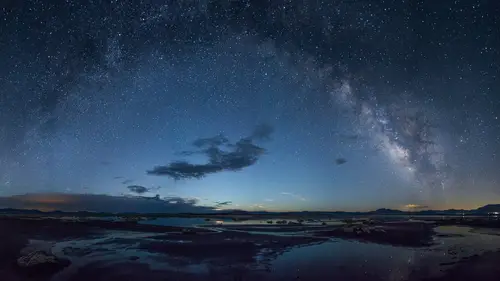
Throughout this course you've seen me paining with light on the various shots that we've done but really haven't gone into much detail about the hows or how much or why or when you would want to do it. Light painting is really one of the most fun and creative parts of all of night photography and I really enjoy it myself, as I hope has been evident throughout the course here. In this section, we've located, we've set up a shot over at what's called Lathe Arch, and it's just, I don't know, 20 yards away from where we were in the Mobius Arch scene. And, what I'm gonna do is just go through some different light painting techniques and show you what works, what doesn't work and the way that I like to do it. Lathe Arch here provides a really nice foreground with relatively few shapes or surfaces to cover, but it's still a pretty nice shot, and we're gonna be shooting through the arch up into the Sierras in the background. Lance's cardinal rule of light painting is don't light from behind th...
e camera because it looks just like on camera flash, and that's as you know, not very flattering. But, aside from that, you can do just about anything. You can use all different sorts of light sources, and typically we're working with handheld light sources. Could be a flashlight or a strobe. Could be candles like we've had through a couple of these shots, or these propane lanterns. You can use EL wire, which is a electroluminescent wire that glows in different colors. All kinds of light toys. There are so many different LED toys that really make for interesting light painting tools to work with. For the most part though, I tend to use just regular, ordinary flashlights and I've got a variety of them in my bag. There are different brightnesses as well as different beam widths. Some of them have a broad beam like this that also zoom in to a tight spot, that's pretty handy to have. Some of them are just a fixed beam, either wide or spot. Also, I've got incandescent lights that are warm, about somewhere between 28 and 32,000 degrees Kelvin in color temperature, and they contrast naturally with the cooler natural light. This one that I just showed you here is an LED light and it's roughly daylight balanced, so it's closer to the color temperature of the natural light. So, when would you use one versus the other? In urban environments, where there's lots of artificial lighting, it's typically sodium vapor light which is real orange-yellow. In those situations, if I want my lighting to stand out then I would use a cool LED light that contrast with the existing ambient sodium vapor light. In a situation where I wanted my lighting to blend in in that urban environment with the sodium vapor, I'd use the incandescent light because it's closer in color temperature to the ambient light. So any time you want your lighting to blend in, use a similar color temperature. If you want your lighting to stand out, use a contrasting color temperature. Just the difference between a few thousand degrees Kelvin, a warm light contrasted against a cool ambient light, or visa versa makes for a really strong and dramatic statement. And again, in this natural environment we tend to have a slightly cooler or bluish natural light and typically I like to contrast it with a warmer light. And that works especially well in this environment because we have this orangeish yellowish stone that works very nicely in conjunction with the incandescent light. In general, you don't want to light a cool colored object with a warm light, or a warm colored object with a cool light. It makes more sense to use a similar color on your object, so again, I'd light this warm orange rock with an incandescent light, generally, rather than a cooler or bluer LED light. So probably the number one question I get is, well, how much light do I add, and there's not really an easy answer there. There are several different factors that come into play there. First, of course, is aperture and ISO. Both of those are going to obviously dramatically affect your light painting. So if you have a high ISO or a wide open aperture whatever light you add is going to be more pronounced than if you lower ISO or a smaller aperture. That's pretty obvious. It's also kind of important to consider another obvious factor, the brightness of your flashlight. If you have a really bright light, it's gonna take a lot less time than a dim one. That's pretty obvious as well. The distance of your light source to whatever it is you're lighting is gonna make a big difference as well. So if I'm lighting this rock right in front of me, you know, this is obviously a pretty powerful light and that's gonna take up, you know, it's not gonna take a whole lot. But let's say I wanted to light the Sierra Nevadas way off there in the distance. It's gonna take a lot more light. It's gonna take a much brighter one than this and it's gonna take more, a lot more time. Fairly obvious. The last thing to take into consideration is the reflectivity of your subject matter. So, are you lighting a bunch of dark trees that are going to absorb most of the light you throw in them? Or are you trying to light up something that's reflective in nature like a metallic object, a street sign or a car or something like that? That's going to reflect most of the light back and then require you to use less to begin with. In terms of quantity of light, it's really relative to your ambient illumination in that the ratio of added to ambient light plays pretty large in the look of your image. So if you have relatively the same amount of added and ambient light then the light painting is going to be more subtle or less obvious, but if you reduce the ambient exposure and increase the light painting then the light painting's really gonna stand out and be much more obvious. There's no right or wrong way to do this and there's no right or wrong amount of light to use or color to use. It's really just a matter of what do you like, what looks good to you. As long as you follow that cardinal rule of not lighting from the camera position cause it's never ever gonna look good. One of the things that I wanna do here is, we're gonna work through a shot and I'm gonna light it a couple of different ways so you can see how it looks, but I also want to demonstrate some light painting techniques and go through, you know, the way that I would do this particular shot here. Well, let's get to it. So as you can see, I've wedged myself down here in the crevice along with my camera and I'm gonna demonstrate a couple of different light painting techniques here. The first one is the one that you're not supposed to do, and I'm just gonna do it just to show you how ugly it looks. I'm gonna open up the shutter and just stand right behind the camera and basically just do frontal lighting on my subject here. Alright, I'm not worried about the overall or the ambient exposure so I'm just gonna stop it and see. Yup, that's not especially attractive but you'll see that in a minute. Okay, next is a useful tool that I often will use just as a fill light. And this could be a main lighting technique. It's softer, it's more even light. It might be good for any kind of portrait situation. So I'll open up the shutter again and what I'm gonna do this time is basically use fill light bounced off of this wall here. And by keeping it moving, what I'm doing is making it even more diffused and softer. So you can probably see the shadow of my camera moving around as I do this. Go over here and do it a little bit on this side. And I'm gonna be doing it a little bit longer than the last one because it's indirect or bounced light. Alright, let's see what that looks like. Yeah, and that's kid of a soft, even, diffused light. It's fairly flat, it doesn't have a whole lot of character to it and like I said, I would typically use this as a fill light, not as a main light. I'd just kind of gently fill in any deep shadows and use perhaps some more direct lighting on top of it. The next techniques are gonna require me to get off my butt and be a little bit more active, but that's okay cause they're gonna have a much, much more interesting look in the final photographs. When you light something frontally, it doesn't have much character, it's just flat, it doesn't have a whole lot of depth. But if you hold the light at an angle, a really oblique angle to your subject matter, it's much more dramatic. You can see, you know, I'm really getting some nice texture from the uneven surface of these rocks here. Look at that, as opposed to that. Which is more interesting, I think it's pretty obvious. Now you can also do back lighting, which can be real dramatic as well. Get some of that texture. It's more challenging to work with cause it's much higher contrast and more likely to cause flare in the camera, but when done well you can get some really nice edge effects and some pretty decent texture as well, alright. So, I also like to often just rake the light across the surface of something and that will give a pretty nice texture as well. So in this case, kind of like just from above. Just straight down on this light or I can also do ground lighting. So you can really see the texture in the ground there, just that little bit gravel has so much character. As opposed to this, which has no character whatsoever. Alright, so I'm gonna start the exposure again and do a couple of these more angular lighting techniques. Alright, so, let's see. Guess we'll start down low and kind of scrape the light across the surface here. And I'll do the same thing on the arch. And I'll come back and do it on the other side too. I like to do cross lighting from both sides. And here we go. So this is back lighting for the camera that you're seeing this with, but it's side lighting for my camera. You'll see what this image looks like in a minute. So it's a little bit over lit, but it definitely has a lot of that character that I was talking about from the side lighting. And then lastly, I'm gonna go behind the arch and give some back lighting from my camera perspective. So last time, let's open that up. I'm gonna go up and over. Same as before, I'm gonna be doing side lighting from both sides. Over to the other side. Alright, now let's take a look and see what that looks like. That's pretty cool. It's got some nice catch lights on the edges of arch. Alright, so those were basic techniques. Let's turn down the lights and do the shot for real so we can see what it looks like. So, I've completed my ambient exposure. It ended up being 25 seconds at 3.5 6,400. I stopped down just a little bit to make sure that I had plenty of depth of field. The arch is relatively close and the stars are light-years away, so we want to get everything sharp. That looks pretty good. The foreground is just about completely dark with no detail so I'm gonna have to light everything up here. Alright, so now I'm gonna switch down to 100 ISO and I'm going to put my shutter speed on time and at this point I'm basically just going to stop the exposure as soon as I'm done with the light painting. (camera shutter clicks) Shutter's open and I'm gonna start from camera right. Now I'm gonna walk around to the other side. Here we go, light from the other side. Now I'm gonna do some back lighting and just to make it a little more interesting and dramatic, I'm going to use the different color light. I'm gonna use the LED light for the back lighting. And hopefully I'm not in the frame when I'm doing this. Now I'm gonna make my way back to the camera, close the shutter. Overall it looks great. It took me three or four tries to get the lighting just the way I wanted it, but now I'm pretty happy with it. I ended up using just the incandescent light and I lit the arch front and back from both left and right. So I will process the two files separately in Lightroom, the light painting shot and the ambient shot for the sky and the background, and then we'll open the two together as layers, blend them together and that's about all it's gonna take. It's gonna be a fine shot. That's about it for light painting.
Class Materials
Bonus Materials with Purchase
Ratings and Reviews
user-1ff946
The classes are full of extremely important technical information that is delivered in a concise, clear manner. It is very difficult to grasp it all in one sitting. I have taken classes before in photography and I love the learning model with Creative Live .I can go back and review the information at my own pace and take notes as I go- I can even rewind and review if I miss something. This is a great collection of material and I would highly recommend purchasing the entire bundle - great job on the selection of fantastic teachers and putting together such a fabulous package on night photography.
Zorka
A tremendous amount of information crammed into one single course - it can be only done by CreativeLive! Along with having such a profound knowledge and skills in a particular field, Lance Keimig has an amazing teaching style as well - he is very clear, concise and thorough. I strongly recommend this set of classes to anyone who is interested to acquire some general (or expand their existing!) knowledge of astrophotography and night sky shooting. Last but not the least, I want to congratulate the CreativeLive for teaming up with an excellent instructor to create and deliver this STELLAR and production-wise very demanding course!