On-Location Demo: Composing, Focusing, Exposing & Mobius Arch ALP
Lesson 2 from: Astro Landscape PhotographyLance Keimig
On-Location Demo: Composing, Focusing, Exposing & Mobius Arch ALP
Lesson 2 from: Astro Landscape PhotographyLance Keimig
Lesson Info
2. On-Location Demo: Composing, Focusing, Exposing & Mobius Arch ALP
Lessons
Introduction to Astro Landscape Photography (ALP)
25:29 2On-Location Demo: Composing, Focusing, Exposing & Mobius Arch ALP
27:44 3Post Processing: Mobius Arch
16:23 4Gear for ALP
28:09 5How to Use an Intervalometer for ALP
07:51 6Camera Settings for ALP
20:24 7On-location Demo Focusing Demo for ALP + SharpStar 2
33:06 8Determining Exposure for ALP
17:00On-Location Demo Lathe Arch Light Painting & ALP
17:02 10Post Processing: Lathe Arch
17:41 11How to Shoot Moonlight and Star Trails for ALP
16:17 12On-Location Demo Star Trails Stacking
07:09 13Post Processing: Star Trails Stacking
29:44 14On-Location Demo Panorama for ALP
10:19 15Post Processing: Panorama
23:56 16Close-out for ALP
01:23Lesson Info
On-Location Demo: Composing, Focusing, Exposing & Mobius Arch ALP
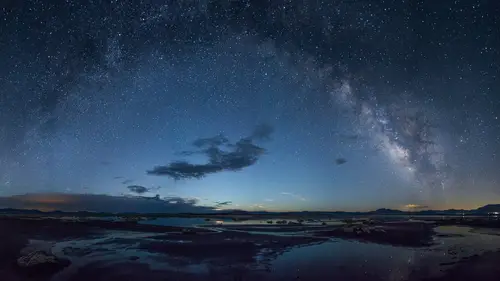
So, here we are at the world-famous Mobius Arch in the Alabama Hills of California's Eastern Sierra, and what we're gonna do in this section is work through a shot from concept to completion, spending a little bit of extra time talking about composition and how to go about finding your shot in low light. Now, we've got some propane lanterns set up here to make it easier for you to see what's going on, but it's important to kind of realize that in a real life situation, it would be much, much darker, and I really would have a hard time seeing what's around me because we're working in a new moon situation, where there's no moonlight and no artificial light, nothing but star light. So, what I like to do to kind of rough out my shot in the first place, is I will go into my camera, and I'm gonna turn up my ISO as high as it will go, which, in my case, it's High Two, and I'm going to open my aperture all the way to maximum, and in that case, it's 1.8. So I've got f/1.8, ISO cranked up all th...
e way, and well, I guess for this, for this exercise, you could use Manual and just pick a, what I would normally do, I would pick a shutter speed that is fast enough to give me some information for slow enough to give me some information, but fast enough that I would still be able to see the image. This handheld shot's for roughing out my composition. I don't really care if it's in focus. I don't care if it's blurry. I don't care if it's a good exposure. All I wanna be able to do is, say, do I like the shot, and what, you know, what do I wanna change about it? What do I wanna keep? So, let's try that. So, I'm gonna just walk over here a little bit. And kinda take the, you know, the obvious shot is just kinda straight on of the arch. And, there we go. It's not bad. The arch is very dramatic and it's got these converging diagonal lines that come down into the bottom of the, the center of the frame, and then the arch goes over the top, and that's okay, but let's try some, a couple of different shots. So, I come over here. If you're not familiar with Mobius Arch, it's a really dramatic formation, and if you get up high on those rocks right there and look to the West, you can see Mount Whitney through the arch, and that's a really great classic sunrise shot that I think Galen Rowell was probably the first person to really make Mobius Arch famous in the mid-70s with his real classic sunrise shot of Mount Whitney through the arch. We're working down here, down on the ground, down below it. So let's try, let's see. We got these, this sage bush in the foreground so maybe we can try a shot with that. And that's a little better. It's a little more interesting. A little more unique. See what we have over here. Now, this is kinda cool because we've got these round rocks in the foreground that kind of repeat the pattern, going back towards the arch. That's kinda cool, I like that. There's one round, two round, and then the big third round of the arch and then one off to the right. Pretty cool. Let's see what else we can come up with here. Gonna just maybe play with this brush and make that more prominent right here in the foreground. Let's see how that looks. All right, well, that's looking pretty good. So, it's a little bit flat because of the lighting that we have right now, but I've got this big sage brush in the foreground, these repeating round shapes of the rocks on the lefthand side, the arch in the middle, and then there's this other round shape on the righthand side. So altogether, it makes for a pretty interesting composition, although right now, with the light that we have, it's not that great. It's a little bit hard to make out a whole lot of detail because it's very flat, even lighting. I'm gonna, later on when we get to this point, I'm going to use my own lighting and make it much more dramatic, but I like that composition. So now that I have roughed out my composition, I'm going to go back and find my spot and put the camera on a tripod and then fine-tune the composition from there. So, that's what I'm gonna do now. Is go off, get my tripod, set it up, and refine the composition. So, I'm not quite sure what height I'm gonna use here. I'm gonna start relatively high position because I wanna be able to shoot over the top of these bushes and get all of that rock formation in the background. But I don't wanna give you the impression that every shot is from eye level because obviously that's really not the case. Let's see. There we go. And I think I'm also gonna do this as a vertical shot which is the way I framed it out. So let's get that going. All right. And I wanna show you just a couple of other thoughts on composing and setting up shots in low light situations. So, instinctively, when we get to a spot and we find something, we see a subject that we find to be interesting or inspiring. You know, kind of, our instinct is to kinda go for the most obvious setup and that's basically, you know, take your dramatic subject, whatever it is, Mobius Arch in this case, and put that right in the center of the frame. That's okay, but it doesn't necessarily take into consideration all the other aspects of the frame. So rather than just taking your main subject, putting it smack-dab in the middle of the frame, we wanna talk, we wanna think about how all of the various elements on the composition relate to each other. We've got foreground, we've got middle ground and we've got background. We've got, so, in this case, the background is gonna be the sky. We are shooting towards the south-east, south-west and we've got some stars and maybe a little bit of the Milky Way arch that's gonna be down there. It's gonna be off to, actually, the arch is gonna be a little bit off to the left. But we'll still get some bit of the Milky Way. Mobius in the middle ground and the sage brush in the foreground. Again, we're talking about considering how these things relate to each other. We wanna have an image that's dynamic and creates a lot of visual movement. In this case, we have several strong diagonal lines, which, of course, create a sense of movement and depth. We want the viewer to go from this mere foreground element into the background, into the middle ground into the distance and also, we wanna pay attention to the edges of the corners of the frame and how they all kind of relate to each other. We don't want anything to be crowded and really tight and we also don't want any important detail to be cut off. A lot of times in low light situations, like, if we had turned off all these lanterns, these propane lanterns, and had nothing but star light, I would really have a much more difficult time seeing the environment here, the surroundings, and I would also have a hard time picking out any stray objects or items that I didn't necessarily want in the scene. For example, if some bone head had thrown their beer bottles on the ground here, I wouldn't necessarily see it, but, kinda going ahead and working out this framing, doing these test shots, it helps me to find all those odds and ends that I don't want in the shot. Maybe there was a tree branch protruding into the upper left corner of the frame. So, you know, those are all the kind of things that you really need to pay attention to. All that little detail when you're composing a shot. Attention to detail, both, in every aspect of your photography is gonna lead to stronger, more interesting images. You know, technically better and visually more interesting as well. Alrighty. So, I got it up here on the tripod. And I've got a rough idea of what I wanna do. I'm just gonna tweak it a little bit here. And see what we can come up with. And we're, we're on kind of a soft, sandy ground here, so I'm gonna make sure that the tripod is really well-seated and doesn't have the opportunity to shift. And just by kind of settling it into the ground. This is really important to do if you're ever photographing near the edge of a river or on a beach or something where there's soft, potentially shifting ground, it's a real good idea to firmly plant your tripod and make sure that it's not gonna shift during a potentially long exposure, all right? So, here we go. This is looking pretty good. I still got this high ISO, wide open aperture settings and, oh my God, it's so blown out here. All right, that's better. I'm gonna tweak it just a little bit. Get a bit more over to the left. And remember, I'm still shooting at maximum ISO, maximum aperture, and I haven't given any consideration to focusing or my exposure or how I'm gonna light it. At this point, I've only been working on the composition and the design of the image. All right. I like the height that I've got here, but I think I wanna get just a little bit closer. And right now, I've got the luxury of these propane lamps, so I can actually see what I'm doing. Ordinarily, I would really not be able to see the scene very well just by looking through the viewfinder so I don't wanna give you the false impression that it's that easy, but I'm taking advantage of the light that we have here so let's use it. And all right. I think this is, one more little, tiny tweak. Just moving it side to side. Just being real careful and meticulous with the, with the framing here, and I'm also gonna tilt it up just a little bit. Yeah. All right. And I'm going to activate my level. And I wanna make sure that the camera is level just so I don't have to lose part of the composition in post by leveling the horizon. I wanna get it right in-camera. And, yeah. All right, so there we go. So I've roughed out my shot with handheld, high ISO, maximum aperture shots. I've put the camera on the tripod and refined the composition just the way I want it. The next step in my workflow is to find my focus. And because this shot has relatively close foreground all the way to distant stars in the background, I'm gonna need a fair amount of depth of field for this shot. So I'm gonna have to focus really carefully. All right. I'm also gonna be doing a longer shot in this case. I'm not gonna be going for the astro-landscape star point shot. I'm gonna let it go into a longer, single star trail shot. I'm not gonna do stacking, but just a single long exposure. Don't know quite how long it's gonna be yet. But that's gonna facilitate working with the light painting in this fairly complex scenario. So, let's see, let's figure out our focus. I'm just gonna kind rough out estimate here. I've got maybe, mmm, a little bit less than five feet. Maybe, yeah, about five feet to infinity. So, let's see, what am I going to need to get depth of field from five feet to infinity, well, I'm just gonna go back and I'm gonna consult my app again. And let's see. 20 millimeter lens, and in order to get hyperfocal, I'd say, what do we have? Five, one, so we're gonna say it's one and a half meters, so that means my hyperfocal's gonna have to be about three meters. Let's just see. What am I gonna need here? All right, so f/8 is gonna give me a depth of field of 1.3 meters to infinity. So it looks like in order to get everything sharp here, I'm gonna have to use f/8. All right, so let's figure that out. And get it set up. So my foreground or my near focus point is going to be about one and a half meters and depth of field is extending all the way to infinity. So, I need to have from a meter and a half or roughly five feet, to infinity in focus. So, I'll consult my app here and see what aperture I'm going to need in order to get that depth of field. So I'm using a 20 meter lens on a full-frame Nikon D and let's see, at f/4.5, that gives me a hyperfocal distance of three meters, which will give me a depth of field of 2.1 meters to infinity. And that's not quite enough so let's go a little bit further, and there we go. F/7.1 will give me 1.5 meters to infinity. And that makes the hyperfocal distance at 1.9 meters. Right, so I need to focus at 1.9 meters and that's going to give me a depth of field of 1.5 to infinity. All right, so how am I gonna fine 1.9 meters? That's basically six feet. Well, conveniently, my wing span here from one tip of the finger to the other, I'm gonna have my one finger right even with the sensor and the other arm extended all the way out and that's gonna mean I need to find a spot that's about that distance from the camera and that's gonna be like right here. So if I focus at this point right here, that should make my depth of field from the sage brush in the foreground all the way to infinity. So, now I get a flashlight out of my bag. So, I'm just gonna place this in the scene here. This is just kind of a easier way to deal with this. I don't really feel the need to use the laser measuring tool in this case, 'cause I know that my reach is just shy of six feet. There we go. That should be good. If that flashlight stays there, I should have no difficulty. So, again, I'm gonna activate Live View. I'm gonna move the little red box over the point where I wish to focus. I'm going to zoom in, and that looks pretty good. Okay. So now I'll go back and retrieve my flashlight, which in this case, I'm using a Coast HP5R, which is a nice flashlight that's got a zoomable range on there and a rechargeable battery. Real nice little flashlight. Okay. So let's see, I've focused. Now I'm going to stop down to, what did we say, up to 7.1, right? So, now I know that I'm not worried about shutter speed length because I'm gonna have star trails instead of points and I'm going to use 7.1 for depth of field, so now I need to figure out what combination of shutter speed and ISO I'm gonna use. Let's see what direction we're pointing this camera. I'm gonna just pull out my phone yet again and go to the Compass app. We're pointing pretty much south-west. Pretty much, yeah, south-south-west. So that means that the star trails are gonna be relatively long, and I think, maybe, somewhere in the neighborhood of about 10 minutes is gonna give us a decent star trail length. So let's aim for roughly 10 minutes at f/7. and we'll figure out what ISO we need to do that. So now in order to calculate the exposure, we're gonna have to turn down these lights and I'll do some test shots to work that out and I'll go back and look at the histogram. So next thing we need to do is turn down the house lights and do our test shots. So we turned out the lights a few minutes ago to determine what our exposure was going to be and with the propane lanterns on, it was gonna throw off the exposure information which is why we went dark, and during that time, i did some testing at 6400 ISO and came up, and remember, we're using f/7. for the depth of field, and I was testing at because that's a good high ISO testing point. It is six stops above native ISO, which would be 100. And six stops is critical because that's the difference between one second. So, what I did, came up with was two minutes at 6400, 7.1 gives us a pretty good background exposure. That's gonna leave the foreground and the arch and everything pretty much dark with just a tiny, tiny, tiny bit of shadow detail, but it's gonna be a really good exposure for the sky. So two minutes at 6400 ISO at 7.1. That translates to two hours at ISO 100 7.1. Now, I don't, I think two hours would be very cool and it would give us some nice star trails, but it's also pretty warm out here, so two hours worth of exposures would be really noisy and well, probably my film crew, although they've got loads of patience, they probably don't wanna wait two hours for this shot. So we're gonna raise the ISO up above our native until we get something a little bit more manageable. So 120 minutes at 100. 60 minutes at 200. 30 minutes at 400. 15 minutes at 800. Eight minutes at 1600. 7.1, that's gonna be our exposure. So now that we've established that, I'll set it on the camera. I'm gonna get my intervalometer out and program it for eight minutes. I'm going to set the ISO for 1600. I'm gonna set the aperture for 7. and at that point, it's time to figure out the lighting on the foreground. Remember, I said that we're gonna have just a tiny little bit of detail in the foreground and a good exposure in the sky. Well I'm gonna make up for that lack of exposure in the foreground with light painting. So next thing I need to do is fish out my intervalometer and set it for eight minutes. Get in there, there we go. All right, and, I'm setting my, oh, what do you know? We're already set for eight minutes. Isn't that perfect? Great. And let's see here. We're gonna do ISO. We're gonna turn that down to 1600 and 7. and we're gonna put the shutter speed on Bulb because we're using the intervalometer and there we go. Okay, so we've got 7.1, we've got Bulb. Eight minutes on the intervalometer and 1600 ISO. Next step is to work out the lighting here. So ordinarily, of course, I would be doing that in total darkness, but just so you can see what I'm doing, we'll leave this lantern on low. And I'm gonna kind of go through the shot. Light, try a couple of different things and see what works out. We've got the sage brush in the foreground. Three different round boulder shapes to light and of course, Mobius Arch itself. My shutter is open. I'm gonna light the sage brush in the foreground. I'm going out of the frame. And I've got a snoot on my flashlight. And lighting it from the side. Basically 90 degrees from the camera and go over to the other side, do the same thing from out of the frame. Got my flashlight with a snoot on it. Okay. While I'm here, I'm gonna light this round rock shape from the side. Again, notice I'm not lighting from the camera position, but 90 degrees to it. And next round rock shape. Up here for the next one. All right. And now I'm gonna climb up behind the Mobius Arch and put some light on the arch itself. And the important thing here is because I'm actually in the shot, I wanna make sure that I get down low and behind some rock form so that I'm not showing my light to the camera. All right, so I just raked along the front and side surface of the arch. Now I'm gonna go behind it and do some backlighting. Okay so, I think I've done most of the lighting that I wanna do on this shot. But I'm gonna try one more thing here. I'm gonna come down behind my camera and I'm gonna rake my light just gently across the surface of the ground. Try to get just a little bit of detail and texture in the ground. It's not gonna show up, what I'm doing now is not gonna show up real well because of the lantern that we've got going, but you'll see the effect anyway. And I'll try that from the other side too. Okay, I finished my light painting. The eight minute exposure isn't over yet. I still got three and a half minutes to go, but I don't really need to let it cook for the rest of the time because I know that the sky is gonna be good. I just wanna see what my lighting is gonna look like at this point. So I'll stop the exposure. And wow, it's really bright. But the effect of the lantern, even though it was turned down low, has kinda overpowered most of the lighting that I've done. So now what we're gonna do is kill that light entirely and I'll go through these steps again and make sure we've got it, and then we'll come back and show you the finished shot. Right on. We have completed this shot now. And you've seen me work from concept to completion on this shot. This is a pretty good example of the way that I work in the field on just about all of my shots. Start with composition. We're doing that initially with high ISO handheld shots. And I put it on the camera, the camera on the tripod. Refine it just a little bit. Get it quite the way I want it to look. Next, I will figure out what depth of field I need and focus using the hyperfocal focusing method and then we determine the ambient exposure for the background in the sky, and then I started playing around with the lighting, just seeing the way I wanted to light the shot. Work that out. It took several different tries to get it. Once we go it, turned out all the lights. Did my light painting during this initial eight-minute exposure, and we've let the intervalometer go for the entire eight minutes after which shot came up, it looks great, and then later on we'll go back into my studio and I'll develop it for you and then we'll see the finished product.
Class Materials
Bonus Materials with Purchase
Ratings and Reviews
user-1ff946
The classes are full of extremely important technical information that is delivered in a concise, clear manner. It is very difficult to grasp it all in one sitting. I have taken classes before in photography and I love the learning model with Creative Live .I can go back and review the information at my own pace and take notes as I go- I can even rewind and review if I miss something. This is a great collection of material and I would highly recommend purchasing the entire bundle - great job on the selection of fantastic teachers and putting together such a fabulous package on night photography.
Zorka
A tremendous amount of information crammed into one single course - it can be only done by CreativeLive! Along with having such a profound knowledge and skills in a particular field, Lance Keimig has an amazing teaching style as well - he is very clear, concise and thorough. I strongly recommend this set of classes to anyone who is interested to acquire some general (or expand their existing!) knowledge of astrophotography and night sky shooting. Last but not the least, I want to congratulate the CreativeLive for teaming up with an excellent instructor to create and deliver this STELLAR and production-wise very demanding course!