Introduction to Astro Landscape Photography (ALP)
Lesson 1 from: Astro Landscape PhotographyLance Keimig
Introduction to Astro Landscape Photography (ALP)
Lesson 1 from: Astro Landscape PhotographyLance Keimig
Lesson Info
1. Introduction to Astro Landscape Photography (ALP)
Lessons
Introduction to Astro Landscape Photography (ALP)
25:29 2On-Location Demo: Composing, Focusing, Exposing & Mobius Arch ALP
27:44 3Post Processing: Mobius Arch
16:23 4Gear for ALP
28:09 5How to Use an Intervalometer for ALP
07:51 6Camera Settings for ALP
20:24 7On-location Demo Focusing Demo for ALP + SharpStar 2
33:06 8Determining Exposure for ALP
17:00On-Location Demo Lathe Arch Light Painting & ALP
17:02 10Post Processing: Lathe Arch
17:41 11How to Shoot Moonlight and Star Trails for ALP
16:17 12On-Location Demo Star Trails Stacking
07:09 13Post Processing: Star Trails Stacking
29:44 14On-Location Demo Panorama for ALP
10:19 15Post Processing: Panorama
23:56 16Close-out for ALP
01:23Lesson Info
Introduction to Astro Landscape Photography (ALP)
Welcome to Astro-Landscape Photography. I am Lance Keimig and I'm one of five instructors with National Parks at Night, an organization dedicated to preserving and exploring our national parks through night photography workshops. Together we have a combined 50 years of experience teaching night photography and that's why CreativeLive as invited us to do this series of night photography classes. This class is intended for people who have at least a little bit of experience photographing at night and basic photography skills. You need to be comfortable with your gear and have a solid understanding of the basic principles of photography. By the end of this class you will be able to compose, focus, expose, and begin to light paint night photographs in a variety of extreme low light conditions. You'll also be able to predict the appearance and location of the Milky Way in the sky, as well as do advanced techniques, such as combining multiple exposures for light painting and ambient backgrou...
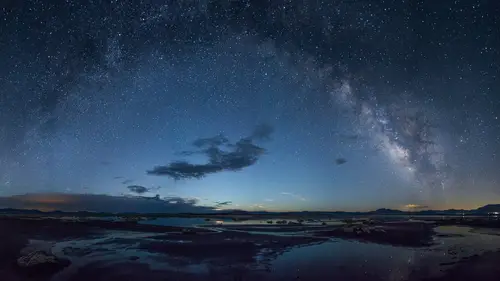
nd images. We'll do panoramic images of the Milky Way, as well use stacking techniques to create images with very long star trail images. I've been photographing at night for 20 years and teaching night photography for almost 20, so I can guarantee that you'll walk away from this class with the knowledge and the skills required to make some truly stellar night images. Now let's get started. I'm gonna begin by talking about, a little bit about the history of night photography, because I think it's important to have some context about how this medium developed and where it's come from. In the early history of photography the materials available were very, very insensitive to light and it made it extremely difficult, if not impossible, to photograph at night with the old processes of daguerreotypes and wet plate negatives and other early processes. This image that we're looking at here was taken in 1826 by Nicephore Niepce and although he wasn't trying to invent photography, he more or less ended up doing that, working in conjunction with Louis Daguerre of daguerreotype fame. This image was taken from the upstairs balcony of his house and even though it's not a night image, I'm showing it here because it's an eight hour exposure by sunlight. The point being that the materials were so insensitive that it was really impossible to photograph at night. So the next image here, this was taken by John Adams Whipple in 1851. And he worked with the Harvard Observatory for three years to be able to make this image, a daguerreotype of the moon taken through a telescope. And although the materials were very insensitive and it took a long time to make the exposure, he was able to do this because the camera and the telescope were mounted on an equatorial mount that rotated to compensate for the rotation of the earth. Again, this image took three years to create and it was well worth the effort, because it really started us down this long journey of night photography. The daguerreotype process was invented, or released to the public in 1839, and that was the primary medium that we had available to us until the mid 1850s. Now next came the wet plate collodion negative and that was either on a collodion emulsion that was either brushed onto a glass plate or a tin plate. And the limitation to this, in addition to being relatively, or extremely insensitive, is that the emulsion had to be applied to the plate, exposed, and then developed within a very short period, all this had to be done before that emulsion dried on the plate. So it only had about 10 minutes to work with and it was really not possible to photograph at night, especially with the low light levels of the 19th century. Remember, there was a lot less artificial illumination, there were very few streetlights, so the night sky and the night environment was really a whole lot darker than what we have now. In the late 1870s the dry plate collodion negative was invented, and that for the first time meant that it was possible to coat these negatives, coat these plates, and then go out later and make exposures. And the exposure didn't have to be so short that it was done before the emulsion dried. This image here is an anonymous image taken some time in the late 1870s of the moon rising through the landscape. And this image probably represents over an hour of exposure. Even though we had the possibility of night photography at this time it really didn't get started until when the English photographer Paul Martin began photo, who was a more or less a street or documentary photographer, he began staying out later and later as he was photographing the Victorian life in London in the late 1800s. And he would stay out and photograph at sunset and then past sunset and he just kept pushing it further and further to see how far he could go. Until eventually he's out photographing well after dark. Now because nobody had ever done this before the people who saw him thought he must be crazy, especially the police. And that's something that as night photographers many of you will probably experience at some point or another. So Martin photographed in the streets of London at night between 1895 and and during that time his images made it across the Atlantic Ocean and none other than Alfred Stieglitz became familiar with this work and also as a result became interested in night photography. And together Stieglitz along with William Fraser began photographing at night in New York at about the same time period. And they introduced night photography to their colleagues and friends at the Camera Club of New York. There were quite a number of people caught onto this night photography bug at this time and at the kind of the end of the Pictorialist movement photographers throughout New York were making these long exposures. So because I've been interested in the history of night photography over the years I've done a lot of research on the subject and one of the things that I've found were that there are a number of photographers who are kind of lost to the overall history of photography, but made significant contributions to night photography. And one of those people was a reverend from some obscure parish in the middle of nowhere England who somehow got interested in night photography. And all the way back in he founded the Society of Night Photographers of England. And I think that's just an amazing kind of crazy thing that all the way back then there was this exchange of information going on and a community of people that were out photographing at night. And that's one of my favorite things about night photography is that we really are a community and we kind of, we share information. And it's just a really wonderful situation to work with. So this is an image from an article from American Photography in 1910 with an article written by A. H. Blake. And this information was kind of flowing back and forth across the Atlantic, from Europe to the United States. There's been lots and lots of night photography over the years. There are many famous photographers who have made significant amounts of night photography. The great Hungarian photographer Borsi for example. And the English photographer Bill Brandt did a lot of night photography. And then many people are familiar with the train photographs of O. Winston Link, made in the late 50s into the 1960s. But throughout this entire period night photography meant long exposures, star trails. Because of the limited sensitivity of the materials, as well as reciprocity failure. So until recently we had no choice but to do these long exposures. Now we've got other options. With the advances in technology, of digital cameras, and batteries, there's so many advances, even flashlights have made tremendous advances in recent years that make different types of night photography possible. Such as astro-landscape photography. So astro-landscape photography is night photography taken at high ISOs and relatively short exposures that show the stars as points of light rather than long trails. And this is really new within the last five, six years or so as camera technology has advanced to the point where we can shoot at these higher ISOs that are required. But contrary to popular belief, astro-landscape photography can be done at any point in the lunar cycle, not just around the new moon. Most people go out only when the skies are at their absolute darkest, but that's not necessarily required. You can go out and you can make photographs at any point. New moon, quarter moon, crescent moon, full moon, it doesn't matter. And it's not necessarily high ISOs of 6,400 or 12,800, you can make these images at any ISO. You can go out and photograph at night, 100 ISO, 12,800 ISO, new moon, full moon, it doesn't matter. There's just so many possibilities. And night photography, it does present a lot of possibilities. You've got just this incredible transformative ability to take a little bit of time and compress it, record it all at once into a single image. And it just makes a photograph that's something that you can't really perceive with your own eyes, with your senses. But you're making a big chunk of time, compressing it into a single two-dimensional image, and there's just so many possibilities to change the ordinary into extraordinary. So long exposures and low light levels provide the opportunity for transformation. And you can do that transformative process either as a passive observer of what's happening during a long exposure or an active participant. And how can you be an active participant? By adding light during a long exposure using light painting and light drawing techniques. So let's look at some different types of night photography exposures. You can do short exposure, high ISO images with no moonlight. And that's kind of the situation that we have here now out in the desert, there's no moon, it's very, very dark, and we've got millions and millions of stars and the Milky Way up above. It's really an exciting and beautiful environment to photograph in. You can also do these short high ISO exposures with some moonlight. And the difference being the sky will be brighter, it'll have more color, and the dimmer stars won't show up in your photographs. You can also do short high ISO exposures under a full moon. And even fewer stars will show up and you'll have even more color and bright brilliant blue skies. You can do longer exposures at native ISO in moonlight, which will result in star trails rather than star points. Or you can combine multiple long exposures for extremely long star trails using a process called stacking. And we'll look at that later. Here are two different images of an arch here in the Alabama Hills in California's Eastern Sierra where we're filming this class. The image on the left shows the Milky Way during a 10 minute exposure. And you can see this kind of cloudy formation moving through the upper right corner. Well, that is actually the Galactic Core of the Milky Way, but it's recorded as a blur, because of the long exposure. The image on the left is the same image, the same formation, except being 10 minutes, it's only a 20 second exposure and you really see the Galactic Core, that cloud of the Milky Way in that same portion of the sky there. Both of these images have the same light painting, so you can kind of get a sense of what the foreground looks like with light painting, and then the different sky with the long exposure and the short exposure. And again, here are three different versions of a different shot. The one on the left is a short high ISO exposure for star points, the one in the middle, slightly longer, that's about two minutes, so the stars just start to trail a little bit and become like dashes in the sky. And then the image on the right is a 15 minute exposure of the same subject. Now notice that the lighting on the foreground is different in each shot as well. So different, the light painting was added from different locations and different positions to create different effects. Again, like I said, it's a tremendously versatile technique that really allows for lots of different exciting types of imagery. Now I mentioned light painting. Light painting is a technique where you can illuminate the dark part of your scene using handheld light sources rather than an on-camera flash, which creates a hard, unattractive light source. By using handheld lights from various points in the scene you can really light an object from multiple positions and create a much more dramatic effect than you would with stationary lights. Light painting also allows you to be really free and mobile and not burdened with a lot of equipment on light stands in fixed positions. It just makes for fun, easy, free movement and lots of opportunities. So light drawing is another technique that's different from light painting. Light painting you are illuminating your subject with a handheld light source and with light drawing you are creating a subject by pointing a light back towards the camera. This image by Stu Jenks from Tuscan, Arizona was made using a Zippo lighter of all things. All right, so light drawing can be simple, like Stu's image here, or much more complex. This is an Australian woman named TigTab, or goes by the name of TigTab, who makes light stencils. She does light drawings with these very elaborate stencils. So each one of these shapes and formations in the image is made with a different stencil that's basically on the front of a soft box with a flash projected through it. She says that it will take her up to a month just to make a simple image. And you can see it's well worth the effort, 'cause her images are just absolutely stunning. Okay, so now let's talk about how do we go about doing this astro-landscape photography thing. More than any other type of night photography, astro-landscape photography requires some thought, some forethought and some preparation. You gotta put a little bit of effort into it. For example, you wouldn't wanna go out and try to photograph the Milky Way in January, because well, it's below the horizon and you can't see it. So we need to do at least a little bit of preparation and scouting and planning ahead before you go out to do this type of work. So photographers can be proactive. You can research, scout locations, get permission to go onto closed areas or photograph in National Parks, things like that. You can plan for conditions, think about the weather, light pollution, different ambient light levels, as well as awareness of astronomical conditions. Or you can reactive, you can just go out and photograph and see what there is. Myself, I tend to be somewhere in between. There's some photographers who know before they leave their home exactly what they're gonna photograph and exactly what it's gonna look like. I like to have some element of spontaneity in there, but again, I don't wanna go out to photograph the Milky Way when it's gonna be below the horizon. Basic astronomy. You should learn how to predict when the Milky Way is gonna be up in the sky. Have a little basic understanding of the lunar cycle. For example, the moon rises about 40 minutes later each night during the lunar cycle, so that during the full moon it rises just at sunset and during the new moon it's rising right about sunrise. So there's a 40 minute delay each day during the lunar cycle. It helps to have a basic understanding of these things. There are a lot of astronomy apps that you can use to help get a grip on all these things. Some of the more popular ones are Photo Pills and Photographer's Ephemeris. Both of those are really very powerful tools that allow you to plan and predict exactly where these celestial phenomenon are gonna be. Both of them though have a bit of a steep learning curve, but fortunately the developers of these apps have made a lot of video tutorials that you can use to learn how to use these things effectively. My favorite astronomy app and I think the simplest and easiest one to use is called Sky Guide. And it has an augmented reality feature that allows you to just hold it up to the sky and tell you exactly what you're looking at and you can fast forward it and tell what's going to appear before your eyes in real time or at any point during the future. A really powerful tool. The old-fashioned way to go about doing this is with a tool or a device called the planisphere, which is basically the astronomers version of a slide rule. It's a disc that you can turn and it will give you, basically show you what's in the night sky in front of you at any given date or time. A really useful tool and it doesn't require batteries. Let's talk about the Milky Way, because that's what a lot of people think about when we're talking about astro-landscape photography. When it is up in the sky? When can you see it? When can you photograph it? Well, in the early spring, March and April, it's visible in the night sky the last couple of hours before sunrise. From May to June it's visible in the sky from basically from darkness until dawn. And really May and June are the key Milky Way season, that's the best time to photograph it, because it's relatively low across the horizon and you can photograph the entire arch of the Milky Way from the south to the north in the eastern sky. In July and August the Milky Way is higher up in the sky and it's a little bit more difficult to capture most of it in a single image or even in a panorama, because it's so much higher above the horizon. That's where we are right now, we're out here in the Alabama Hills in California's Eastern Sierra and it's late July and that Milky Way is pretty high up in the sky. We can still photograph the core, but it's a little bit more difficult to get the entire arch in our photographs. Later in the fall, September and October, the Milky Way is briefly visible as soon as it gets dark and then it's up out, it's gone out of the frame of view. And then November through February, at least in the northern hemisphere, it's below the horizon and while the air is clearer and bright and you can see millions and millions of stars, you don't get that really strong Galactic Core of the Milky Way. Okay, so this is a panoramic image taken at Mono Lake here in the Eastern Sierra and it's made of, I believe it was six vertical images stacked or combined together in post-processing. And it shows the entire arch of the Milky Way. Again, it's in the eastern sky from the south where the core or the densest part of the Milky Way that we can see is, and it's moving all the way across to the northern part of the eastern sky. Now the bright part in the center of this image is the moon that's just about to rise over the horizon. And that's happening because this was made late in the summer as the moon is coming up just after it gets dark really. So again, May and June are the best months to photograph the Milky Way, and especially for panoramas, because the arch is lower in the sky. Later in the summer it's pretty high up by the time it actually gets dark. Here's another panoramic Milky Way image. This one was made in Bodie Ghost Town, which is about 100 miles north of here. Also in the Eastern Sierra. And again, the moon is just about to rise over the horizon and that's what contributes to the brightness in the sky, especially the bright part right at the horizon there. Okay, so this is NASA's official representation of our galaxy. It's an artist's rendering, it's obviously not a real image. But I'm showing that here, because it really helps to get an understanding of what we're looking at and what our place in the universe is. So you can see that little yellow dot down in the center towards the bottom third of the image, well that's the sun and, of course, we are revolving around the sun over the course of a year. And when you look towards the core or we see that dense core of the Milky Way you're really looking towards the center of the galaxy. But this is spiral galaxy that has various arms that rotate out counterclockwise from the center of the galaxy. And we're just looking at, when we see the core, we're just looking at one of those arms, but it is towards the center of the galaxy. So in the summertime the earth is in between the sun and the core of the Milky Way, and that's why we can see it. But in the wintertime the sun is in between the earth and the Milky Way and that's why we don't see it, that's why it's below the horizon. So it's just really incredible to think about, as Carl Sagan would say, billions and billions of stars. And that's what we are, we're just one tiny little speck, one lonely speck in the middle of a huge galaxy. So the central core of the galactic center of the Milky Way can be found in the eastern sky towards the south in between the constellations of Sagittarius and Scorpius. Sagittarius is a little bit difficult to pick out, but Scorpius is relatively easy to find, because of the bright red star Antares that makes up part of the constellation of Scorpius. There is an asterism called the Summer Triangle made up of three bright stars, Altair, Deneb, and Vega. And that generally appears high overhead and is very easy to find in the sky before it gets completely dark. And that's useful, because the Milky Way goes right through the center of that Summer Triangle. So if you can see those three bright stars of the Summer Triangle you'll be able to tell where the Milky Way's gonna be higher in the sky. So in the summer look in the eastern sky after about 10 p.m., again, from the south to the north. In the south you are gonna be looking in between Scorpius and that Teapot asterism or Sagittarius and coming down and landing, basically ending in Cassiopeia in the north. So the Milky Way is best photographed at or near the full moon, because the moonlight will not obscure the dimmer stars. You can still see little bits of the Milky Way, but it won't be as intense when you've got more moonlight in the sky. All right, so here's a representation of that Galactic Core or the densest part of the Milky Way. This is, again, the southeastern sky. You can see the asterism called the Teapot in the left, which is a little bit easier to see than Sagittarius, and Scorpius over there on the right with Antares, the red giant star. Following that up higher in the sky you see the Summer Triangle and then it would continue on over and come down in Cassiopeia. And here's that Summer Triangle superimposed on an image of the night sky. And you can see the denser part of the stars over there on the right, which would be the southeast. All right, so that's our astronomy primer. Let's get started.
Class Materials
Bonus Materials with Purchase
Ratings and Reviews
user-1ff946
The classes are full of extremely important technical information that is delivered in a concise, clear manner. It is very difficult to grasp it all in one sitting. I have taken classes before in photography and I love the learning model with Creative Live .I can go back and review the information at my own pace and take notes as I go- I can even rewind and review if I miss something. This is a great collection of material and I would highly recommend purchasing the entire bundle - great job on the selection of fantastic teachers and putting together such a fabulous package on night photography.
Zorka
A tremendous amount of information crammed into one single course - it can be only done by CreativeLive! Along with having such a profound knowledge and skills in a particular field, Lance Keimig has an amazing teaching style as well - he is very clear, concise and thorough. I strongly recommend this set of classes to anyone who is interested to acquire some general (or expand their existing!) knowledge of astrophotography and night sky shooting. Last but not the least, I want to congratulate the CreativeLive for teaming up with an excellent instructor to create and deliver this STELLAR and production-wise very demanding course!