Retouching Workflow: Contouring
Lesson 22 from: The Art & Business of High-End RetouchingPratik Naik
Retouching Workflow: Contouring
Lesson 22 from: The Art & Business of High-End RetouchingPratik Naik
Lessons
Day 1
1Introduction and Pre-Shoot
19:30 2Shooting for Retouching: Beauty Look
27:52 3Shooting for Retouching: Beauty Continued
36:58 4Shooting for Retouching: Fashion
35:04 5Shooting for Retouching: Fashion Continued
27:47 6Shooting for Retouching: Male Fashion
23:13 7Culling for Retouching
16:47Annotating for the Retoucher
37:27 9The Retouching Industry
15:19 10What to Know Before You Get Started
27:07 11Tips for Retouchers & Gear
36:16Day 2
12Overview of Photoshop Workflow
37:29 13Photoshop Workflow Continued
43:34 14Retouching Workflow: Camera RAW
38:29 15Retouching Workflow: Beauty Image
30:31 16Retouching Workflow: Healing Brush
24:29 17Retouching Workflow: Content Aware
32:55 18Retouching Workflow: Dodge and Burn
31:08 19Retouching Workflow: Frequency Separation
31:03 20Retouching Workflow: Frequency Separation Continued
16:04 21Retouching Workflow: Color Correction
26:08Day 3
22Retouching Workflow: Contouring
34:56 23Retouching Workflow: Sharpening
17:39 24Retouching Workflow: Color Toning
28:54 25Retouching Workflow: Color Picker Table
20:24 26Conversion to Black and White
27:10 27Conversion Q&A
13:54 28Retouching Workflow: Luminosity Mask
14:31 29Retouching Workflow: Male Model
30:01 30Retouching Workflow: Male Model Continued
39:26 31Retouching Workflow: Fashion
28:39 32Working with Clients & the Business of Retouching
46:15Lesson Info
Retouching Workflow: Contouring
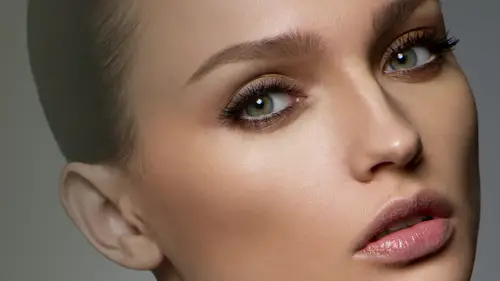
Going back on track from yesterday recovered basically most of the retouched image from start to finish you got to see everything from the photography from day one all the way to the finishing touches on the image however we do have a little bit love to go this is sharpening such as exporting for the lab maybe some optional contrary options I know people were still a curious about that I looked online and people want to know you know what if you really want to do some more country and what would you do in the end? So we'll cover these things and then from there will carry on and do some stuff with black and white as I mentioned because it's a big topic people convert to black out quite a bit how do you go about and do that? And then we'll do other tips and tricks along with continuing the other two looks, which is, you know, the male head shot that we did and if you have time to go forward with the fashion, look as well on the end of the day and then finally finishing off more about th...
e business side of marking side on the presentation so that's kind of water programs and b and we'll get started so I'm going to go ahead and rd a photo shop and let me go ahead and open up the image that we had from yesterday you know, yes, I went back after the show and I did some files for a couple of my clients, and as I was working, I realize something it's much easier to work when no one's looking at you and the funny thing is, I never quite understood that concept in principle because no one has ever seen my skin and I was teaching, but when someone is there looking at you over your shoulder, you get this feeling that you under this performance, anxiety. So you worked different. You forget the things that you typically would remember, and it happens, and I found that funny, because always, whenever I teach photographers on a one on one basis, I would look over their shoulders, and they kept telling me, oh, I'm not doing it like I should they kept saying these things I said, you're just making excuses. Now I talk, I no, I completely understand what they're saying, all right? Except that these people watching don't have any faces and the invisible, which is kind of creepy. In a way let me do a quick recap before we continue. Now, as you notice the other really cool part about this thing is that read it and spend that long returns use image we spent maybe half a day yesterday with breaks, with explanation, with questions collectively, just doing the work would have amounted to about hour hour and a half for medium from an image from start to finish doing everything possible think about that in the grand scheme think about that from the point of actually working on this at home and getting more efficient with time. What that translates to is not having to spend sixty eight hours on an image and the work so so simple and so concrete that you can apply this to anything you do, no matter what you shoot, even if it's lean like cars, you know, the concept is still the same. You clean the image, you make the line of beautiful, you made the colors of beautiful, and you have this really beautiful package that's easily transferrable through whatever you're working on, which I think is the main goal of what I wanted to share over the last two days. And today now, before he could considers image complete. Let's, go ahead and recap, so I'm going to show you a quick before and after. So looking at this image, we see that three things, um, have happened, and that goes back to my principle of the image is cleaned up in the sense we don't have any blemishes showing andre don't have any other flaws that, when I consider flaw, is something that stands out an image. That you should take out from either healing of cloning. The second thing is that we even got the lighting and the transitions, so we don't have any blotchy skin that everything is transition perfectly. The third thing is any color distractions or any skin discoloration is even doubt to match a really nice tone in the whole image. And what that means is that we have this package that looks beautiful and she looks like herself on a good day that's the best way to describe this sow again let's, take a look at it before and after it quick just to give you a quick recap. This is the after everything we've been working on so far and this is the before, and you can see the main difference being that when you apply everything, you get this really beautiful image and it's exactly like her the lighting so the same, the texture is still there. The makeup is still the work of the makeup artist. You haven't changed your work completely it's nice, clean and beautiful and that is essentially, you know what makes it so important? I want to turn on selling real quick, which is essentially kind of um actually we go back to that in a minute before I go any further, let me go and open up in these individual folders and kind of show you what we did so first and foremost in our cleaning section, we had, uh, healing, including work, which had mentioned to clear the flyaways let me go and turn that on and off from scratch so you can check out our progress. You can see exactly what we did to this point. We turn it on and off, you can see that the model work we did wasn't a lot because in this step you're only taking on the flaws and you're not doing anything everything else at once that's the biggest mistake I find people do because he wanted everything at once they want to work on everything on the face first and then go the arms and go this dumb maker legs or whatever and what that does is just it's a lot of time and secondly, it doesn't look very good because you want a section u in a section it and you wanna make sure that each step goes as it should. So after the cleaning step, we went onto our dodging burn step if you notice without dodging, burn, step it like she looks pretty nice in the sense where we've taken out all the areas that have darkened up around the lighter parts of her face, so for example, under the eye here you see this crease that comes up and also you see some areas on the forehead that we lightened up and under the mouth and across the body so we have our dajun burn here there's also an area if you'd like to conquer allows you to do so then we went into our frequency which even doubt a lot of transitions just turned on the hot spots he could do quite a lot with this action or ice this technique next we went into our little folder where we had a group sees we messed up here and there so essentially this is kind of like your redemption stage in case you have done everything you still say that you know what I still want to move that little thing that's annoying me this is where you do it and that way you're just being more efficient and you're saving time rather than everything beginning and then finally we had um well color correction issues going on here so any time we have any transitions that produced green tents or tones or where the skin is more saturated or de saturated we can fix that in this step so everything is brought back together luckily she didn't have many issues so there wasn't a lot to do. However the techniques covered here pretty much encompass everything that I would do anyway then we finally went into her liquefy step and what we did was kind of just even out the area and what I typically wanted teo alicia would liquefy is that I don't liquefy to make people skinnier necessarily unless the client asked for it and they really wanted and the models okay within everything like that however liquefy is essentially something we do to make things more proportionate for example or even correct for distortion because ah body part may be closer to the lens for example, I think this was shot on the eighty millimeter, so we had some distortion ground and actually that worked in our favor because it allowed me to demonstrate some of the things that liquefy allowed me to do and which is correct the areas that were close to the camera like I think one of the things that happened with this image was aside from her body being close because the lower part of her face is close to the camera. It accentuated a lot of features unnecessarily for example, maybe some of the jaw line came out more than the eyes or something like that. And so what I did was kind of just bring it in to both match um the sides of her face as well as fixed we're distortion and so collectively we have this really clean image and winkle and surely before after and the difference is huge even though we didn't really do too much now going forward, what do we have left to do and I spell liquefy wrong that's brilliant. Okay, um, let's see here. So now let's pretend that you wanted to do some more contouring on the image. Now there are a couple of ways to do that, say, contouring the purpose of country is to actually how can, it seems, is to enhance the shadows and the highlights to make the impact greater for the lighting or the makeup on at least the other alternate alternative is to use contouring to slim down a model's face because you're adjusting lighting and the rap just how the face looks or how the body looks and I think that's the intention of country, at least to me, um now they're a couple of ways that I clung to her or would contour the first way is just doing our regular dodging burned techniques, which is our curves layers, you know are up curve down curve what we cover yesterday, we're not gonna go over that again. However. Another method is to use the soft, light blank layer, and that allows youto dajun burned as well, and some people are probably wanting what I mean it blank layer because typically using dodging burn is on a on a layer is done with a grey layer. However, you don't need that gray earlier. You can use a blank layer and I'll show you what I mean someone to go in and select a blank layer inside my extras folder and here I'm going to change it too soft light I'm sorry we rename teo contrary, probably not all caps. I'm not shoving anybody if you write in all caps, please don't do that now I'm gonna see you soft lights and I'm going to use my brush tool and keep in mind flow is still important I'm going to make sure that I have my default set my paint or color selections. I'm going d, which goes back to defaults, and ex inverts the colors because excess said to invert whether it's um, you know, black or white, whatever it is that you have selected. So with my contouring layer selected, I'm going to go in and start with black because black is too cute, typically a color that we used to enhance the shadows or slim a little bit of face. So what I will do here to start out with is keeping my flow at around two percent, and you'll notice that law of the times when I'm doing gentle work it's kept around two or three percent because I'm just doing something very suddenly I'm bringing back in nice and gently without going too far. Now let's go around the perimeter of her face just to kind of accentuate a little bit of her dimension and along with the shadowing, so I'm going to start by brushing just gently around the primitive her face, and I won't mind that I'm going to the hair because going to mass that out in a bit, but this gives me the ability to create a wider, softer brush at the moment rather than having a really thin brush and controlling, because that makes it much harder control. So I did a few strokes, maybe under mouth there's still a bit, maybe some right under no supreme michael with the shadow maybe on the side of her nose here, maybe a little bit in the collarbone, so I can already assume that people are probably asking, how do you know what to contour? Guess what? I don't know either, uh, what I mean by that and I'll tell you what I mean is that it goes by I it really does, and this is where individuality really comes in. Sometimes you really don't have a guidebook for every single area that you're doing, it just comes out what stands out to you, you know, don't be afraid to target things, even though you know, it may be something that most people wouldn't do because honestly, all this is experimentation the style that I have come up with in terms of the look that I like is just based on individual preference, you know, where should highlight speak century they were, should shadows be deep and things like that? Now I have my brush set to white, and I will then go and accentuate some of the highlights on her face a little bit and some of the collarbone, maybe not so much on her face because we've taken out and taking the time to tono those highlights to make it more even. But now, when I accentuate them just a little bit more, the evenness of those areas look much more natural. It's kind of weird. I still find it weird that we can go back in time and alter a moment in time that never never stops freaking me out, you know? Because what people? What are people going to think? Three hundred years of forty years from now, when they look back at a photo, you know, you never really know what a person looks like. If the only photos you have a retouched, which makes it awesome to be friends with the re toucher, was awesome family photos, and I say that retouching is all about perception because teo each person, things that should be retouched a completely different, for example right now you said maybe should country lips somewhere and sometimes people contra the lips to make them look fuller and the way they do that is they take the white brush and add highlights of the center or at least enhance the mid tones for the highlights that air prominent in the center of the living and then they take the black and then deepened a lot of the perimeter and I kind of learned this from makeup taking so like I said if you want to enhance your recharging photography spend time with people who aren't just photographers and re teachers and go out and venture and spent I'll make a partisan go to museums because that's really how you learn about lighting and make up and how they should be contoured it's not through just looking at lighting it's through looking at you know the people that add to the final image it's people that helped build that file image will show you what a good foolish could be you know when you spend time in the make up artist and you analyze what she's doing and saying why she adding, you know highlights on her nose when you don't want them there and things like that and you ask him to give you these amazing reasons that sometimes no other photographer will tell you so if you um that's why I think that if you're usually either artists are really good at applying makeup you tend to pick up on retention techniques a little bit quicker because you have this from basic principle in foundation of how to basically get to where you're going let's see here we could even add some detail ing to some of the dress we can go ahead and uh some highlights and bring it out a little more and maybe even accentuate some off the highlights in care as you can see I'm talking out loud just to show you that this most a lot a lot of this isn't scripted it's basically just me talking out loud and showing you where the progression of the images going I think that really helps because you know not everyone is always share about everything they're doing all the time it's basically experimentation and seeing well let me see if this works that's why I really loved about the first segment because with felix he was able to show you that you know he was just testing things to see sometimes what worked and what didn't but everything doesn't necessarily work all the time that's fantastic okay so that is pretty much what I did for my contrary let me zoom out a bit and see when you double click this icon it zooms in two hundred percent I never knew that that was that I learned completely new yesterday okay so when I tried it on and off you see it adds this dimension right and it just enhances what's there in a very little bit it's a little bit of like a three d effect in a sense where it pronounces a lot of features she has already its limbs or faith love it more so again this's in the access holder because it is optional it's not something I recommending all the time and secondly, as I mentioned going on the perimeter of her face, I used a blank layer because now if I want to, I can mask it and erase or hide I should say in music terminology hide the areas of the hair that were affected use the higher floor because I quickly want to just hide it I'm not interested in bringing hiding it really slowly and again I started with a wide brush because it allowed me to create a really soft um contour around the perimeter of her head without having she's really small brush and brush for a long time I think it makes it more precise as well and we even accentuate the lips and some of the hair so the arms pronounced a little the collarbone because I think that's kind of in the wind when you see a collarbone people are getting excited about e don't know why it's kind of creepy ok enough of that pretty do you when you're working on the particularly shadowing aspects of this do you also go in and now de saturate or something like that particularly the reds in the shadows because you're enhancing reds in that area usually I think that what I would do is if I noticed that the situation has come up in a particular area because you're right good point when you do dark in an area you'll notice the saturation shifts the way that I tackle that is actually really simple I'll show you I will go ahead and go to my adjustment layers and click on the saturation I will make it a clipping their in the sense where I will clip it to the bottom I'm doing this by holding alter option and my mouth is hovering right under or actually the middle of the hue saturation on the contrary on what this is going to do is any changes applied here will only work based on whatever is underneath essentially and then I will decide trait completely or secondly if I don't do that let's pretend I didn't have that option I will then essentially just going my reds and then manu to saturate a little bit and then masculine around the perimeter so very similarly do the same thing. However I do notice that on images like this I find that the amount of the amount of reds that air shifted aren't so great because once I have fixed it in my color correction area the shadows don't typically just so much for so it does give you option in case you do find it or if you like your contra lot however, if you do contra lot would still be careful because I don't think looks natural when you contrast so much of an image and you khun typically see the people who try to over contour it looks very three d and um thank so don't try and change the lighting properties of an image if you're not sure of what they should actually look like in real life that's the main goal which is why I say study outside photography because you know when you study the grates and I don't mean just photographers I mean artists and you look at a painter's from the old day they started painting like from their imagination and they started painting just based on what they see and how they interpret on canvas sometimes they even have to change it as their painting and understanding and seeing artists who can control light like that is masterful and you get a real sense of idea how lying should be adjusted that applies to retouching photography as well. So okay, back to the point about country now let's say you want to contour without actually contouring and what I mean by that is if you don't actually manually go and contour everything what I typically do is go ahead and use levels to actually enhance the shadows and highlights and a very natural progression the way that I do that is I go under my adjustments um adjustment layers and click on levels and what I'm gonna do is going to scare you a little bit, so don't freak out it's not gonna be intentionally on the whole image I'm going to shift these end points here, which are my highlights of my shadow values and my or my black men white points and bring it in so that the brightest point is right essentially the history graham starts and then I may or may not bring in the shadow area and I'm essentially be focusing on the face I'm not worried so much about on the background, the hair the moment because this whole pista graham is showcasing the whole image or whether they were the shadows and highlights are of the whole image essentially just focused on the face of the moment. Now I notice that I kind of like what's happening with the face when I turned on enough it's adding this emphasis of beautiful shadows and highlights and it's making this image showcase oh really nice contrast look without overdoing it particularly but again, as I mentioned, I'm not gonna place to the entire image going applied selectively so let me go ahead and first and foremost see what it looks like when I bring the blending mode here above next capacity and phil set to luminosity and what this does any color shifts that happened will not happen essentially because only thing that is transferring over is a changes toe light and not color. Okay, now I have my levels, I have adjusted my points and brought them in from left and the right side, and I've also changed the luminosity. Now I'm going to click on my mask, I'm going to invert my mask, and now I'm going to say that I'm going to start bye adjusting the density of the mask and what is then city? If you don't know, density is essentially opacity of the actual mask itself, so if you notice when you look up here the mask, it starts getting grayed out, and the reason for that is you're adjusting the opacity of the entire mask, and why would I do that? I was going to do this because I like the look that it had overall to particular extent, however, I'm going to go ahead and find too that even further later on. So that's, what it's used for essentially so let's say that I liked it coming through about maybe seventy five percent overall, and then I'm going to bring it back even further along her face selectively, so I have my brush selected switch overto white making sure I get my mask a selected because if you don't you don't like your masks you're gonna wonder why it's not working okay it's very important such a simple thing really important next I have my brush said toe white my flow said two two percent using shift zero to I'm going to gently brush over a global area of the face keep in mind that when I write click my hardness is set to zero I have never changed that through this whole thing everything has always been set to zero percent hardness now I stopped brushing over the image just on her skin tones and what I realized is and secondly do you notice I'm not making cutouts that I'm not like extracting making super precise because this gentle blending of every area and it flows into the dress and background just gently makes it look much more natural just because of where the light works in real life whenever you have lighting one of fires like typically does spill a little bit from here and there so I don't wantto select particular areas and bring just those areas out that's why he's a soft brush in a big brush to do these changes okay now if you know what it's my turn my layer on enough it has beautiful range on the skin and it's incredible because when I turn it on and off it shows you that the highlights air pronounced but not so distracted so it's also making the mid tones were pronounces bring the shadows deeper and it's kind of like we spend more time contouring but we did it reaches cheated in a sense I shouldn't pry not use the word cheated in the hind retention course but you know it is what it is comments you're a cheater you should use me love with dodgy birds okay now the next thing we're gonna do moving on from that is kind of talked about sharpening you know what you need you to sharpen these shopping with I don't know why it's such a big topic because cameras are quite sharp you know especially you have really nice lenses and you're over scharping detail that you're trying get rid of to begin with what's going on really quick actually before we get onto sharpening their couple to kind of main subjects that we had questions on you mind if we take those of course james uk and pars on both had questions about color shift and banding in the transition from highlights two shadows and skin tones and how to correct it it was point out that kind of on her left arm the one on the right hand side of the image there's a little bit of banning happening going from that transition into the shadow do you have any thoughts on how to deal with that? Yes this is why you use sixteen bit exactly. Bingo on dh, however, if this typically isn't something that is taking care ofthe by sixteen bits, what I recommend is this's when frequency within sixteen bit comes in to use because whenever I have my sixteen bit file loaded, whenever I see banding, I can do two things I can do a split frequency and brush very gently like I did yesterday, and if you notice with sixteen bit, what happens is the mount of levels between each shade of luminosity there. But there are many more shades wasn't their money more levels, and you can even at the banding, which are naturally also on top of that when she even that you can add noise on top of the color work that you've done by brushing and really separates the banding also it's important to notice that on my screen, there isn't a lot of banding, and the reason is sometimes depending on what monitor you're using there's perceptual banding, meaning if your monitor is really bad, you're going to see artificial banding and it's not there in the actual image. So it's very important to have a calibrated good screen. Sometimes you see things that are not there, and it really freaks you out, you're not correcting them also, if you're zoomed in a particular level. What happens is for the shop is rendering this father that particular percentage and therefore creating artificial banding because sometimes we use about one hundred percent you notice that the banding is not there also when you zoom out it creates this weird look that there may be some there isn't so again the way that I fix that is either by using the frequency of sixteen bet brushing it very gently selecting both colors like it did yesterday and then adding a bit of noise and that has taken care of a lot of banding for me so yeah great and the and then just to clarify for fitel who is asking about if you're given an eight bit can you then up convert to a sixteen bit and we talked about that yesterday and the answer was an emp vatican know how yes that's very true you should never converted the end to give to your client and say hey guess what I worked in sixteen bit and that's not true because you've just lost everything however if for banning purposes if you are in a bit of the moment and then you convert a sixteen bit and start brushing the colors will still retain that sixteen bit fidelity as you work then you can continue on progress so that means that any work that you've done prior to all the information and the images obviously gone however then if you convert sixteen dead and then work on just abandon you can still rescue it because you will have all the levels available when you start using new colors and add to your psd. So please don't start in a pit and then convert to sixteen and, you know, senator, your client that's probably a bad idea, all right? And then one more and it's funny, we got two questions coming at this from two different ways. We've got deepti who says, how does one create texture in areas of somehow the camera doesn't capture say in shadow areas due to low light and then lenin glass from oklahoma city textron areas that may have been blown out and you want to add a little bit of so basically, how do you add detail in texture to areas that have been blown out or lost? Because chata alright, cool. Let me blow your mind right now make sure you was gonna happen. Just oversold myself there. All right, let me go ahead and, um, close these folders up and go back to our little frequency holder. Okay, so the great thing about this frequency is that say that we want to add more texture to an area that has seemingly none or much less their couple things you could do, which is really cool. You can either enhance what's there if there's minimal amounts of texture by duplicating the high frequency later. I'm asking it in, and I'm going to show you that first, then I'm going to show you how to do that if you have no texture. Okay, so here we go. Um, I have my high frequency, they're selected, I'm going to command j and then I'm going to add a mask, invert, and then I will go and selectively start brushing in areas of the skin. So say that I want to brush a little bit more over here and I'll use a quicker floor just for demonstration purposes. Not that I would do this, usually, and so what happens is, let me zoom in here, you notice we didn't start with much texture along the side over here, but when you emphasize this by duplicating it and bring it in, you bring a lot more texture back in areas that seem to have very minimal amount of texture. So that's one way I go about doing that, and it works really well because it typically it blends in nicely the texture profile of the surrounding areas. Now, if you didn't have that option not going to eat, I'm going to select a new blank layer on top of the high path layer. And see if I can essentially clone one area to another and apply just a texture however what you'd probably want to do is on this high passed layer make sure it is selected first then I'm going to slit my clone brush and then go over here to my sample size and say currently only and the reason I'm doing that is I'm only going to be sampling just that particular layer and moving it over two segments that I want to fill so where we going through what all this means again my high pass their selected my clone brush is set to current layer and my float will very typically in distance I will say keep it at ten percent something little gentle but not too quick I will sample an area of texture here and then start brushing in this area on the side and what tends to happen is the texture profile will then switch to whatever it is that you're trying to fill in so if there is a hot spot area or something another where you want more texture there you can sample our area of texture next to it and then essentially just continue brushing and what that does is enhances as you can see is I'm going back and forth you can see it enhances what was already there based on the texture that surrounded and that's as close to natural as you could probably get I would not recommend don't don't getting donor files from other skin types and applying that to new images, because what happens is that you're getting different. Texture profiles of other people's face. If you want to see why that's weird, look at the person next to you with the other person on the other side and see how different their texture it looks compared to yours or the other person. Everybody has a different texture pattern, depending on what part of the face you're looking on, as well as who you're looking at, and also to add to that. Based on the lighting, it changes as well. And the camera and the lens. So essentially, what I'm trying to say is, please stop doing that.
Class Materials
bonus material with purchase
Ratings and Reviews
Valentina
Pratik has been a revelation and a revolution at the same time, even kinda a benediction because of its huge generosity to show us such an efficient and powerful workflow. His genial approach turns impossible things into possible. What amazed me most, was Pratik ability to see further the shot and take the best of it to reach the perfection. The original photo is still there, very recognizable, but through a precise and meaningful workflow, it becomes eye-catching, high quality, high impact. Pratik is a wonderful person, very genuine, high talented, with a sophisticated sense of the aesthetics and arts. This course changed drastically my way to look at photoshop and at the retouching techniques. Thank you!!
peter
Really wonderful course, thanks. May I suggest a fantastic idea for maybe those who purchase the course? It would be extremely useful to be provided with a summary of the content of each video segment, perhaps a 30-60 second video with written 'dot-point' sheet at the end of each segment, to be reviewed at a later time. It just takes too long to replay each video to get the important messages. The notes provided by Pratik were a step in the right direction but they need more detail of what was presented, including tips and tricks, in each segment. In this way, once having watched the entire course, you could go back and review the nitty-gritty aspects of each segment quickly and efficiently. These quick 'summary' clips could make up a separate 15 minute video, recapping in detail the hard-core content of the course, without interruptions from questions. This would be extremely useful and hopefully not take the presenter too long to film. I feel this would be a wonderful 'added value' aspect of buying the course, as it would not be available for for free viewing. It would certainly encourage me to buy more of the available courses. Keep up the great work at Creative Live! I have stopped my Kelby subscription and just watch you guys now!! Well done!! Peter Bourne Australia
user d3cdf7
I have been a retoucher since 1992 and a commercial photographer and I am amazed at the wealth of information Pratik is teaching us. Love his great sense of humor. Yes, retouching takes me way into the early part of the morning...up to 4 am. I've learned to listen to Books on DVD from the library which help my attitude much better. Several degrees behind me and I know I was meant to make a difference with portrait photography. NO ONE wants reality, especially at elder ages. So I continue to learn to retouch professionally and not use a quick retouch filter which renders a fake look. I may incorporate a light retouching filter, but I find I must always do some manual retouching first, in order to have the appearance look real. Which is the old first rule to retouching itself. In the film days, I use to make my own texture screens in order to create more beautiful faces. My photographer friends would ask for my help in using them, when they had blurred an important celebrity shot. The texture screen would help spread the dots and give the appearance of your digital noise now. The results were the image looked more focused Thank you Pratik Naik, for being so generous with your techniques. I am interested in how to price out retouching jobs, as I have been told I give my retouching away with my photography. Thanks,, Jeri Goodwin-Akari cherished moments photography in walla walla, WA
Student Work
Related Classes
Portrait Photography