Lessons
Lesson Info
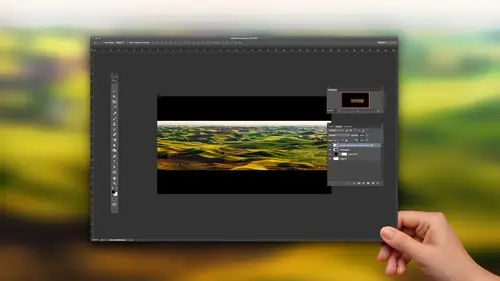
Quick Mask Mode
My name is Drew Councilman, and I'm your host. This is advanced Photoshopped. Tips and tricks with Ben Wilmore. Help me! Welcome back to the Creativelive stage, Ben More. All right, you guys ready for some advanced tips and tricks? All right, well, you have to ramp ourself it into that meeting. Our very 1st 1 doesn't have toe melt your brain quite that much. Although it will be useful and, uh, in cool. What I want to dio is show you how to quickly remove the background on simple graphics. So that means if you sign your name on a sheet of paper, you scanned it in, and now you want to use that Put on top, your photo or something else. I have a graphic here that I took a photo of, which is, uh, my little pirate graphic here. And I would like to have that as a graphic I could use, put it on top of my photos or do something else, But I don't want the background that's there. There are many different ways you could do this, but most methods involve using a selection tool of some sort, and in...
the process of doing so the graphic itself will usually get simplified. And I wanted to be mawr pretty darn precise of what I have here. So here's what I'm gonna do. I'm going to use something called quick mask mode, just in case you haven't used it before. I'll just give you a quick intro on it, and that is right now you can't see it, but at the bottom of my screen, just outside of the bottom of my tool up panel, there's usually an icon down there for quick mask mode. But when we're recording this video, my screen is too small to show it to you. I can get to it, though, by typing the letter. Q. It turns it, toggles it on and off. But if you have a larger screen, you'd be able to see it down there just below my foreground and background color do is grab my paintbrush tool. I'm going to type a letter Q. And then I'm just gonna paint the letter L and I'll type letter Q again and what you do, in essence, when you have quick mask mode, is your painting in a selection and what actually happens is where've you paint is what will not be selected. So if you look here, the area where I painted is the only thing that's not selected. Well, what you can do in quick mask mode, though, is you don't have to paint. You can put the cool into black and white within that quick mask in any way. You want pasting images in running filters, doing anything. And so what I'm gonna do here is select all and then I'm gonna copy. And I no longer need the selections like De Select. So I have this sitting on what's known as a clipboard just just sitting there all type the letter Q to go on a quick mask mode. Usually I'd be able to see it at the bottom of my tool panel. Just little icon would get pushed in that indicate it's on. And now, instead of painting, I'm gonna pieced this copied picture into the quick mask. So now it's as if I grabbed my brush and I painted in all the areas where we have black in that graphic, and I did not paint wherever we have white in that graphic. The only problem with that is that the contents of what have copied wasn't pure black and pure white. There are different shades of grey and other things up in here, so I need to adjust this. I'm gonna do that by going toe levels in in levels. Whenever you paste in some sort of a graphic, they'll usually be two very distinct humps in the history. Graham that's here. In this case, the hump in the left is indicating that there's a large area of these brightness levels that you see directly below that hump. That's got to be my background If I pull the slider near the upper left over until it's on the end of that hump, I've just told the entire background to turn black. What that means is, it takes wherever this little slide has been moved to go straight down to hear anything in this brightness range has turned solid black. Now I want to get the graphic of the the S words in the skull to turn white. That's most likely this other hump, because that indicates that there's some of your image that it is in this general brightness range. Here. I'm gonna grab this slider and pull it to the other side of the hump, and that should have cleaned up the image such that we have mainly solid black and mainly solid white in there instead of having that excess detail. Ah, click. OK, and now I'm gonna type letter Q to get out of quick mask mode and let's see what we have. We have our graphic selected in the edge of that Graphic is really precise because it's made out of the original graphic. All we did was adjust the brightness of it to end up at this point. So now if I want that, I'm not going to copy it and paste it on another image or delete the background. Because if I did, there's usually a little hint of the old stuff attached to the edge where I wouldn't get a pure white result in here right on the edge, you'd see just to hint the black coming in like a slightly soft edge. So instead I'm going to not use any part of this original. I'm going to instead go to the bottom of my layers panel. We'll click on the adjustment layer icon, and I'm going to say, Let's create a layer full of a solid color. When I do that, it looks and sees that there's a selection active, and so it assumes you only want to fill the area that selected. So I choose that. And now I can choose any color I would like if I wanted to be read. I can come up here and she's read. I wanted Yellow, White, whatever color click on OK, and then just to show you that it's got a clean edge, I will take what's in the background and replace it with something new. Maybe I'll go to the Grady Int Tool and make a rainbow Grady int here and will apply that underneath. And if I zoom up on this image, you'll find that there is no residue of the old background attached to the edge. There's no hint of black coming in there, whereas had I, um, kept the original graphic that's there and just deleted the background like select inverse to get the opposite hit delete. You would have seen stuff clinging to the edges, and so this is what I do. Any time we want to remove the background of a scanned logo tax to signature anything like that, and it works every time as long as you practice it. If I look at my layers panel, you'll now see that this is called a solid color layer, and then it's got a layer mask that limits where it shows up, and at any time I can double click on that left side. We're currently see the Color white, and I can change it to anything I'd like. And if you want to inspect the mask, the mask would show you how clean the edges now, that kind of stuff, because sometimes you need to clean it up a little bit. You could move your mouse on top of the mask in your layers panel. You can hold down the option key and click on it. And if you dio, you'll be viewing it here in the main screen, and I could zoom up on it and maybe just clean it up a little bit because I can see some white specks like one out here. I'll just grab my brush, make sure I'm painting with black, just clean up any little spots that don't quite look right. You have a dirty screen like mine. It can help to move the image around like this to see. Does that stuff move with the image, or is it actually on my screen, fingerprints and things so I might just clean it up a little bit? Larger brush could make that a little more efficient, and I might decide to clean up what's in here. Let's get a slight this smaller brush, clean that up.
Ratings and Reviews
Frank Lombard
Ben, THANKS, you always make your classes a pleasure and informative opportunity, Keep them coming !!!
user-1c9a21
Ben is fantastic as always. Has a way of getting directly to the point and packs a lot of information in each of his classes. He's my favorite instructor.
Terri
Watched this cass live during Photoshop week. I think I'm going to have to buy it. Amazing stuff here.