Lesson Info
2. Exploring the Interface
Lessons
Class Introduction
03:37 2Exploring the Interface
11:29 3Meet Premiere Pro
08:43 4Building a Rough Cut
06:11 5Setting up a Project
07:10 6Importing Media
10:55 7Working in Timeline Part 1
15:21 8Working in Timeline Part 2
18:44Refining Your Edit
10:00 10Trim Tools
30:47 11Working wth Audio
13:28 12Adding Music
10:47 13Working with Music
16:53 14Basic Transitions
17:02 15Advanced Transitions
12:07 16Working with Filters & Effects
25:30 17Working with Nests & Sequences
13:09 18Motion Effects
26:03 19Rendering & Positioning
06:03 20Titles & Graphics
18:50 21Basic Color Correction
11:33 22Exporting & Archiving
23:30Lesson Info
Exploring the Interface
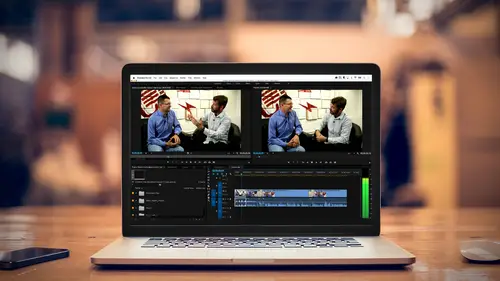
So, let's go ahead and meet Premier Pro. And so this is the interface, and I want to walk you through the interface first, and then we're going to actually play the video that we're going to create throughout the day. So, here we are in Premier, and there are four basic areas that you need to be familiar with. In the lower left hand corner, this is your project panel. And the project panel is where you're storing all of your media. So, if you want to be able to access video clips or interviews, you will import them into this window, and organize them into this window. So that's the start, that's your project file. Up here is the source monitor. Now I'm going to go ahead and open up a clip in the source monitor so it's not blank. And I just did that by double clicking. There's lots of ways to load things in. We will talk about that throughout the course. But this is where you can watch a clip that you have imported, and you can choose exactly what part of the clip you want to go ahead a...
nd bring into your timeline. So this is kind of where you start your edit. You bring the clips in, a lot of times we shoot things, we have our foot, we have our thumbs. If you're working with GoPros there's a lot of footage of you looking at your face. That's just the nature of the beast with GoPros. I probably have hundreds of hours of me looking at my GoPro, saying, is this on? Ah, yes, and then I hit the on switch and I don't get anything else. But that's where you would do that. You'd mark in and out points, and we'll talk about that. If you look down here to the right, this is where the magic happens, this is our sequence, this is our timeline. This is a graphical representation of our program from beginning to end. And you'll see lots of elements here, and I'm going to go ahead and I'm going to bring this full screen so it's a little easier to see. And let's zoom in a little bit here. So what we have here, shift plus, now I'll talk a little bit about keyboard shortcuts throughout the course. I am using keyboard shortcuts throughout the course, and I will try to say the keyboard shortcuts that I am punching in. Even if it's not something I'm specifically teaching at that moment in time, because it's always a good reference. All I did, by the way, is to bring this full screen in Premier, if you hover your mouse over any of those quadrants, over any of those windows, and hit the accent grave key, or the tilda key, it's in the upper left hand corner of your keyboard. It looks kind of like that squiggly ocean wave, or the grave is the little accent that points down. And what that does is it actually brings that one panel full screen. And this is an amazing shortcut. As a matter of fact, this is one that you should remember because there's a lot of stuff happening here, and sometimes you just want to focus on one element, so that tilda key, or grave key, will toggle you between full screen and your original layout. So we'll be using that a lot, but, as a matter of fact, my mouse had moved. So we went full screen on the boat. Pretty, but not necessarily what I wanted to talk about. There we go. So this is our timeline. It's a graphical representation of what's going on. Our first shot might be on this main level. I might have something on the second track, and that is my title. I have music playing here on audio. And I have some B roll and interview clips going along, some more B roll up here, and the show continues, and at the end, we can see we have some music and some credits. Lots of video tracks, lots of audio tracks, something to keep in mind that especially if you work in Photoshop, this will make a lot of sense to you. I'm stacking elements, so, I have video here and if I play it, as long as there's nothing above it, I see what's on that track. Now you'll notice I have some things on the second track, and in that case, that will block what's below it. So if I'm in a situation where, and I'm going to just jump ahead, that's my main track here. And I'm going to bring this down and you'll see I'm over my interview. And we see the element here. But if I go ahead and I move my play head, and we'll learn how to do all this. And let me go ahead and mute this so that I don't deafen everybody. We see it's being blocked by this footage. So think of this as a building with multiple stories. If you're on the main level, and you're looking down to that building, you see the first floor. But, now if somebody puts a second floor on it, in this case the B roll, that blocks everything in the first layer. And that is your B roll, or your cutaways. If you had something on the third layer it would block everything on two and one. Now to take this to the next step, imagine that layer three is not the full size of the building, but it's just a small section. So it reveals part of what's on level two. That's a picture in a picture. Okay, so with video you start stacking things up. I also talked about titles here. And titles work very similar to B roll. But they have something called an alpha channel, or a transparencies channel. So if I put a title on, it actually is transparent during part of it, so think of this is as a floor that's made of glass. And the writing is on the glass, so you actually see through what's below. So that's why we have all of these different layers and as a matter of fact, you can have up to 64 layers of video, that's probably a lot to work with. Most time editors might have anywhere from two or three to maybe seven or eight, unless you're doing something very complex. I want to also talk a little bit about audio in the interface here. Where video, whatever's above, overrides what's below, audio is all simultaneous. So I can actually play background sounds, I can play music, I can play the interview, and I can play that all simultaneously. So you'll notice that the audio is green, the video is blue, and it gives us just a quick idea of what's going to happen here visually. And that's what this final window is. That is our program monitor. That is what you're viewer sees, whether they're watching television, whether they're watching it on their phone, whether they're watching it on their laptop. This is your final show that's outputting, that they're seeing. This is where you have your media, this is how you refine it, this is how you organize it, a graphical representation of what's going on here. And, you may notice there are also some tabs throughout, and those serve different purposes. And as we go through the course you'll discover what those tabs do. Now we're not going to be able to cover every tab, unless you turn this six hour class into a 120 hour class. And even then, they keep changing things. So, that's an idea of the interface. So let me go ahead and play the video because I think it's kind of fun. This is a almost ready to export video. I haven't quite finished cleaning it up yet. So there might be some hiccups with the audio hasn't been refined, but, it gives you a good idea of what's going to happen. Now I could play this full screen, but I intentionally want to play it with all the quadrants, so you can see the playhead move, and see what happens in our shot. And we'll eventually get to see this full screen because this is some very pretty stuff. As a matter of fact, we're very, very fortunate that Colin Smith of Photoshop Cafe worked with us to give us some really pretty drone footage and was willing to do an interview with me, a very patient man. So that we would have this footage to work with. And as a matter of fact, if you buy the class, you'll get this footage to actually work with. And it's some absolutely beautiful, beautiful imagery. He's talking, as you will soon see, about shooting sunsets with a drone. And this is just a nice short little clip, and example of maybe what you might cut as a YouTube, Vimeo, or marketing piece. So let me go ahead and hit play. I think I muted it, so let me go ahead and unmute that. (upbeat music) So anyway the beach is a beautiful place, there's so many opportunities to capture just amazing things. You have the ocean and boats, incredible cloud formations come over the water, and then when the sun comes down you get these gorgeous reflections that come from the sun. So one of the important things you'll want to do is make sure you don't fly too high. That's a mistake a lot of people make. They get the drone and they think I need to go as high as I can, 400 feet. Well if you actually look at the angle of the sun as it reflects off of the water, you actually want to be lower, and you're going to get that nice beam of light that's going to come in. I mean you'll see it, when you go up and down, you'll see that beam of light when it just gets long and stretches right across the water and it's gorgeous. Look for some kind of a foreground element. If you're just shooting the ocean, and the sun in the background, it's very, very boring. It's a nice sunset, but it looks like one of a million other sunsets that anyone would have captured. There's no advantage in using a drone. But if you can find a foreground element that you can frame that shot and have something interesting in the foreground, with that sun setting in the background, it's going to create a much more interesting composition. When I go to a location like this, the first thing I'm going to look for is a nice spot to have that sunset in the background. You might see this really interesting rock there with a hole in it. So what I would do, and regular thinking is, oh, I can't get out there, but here you can. You can go anywhere you want. So I would always looks for a spot, and it's like okay there's a great feature. Once you find that interesting feature, then figure out where your sun's setting, get there, frame the shot nicely, find the right angle, and just kind of come around a little bit. Use altitude as a compositional tool. And also go side to side until you compose it beautifully. And then just start shooting and let your sun set go there. If you're shooting video, photos, doesn't really matter. You've got a beautiful scene, and then just let it unfold in front of your drone. (inspiring music) So that is what we will be learning to build. I think that's some fun stuff and beautiful footage. Again, I want to thank him. Check him out at Photoshop Cafe, an amazing photographer. And also a wonderful teacher. He's actually been on Creative Live himself.
Ratings and Reviews
Maude Colin
This class is exactly what I needed! I've been trying to understand Premiere Pro for a year now and I've never been able to do anything with it. I had the feeling that I would never succeed and yet... Abba Shapiro is not only a great teacher, but also the kind of person that makes everything looks so simple. I loved that class and even though I've got everything I needed from it, I really want to do the Premiere Pro bootcamp this year. I want to go further and learn Premiere in depth, just for fun cause that's what it was! With Abba Shapiro, I had fun learning this super-complexe program! It was fun, easy and super rewarding!!!
perrault095
One more amazing class from Abba! The is a fantastic teacher who would explain complicated issues and make it souds so simple. Lots of information to work with. Really great speaker and his humor is brilliant. Love his class!!! Will be rewatching it again and again.
Yevhen Byelyakov
An awesome class that makes the initial hoorays to Premiere Pro so much less intimidating and is guarantee to save you a lot of time. I've created about a hundred clips over the last year or so and after this course identified a huge amount of productivity boosters and also learned a few things to improve the quality of my produce. Looking forward to more in-depths courses. One last comment -- it is basic and gives cursory overview of the topics listed. Do not expect anything too deep or advanced but if you're self-taught, Youtube-style person who still drags the clips around or copy-pastes attributes across all clips, this course will be a great way to improve many of the routine tasks.