Lessons
Lesson Info
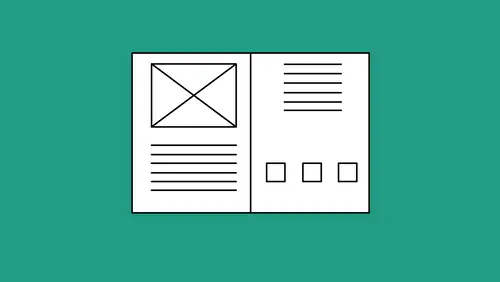
Layout Workflow
So now I want to talk about actually getting in here and talking about the workflow of how you'd actual set up an overarching file where you've got everything laid out. You may be working for a company that does a lot of proposals so you're going to have several different pages with different items of content in there. Text containers, image containers, grid structures, your guides are gonna be different, your column guides are gonna be different and you're gonna want to go through and set up this entire document. And it's not just setting up the files so that the grids are there for people to put their content in, I need everything to be right in the right location. If I'm gonna do a bio page I need to have the image container on that page in that location ready to go with all of its attributes applied to it and all of the other attributes dialed in. So when somebody imports an image into there it's gonna fit the box perfectly. You don't have to fit it. I need to dial everything in to...
make sure it works the way it's supposed to. So as I go through here I could go in and start laying things out on master pages. We're gonna get to master pages in a bit. But I'm just gonna go in and start laying this out because I can always take what I've done and turn it into a master page. So as I start off my document here and I've laid this all out, I'm just gonna select my guides here. I would like to go and I would like to divide this particular document into thirds because my layout is going to require me to have my content divided into thirds here. So a really easy way to divide a page into thirds, or quarters, or whatever divisions that you want, is this. I'm gonna drop a guide on the page and I would like this to be at 1/3 down the page. My guide's active. I go to the control bar. I use my calculator and I know that 1/3 of is gonna be 11 divided by three and I hit return. There's my guide 1/3 of the way down the page. I would normally use a calculator for this. I got the calculator built in to end design. Now I also know that if I want to duplicate something I can always hold down my Option or my Alt key and I can duplicate anything that I want. It doesn't matter if it's a guide or it's a container, if I want to create a duplicate of this I simply select it, hold down the Option, the Alt key, and duplicate it. So that Option or Alt command works to duplicate anything. Where I'm going with this is just because we're not going in and duplicating something on the page doesn't mean that Option or Alt doesn't work in other locations. Here's what I have. I have my first guide on the page. I used my trick of using a calculator of getting it right to that location. I would now like a second guide twice as far down as the first guide. So I got my 1/3 division here. I want the second third division. I'm gonna select that guide. The control bar shows up with that position right there. I would like this guide to be twice as far down the page. So I'm gonna say times two. And if I hit return it's just simply gonna move this down the page. I want to keep this and I want to copy this guide. And I know that using my Option or Alt key and click and dragging will copy it but if I go in and use my values in here, select the guide, put my cursor in there and say times two, I'm gonna hold down my Option key and hit Option return and that's gonna duplicate what I've done. It's gonna happen time and time again with all of our control bars. So this is the ability to go in and set this guide exactly where I want it to be. Awesome, I like this! Now I'd like to go in and I'd create some containers in here on the page for my initial layout. And what I'd like is I'd like to have containers here that are exactly this width right here of each and every one of my columns, and I want them one inch high as well. So I could go in and manually draw these items and then go into my width and my height and change the size of my items here each and every time to get them where I'd like them to be. Or I can simply take any one of my tools and instead of drawing them and editing the height and width later, I can simply click once and I can put in the values, use my Tab key to go to the next value field, type in the values and simply click okay to get those locations. Now I can put these in. Now when I put these in here how do I know that the spacing between this and the margin, or my guide, is gonna be exactly the same? Well here's how I do it. I'm gonna take my container that I've drawn, it's the perfect size, it's snapped right to my guides, and I'm gonna park this right on my guide. Now I would like this to be 3/8 of an inch above that line right there. So how do I make sure that it's 3/8 of an inch above? Well I could go in and I could draw a little 3/8 of an inch high box, put it in there, and move the whole thing. No! We're gonna use our x and our y right here in our control bar. This is where you take good knowledge and apply it so that you use the numbers and you make everything exact. It makes life super-easy when you can plug everything in exactly where you want it to be. So I have my container. I'm gonna zoom in on this so you can see. There's my container. My x is my position from left to right on the page. My y is the position up and down on the page, remembering that I always measure from the upper left-hand corner of my page. So here's my container and so I would like to adjust the y measurement. And I would like to move this up 3/8 of an inch. So if I move it up, that's gonna reduce the number, or I'm gonna have a negative number. Down, I'm gonna add to it. So I would like to move this up 3/8 of an inch. So my container is selected, I go to my y, and I'm going to say minus .375. Cause if I've been using a calculator this is exactly what I would do. 3/8 of an inch is .375. When I go in and use this as a calculator and say subtract 3/8 of an inch from the y position and I hit return, that has moved it up exactly 3/8 of an inch. I know exactly where it's supposed to be. The same thing, I can go down and do this next one too. I'm going to position this right there to snap at the guide and I have some weird number right in here. It doesn't matter, I simply want to move this up 3/8 of an inch, minus .375. Both of these are in the right location without having me to move things around or guess or draw a box, which people will do. They'll draw a box and they'll make it this big and make sure it's 3/8 of inch high and then they'll move this up, no. No, no, no, no, no, none of that stuff at all! We're gonna take this and we're just gonna use our measurements right here. Awesome! There's our shapes. Looking good so far. Now going in I can calculate the size of anything. I may want to come in here and I may want to make this box twice as high. So if I go in and I change the width or the height here, I would like to make that height two inches high on this container, instead of one inch. When I go in and I change the height on this and I say two inches, it makes it two inches high. But you'll notice what it did. It did it from the center. I don't want it from the center. I want to keep the baseline where it is and I want to add it to the height. Well in the control bar here I have my reference point. My reference point is where I measure from, rotate from, distribute the size, change, flip, whatever. So if I want to add the height to something I'm gonna click on reference point that is gonna be my anchor point. So when I add height to this object it's going to keep the base where it is and add the height from that reference point. By default the reference point is selected in the center. When you start up in Designer for the first time it's there unless you change it. So now if I go and I change the height of my box and say two inches high, it keeps the baseline right where it is and it makes it twice as high. It's fantastic, I love it! So if I want to rotate or I want to flip or anything like that, from this point, that's what the reference point does for me right there. So this works out really good. If you've never used the x and y in the width and the height and your reference point here, be prepared for an absolutely awesome show, because this works great all the time. And it's all about making sure you set up everything the way it is, quickly and efficiently, that's why we use these fields. If I want to go in here as well and I want to flip certain items around, I want to rotate something, I can also use my flip and my rotate here in my control bar. But with any of my content, if I use my content, I'm just gonna duplicate this here using my Option click and drag. Get my content. If I want to rotate these things I need to choose the point in which I rotate. So the reference point is gonna be really important. Do I want to rotate around the lower right-hand corner? If so I choose that reference point and it rotates around there. Do I want to rotate from the middle? Then it rotates all around or from the upper right-hand corner. Wherever I choose that reference point that's where it flips and rotates. So if it on the upper right-hand corner, I can flip vertically or horizontally from that. If it's from the middle then it just simply flips right on top of itself right there. All a matter of the reference point. Really handy to know this kind of stuff. Now here's the one thing that I absolutely love. I may want to create a quick little layout of some containers here in a nice little pattern. If I go in, I'm just going to draw a one inch square here. One inch by one inch. And there's my location right there. And I decide I want to round one particular corner on this. I'm gonna click my little corner editor and I'm gonna go in and hover over this. And it says Option, click to change the shape, Shift to change one corner. I'm just gonna hold down my Shift key and that would be my Shift key. I'm gonna change one corner here and I'm just gonna round this corner ever so slightly, like this, okay? Now what I'd like to do is I would like to go in and I would like to create a nice little pattern of these four shapes all together. I can go in and select in the upper left-hand corner as my reference point, and rotate these all around like so. I could do the very tedious way, Option, click and drag, manually rotate, snap into position. Not gonna do it. When I flip or rotate or change the size of anything, I can go in and I can very easily use my duplicate on this as well. If I want to rotate this around the upper left-hand corner like this, I can do my rotate. If I hold down my Option or my Alt key when I do that, that's gonna allow me to go ahead and duplicate as I go. A whole lot easier than trying to go in and align everything up. It's right there, it's all together. Pretty awesome. I love that feature. If I want to do something I just simply want to create a vertical flip copy here, yeah I can flip it back and forth. Hold down the Option or the Alt key, and do it. There I have it. Works wonders! Absolutely fantastic. So these things just save a whole bunch of time as we go through our layout. So I can rotate, flip, measure, do all the stuff with items. Now here's another cool thing too that I really like. I'm gonna copy this shape right here and I can add, subtract, multiply, and divide. But what happens if I want to go in and I want to make this like another 10% higher? And I have the x height of 1. and I want to make it 15% higher. Just simply want to make it 15% more. I want to keep that baseline and I'm gonna select one of my reference points at the bottom, and I'm going to choose 15. I'm gonna say add 15% to the height. I'd have to break out my calculator, find out 15% of 1.75 inches, add it in here, and do the number. No way! That's my calculator. Keeping the baseline where it is, I'm gonna add 15% to the height right there. Now of course I have to put it in the height, not the width, that happens. Plus 15% and it's gonna add it to the baseline. That's where my reference point is. So if i wanted to do a stair step effect with these percentages, I could do it really easily all by using the calculation fields. Super-awesome, I love it! If I want to have these duplicated across here, I'm simply going to take my object, Option, click and drag. Now when I'm dragging content across here and I'm using my Option key it can go wherever I want to. If you want to keep everything lined up as you're moving, simply hold down your Shift key. If you hold down your Shift key you can't knock it out of the line that you're drawing in. If I hold down Shift Option key I can drag it wherever I want to. But hold down the Option and the Shift key, it only allows me to drag it the direct that I started which is a really quick way if you want to set up a whole bunch of content, keep it all in line there. When you Option, click and drag, simply hold down your Shift key, beautiful, every single time. Okay, so there's the basics of using my x and my y, my width and my height, my rotate, getting everything dialed in to make sure everything's in the right location, the right size, everything else.
Ratings and Reviews
Jayada
Great teacher! Love his classes
Clicks FromMe
Jason Hoppe is a great teacher.
Kara McDade
Student Work
Related Classes
Adobe InDesign