Lessons
Introduction and Overview
05:28 2Ableton Push Sections
12:46 3Sequencing Drums
49:15 4Creating Melodies
09:28 5D-Pad Theory
22:27 6Creating Chords
11:03 7Alternate Voicing
09:24 8Creating Chord Progressions
08:33Lesson Info
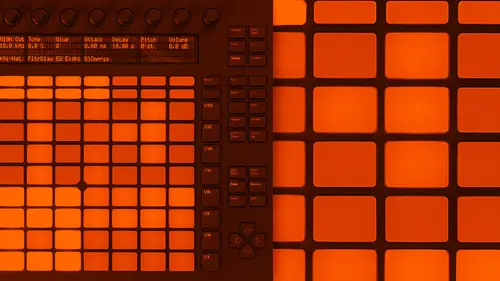
Ableton Push Sections
So let's talk a little bit about the sections I'll start up here in the top left so we've got the nice ableto logo here but this is the tempo section and you have the ability to easily tap tempo uh if you want tio get your project started you can also toggle on and off the metro gnome as well here then these two uh encoders are here a nice there touch sensitive so this one's the tempo and when I touch it you see that shows and what the tempo is and I can just turn it to go up and down by one bpm increments and then if I hit shift it will go by tenths so that's really nice also we have the second one which is ah swing amount so this allows you when you're in putting notes to have a little bit of swing on it it makes it really nice as well when I turn it goes up, turn it down and you could just tap them the kind of check where you are right now below that we have at it section so you can do undo on here, which is really nice and if I do shift and undo it will redo uh there's also delete ...
so I could delete clips, delete tracks you could pretty much do anything and we'll go through that as we go on if you notice there's another button right here it says double and that allows you to double clips and if you notice it's uh great out so push gives you ah nice feedback to let you know what capabilities you have at the moment in which ones you don't the next one is kwan ties so this allows us right here on the push to kwan ties our beats our melodies weaken even kwan ties one instrument at a time which is really nice when you're in the drum rack and we'll go through that as well ok so the next section now here we have fixed length so when we're making beats and melodies we can set a fixed link before we start recording which is really nice if you do it here in live you have to start and stop it but on here you could just say fixed length on record to bars and boom it's automatically a record two bars when you start we have the automation on enough so when it's on you're allowed to whenever you turn the knob it's going to record your automation with it off it won't record anything men just like the double is off this new allows us to create a new clip automatically so we could do that all right here next we have the session record since record button on ly works for session s oh it's not a arrangement record so few see on live that's what this button is that came in in nine when you hit that that sets up the session record, then we have play and it also does stop so just toggles back and forth through play and stop ah, the encoders up here also you can touch them and they will give you, uh, feedback we don't have anything on here yet, but you'll see um that this last encoder is the master encoder and so that's to be able to turn up the volume up and down for your master and if you hit shift and turn it, it does your cue volume, which is really nice. Uh, this pat area right here is where we're going to be putting in all of our notes whether it's a drum rack or an instrument all that's done here also, uh, your clips will show up in this group as well. So if you ever used a pc or a launch pad, you kind of understand this this world right here and if you don't, we're going to go through it, so be able to see what's happening. This is a touch trip very nice it allows you to get really expressive with it uh it now in nine point two doubles for you to be able tio do modulation as well, so if you hit select and then turn it you have modulation so if you haven't updated the nine point two I would suggest doing that because it makes it really nice alright this lcd screen uh works in tandem with the encoders so it'll give you all the information and uh on these encoders down here and we'll see that in just a second when we go into the drums these thiss right here is going to be this election so this is how you select different things different items and then this one here is the state so you will be able to turn on and off different devices or tracks or clips and things like that and as we go over um this is turned off right now but let's see let me just add attracts you can see here all's right add something randomly so you're saying the lcd right here shows up with um macros for this instruments we have bright tone color and then when I touch it it shows me my current state they could just turn the knob I could see where I'm at on the encoder everything right here is you see I'm not looking at live at all so going back over to the state in selection if you see there's a master buttons I could get to my master track and get to the device is on there and then over to make sure we're on the right track there we go and then over to uh the right here we have it in so this goes into the device that you're in and then there's that out so you can go deeper and get two more parameters inside of each device inside of life and then and go out to get out and then this is where I can toggle on and off devices here and then over in this section I can select what I want to do with the devices if I'm in track mode I can say solo tracks or mute tracks so that's this state and select area and as you see I was clicking on different buttons up here this allows you to change the view of your lcd so we have these six we have a volume so I could change the volume in this section of all my tracks there within view right now I have five tracks but if I had up to eight tracks they would show up here and since I only have five it just puts in whatever returned track so I also concede my river been delay as well so you have access toe everything the next one down is the current track that you were on so if you look I have selected uh this instrument right here and because I've selected this instrument it's showing the the track selections for this one so I could turn the volume up and down I can change the pan and the send of and I have it will show all the sins that I have up here then device where I just was that's where I can get to all my mac rose and all my parameters so I go saying I can go in and get in there as well the pans allow you to do the same thing as the volume you can select all the tracks and pan them all at once you can go to the sins do sends on multiple tracks and b and then as you have other sense it'll go through there and that just loops back around then we have clip so whenever you're in a specific clip you have the ability to go in and edit uh the loop length and where the clip starts and if it loops or not and audio tracks you get other uh parameters as well and we'll talk about that later the last one here is browse and this button is probably the one you will use the most when you're working with push because this is how you get to the browser and add different instruments and piece of the pads very nice very expressive you can get nice velocity out of it their settings that we'll talk about where you can change the intensity of the velocity uh it lights up very nicely the's are multi color lcd so you can get a lot of different shades and colors out of them when you're in instrument ah when you're in the note mode for an instrument this is how it'll look and we'll talk a little bit more about that later so going down from the ins and outs and the muse and solos we have scale so if I hit this scale button it allows me to get into the scales and changed my scales there's ah user which then turns it to pretty much eh default maybe controller with specific knobs and functions on it um so like the encoders work a certain way the pads work a certain way pretty much anything outside of the pads or momentary so that's really nice so you khun mini map it however you want user mode next to the repeat which is really nice talk a little bit more about that later accent puts it at full volume for you uh active up and down pretty self explanatory right up and down one doctor um at effects you khun at effects and the tracks you don't have to go to the laptop you know you can add track and do that all on here note mode so this allows you to see this view to put in notes and then the session view shows you the session view that you see right here on live and since I have no clips loaded it's completely gray select well, as you do many selections, so for example, phone a select specific drum or a specific ah thing inside of live I can you select and then hit a button and there's lots of combinations with the select shift also does a lot of different things, as you see right here impressing shift, and it does zoom out view of the eight by grid, so everything here is based on is eight by eight so the grids or a bite for launching, um and it makes it really nice and uniform blow that is the ah nev and this allows you to navigate up and down, depending on if you're in session view or the note view. Uh, and you can go back and forth to be able to get to, like, here I can move if you look at the red ring, it moves around. When I'm in session of you, when I'm in note view, it allows me to navigate two different tracks. They closed the browser here, cool. Ah, and then right here, the strip going down, if you notice it kind of corresponds with the lines here, and if you use live, you'll know that everything in the road that lines up makes a scene so these double as seen launchers and also grid sized resolution buttons, depending on which motorin so that's, really nice as well. Then you have a stop here to be able to select which ones that you want to stop when you're in track and you have a clip play.
Class Materials
Bonus Materials with Purchase
Ratings and Reviews
Student Work
Related Classes
Electronic Music Production